It’s divided into 4 tabs:
- Individuals
- Corporates
- Transactions
- Cards
👤 Individuals
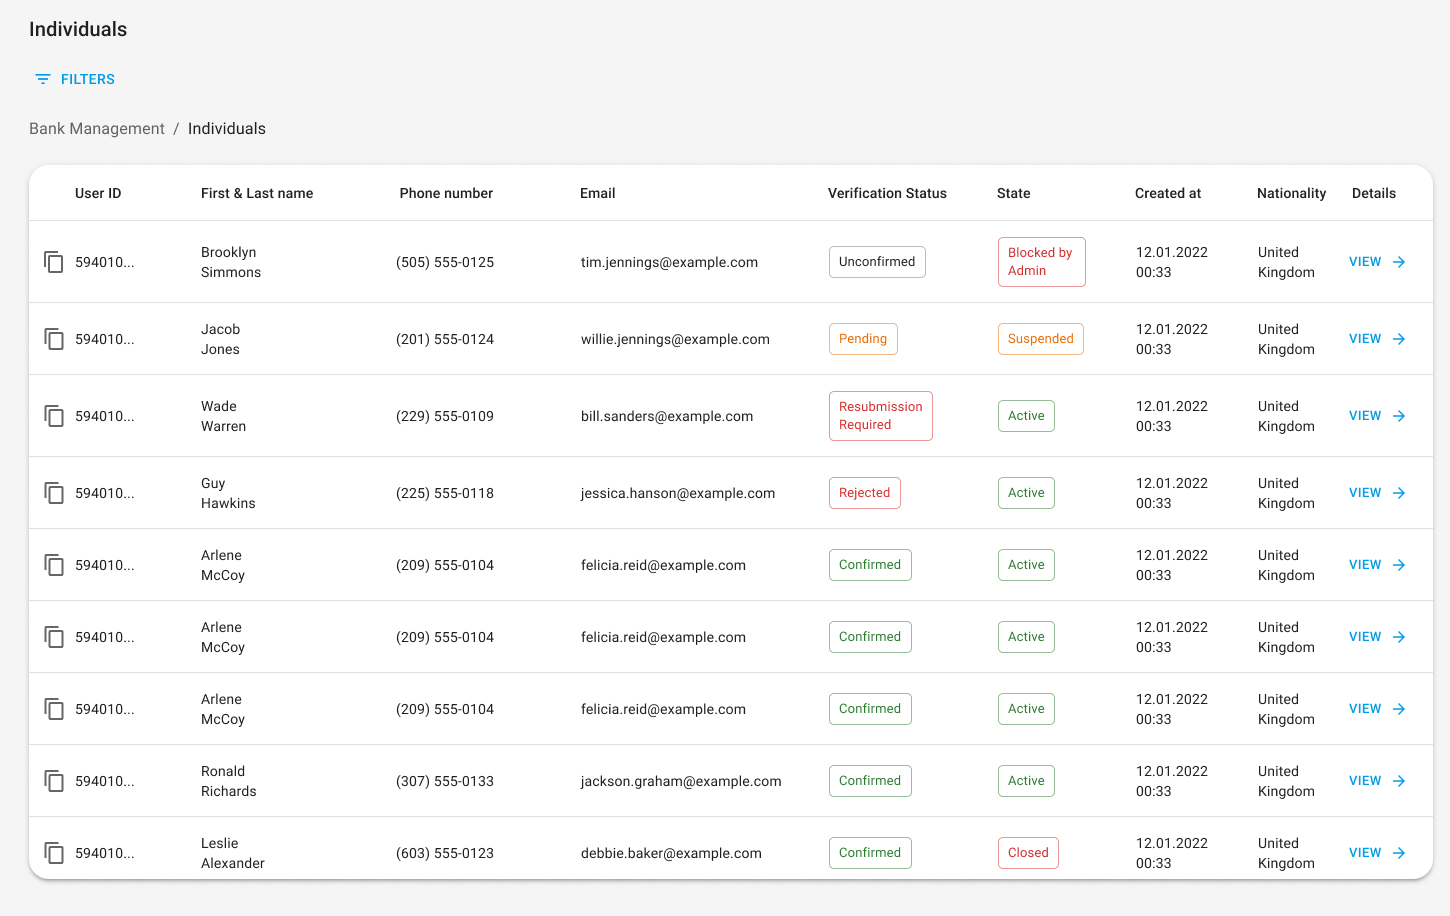
An individual is a person who has created a profile in a white label application and is authorised to access and perform various banking activities through it. Each individual might be registered only by his own via white label web or mobile interface. There is no possibility of creating an individual user via the admin panel. The represented table on page “Individuals” shows the list of all individual profiles signed up in the White Label application. Each individual contains the following information:- User ID;
- First and Last name;
- Phone number;
- Email;
- Verification Status;
- State;
- Date of creation;
- Nationality.
✅ Verification status
Represents the status of individual verification via KYC procedure. Applicable values:- Unconfirmed – the user hasn’t submitted any documents for starting KYC procedure verification;
- Pending – user submitted documents to the KYC service but the verification is not finished;
- Resubmission Required – user is required to resubmit any of provided documents;
- Rejected – user’s application is rejected by KYC Service permanently;
- Confirmed – user application is approved by SumSub;
🔐 State
The value represents the state of an individual in the white label system. Applicable values:- Active – user has access to all functionality;
- Suspended – functionality “Send money”, and “Create accounts” are not available. Admin can unsuspend the user;
- Blocked by Admin – user is blocked permanently. The user cannot access his profile;
- Closed – user is closed (done on his/her own). The user cannot access his profile. The profile might be closed only if all his bank account balances are zero and there are no pending transactions.
🔎 View details
Per each individual, it is possible to look through the detailed information by pressing the [View] button. Given the details are opened the information is divided into separate blocks:- General information
- Accounts
- Orders
- Cards
1. 📑 General information
General information is divided into two main sections: personal and legal info.- Personal displays information user entered manually while the onboarding process.
- Legal displays information that is pulled from the KYC service. KYC Id serves as a link to an external service (SumSub) and enables an admin who has access to this service to look through all the documents/details the applicant submitted for verification.
2. 💳 Accounts
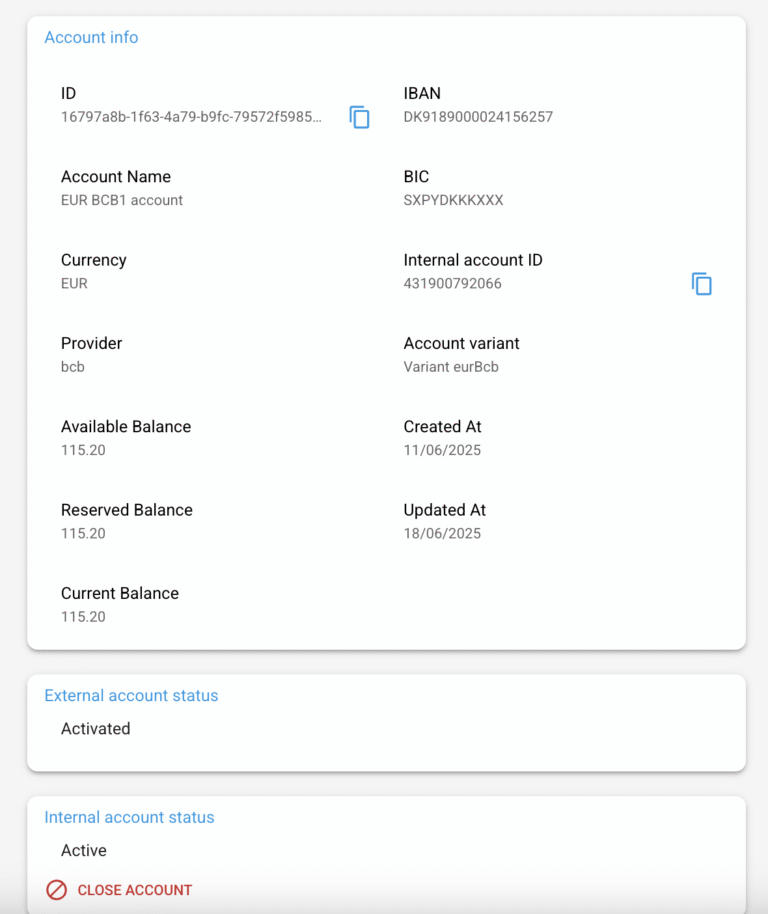
Here is represented the info about users’ bank accounts. An admin has a right just to view those details, there is no possibility to open the account, edit, or close (delete) it. The following information is displayed per each account:- Id – unique account identifier in the white label system;
- Account title – the name of the account which is automatically generated, pattern: currency_account_order;
- Currency – available currencies EUR, GBP, USD, PLN, ETH, USDT, USDC, TRX;
- Available balance – the balance resulting from all transactions (including pending status). This is the balance user sees in the app and is available to use;
- Reserved balance – the balance resulted from all incomplete (pending) transactions. A total sum of currency on hold for the account (outcoming from the account);
- Current balance – the balance created according to transaction that are Completed.
- Created at – the date when the account was initiated;
- Updated at – the date when information about the account was changed last time: status, balance, created transaction, etc.
- Internal account ID
- Account number – a unique 8-digit code that identifies users’ personal bank account, applicable only for UK banks;
- Sort code – a 6-digit number that identifies the bank where the account is created, applicable only for UK banks;
- IBAN – identifiers of users’ personal bank account;
- SWIFT/BIC code – identifiers of users’ bank where the account is created;
- Provider;
- Account variant;
- Deposit address, applicable only for crypto accounts;
- Initiated – account is created on the white label side, but it is not created on the Provider side and due to this does not have account details yet;
- Pending – account is in the process of changing from initiated to activated;
- Activated – account is created on the Provider side. The account contains account details;
- Closed – account is closed on the Provider side.
✏️ Edit account details
Admins can edit the bank details of fiat accounts that use a mock provider. Accounts with an integrated provider (e.g. OpenPayd, BCB, Fuse) cannot be edited — the Edit button will not be shown.Only accounts with internal status Active or Suspended and external status Activated can be edited.
| Field | Currencies | Required | Validation |
|---|---|---|---|
| Account number | GBP, USD, CAD | One of IBAN or Account number is required | GBP: digits only, exactly 8. USD/CAD: digits only, 7–12 |
| Sort code | GBP | Required if account number is present | Digits only, exactly 6 |
| IBAN | All | One of IBAN or Account number is required | Alphanumeric, 15–34 characters |
| BIC/SWIFT | All | Required | Alphanumeric, 8–11 characters |
| Transit number | USD, CAD | Optional | Digits only, exactly 5 |
| Institution number | USD, CAD | Optional | Digits only, exactly 3 |
| Routing number | USD | Optional | Digits only, exactly 9 |
| Intermediary bank BIC/SWIFT | All | Optional | Alphanumeric, 8–11 characters |
| Account holder name | All | Required | Latin alphanumeric + special symbols, max 140 chars, no diacritics |
- For shared IBAN/Account number — the account holder name is editable and stored separately. A reference is automatically added to the account (format:
InternalAccountID-TenantShortCode). - For dedicated IBAN/Account number — the account holder name is automatically populated from the user’s profile and cannot be changed directly. To update it, change the user’s name — the account holder name updates automatically.
- Optional fields can be cleared (left empty).
- Existing transactions retain historical data — old transactions will continue to show the bank details that were active at the time they were created. Only new transactions will use the updated details.
- After any change, an email notification is sent to the end user to inform them about the updated account details.
- All changes are saved in the account’s history with the date of the change.
💰 Transactions
Along with the account details per each account, there is a separate section representing the list of transactions related to that account. The table with transactions contains the following information:- Id – unique transaction identifier in the white label system;
- Payment method – Internal transfer, Faster Payment, SEPA, SWIFT
- Remitter – first, last name;
- Recipient – first, last name;
- Amount – transfer amount with the fee included;
- Current balance;
- Available balance;
-
State – available values:
- Pending – transfer is initiated and is reviewing on the white label or already on the Provider side but still is not approved by the Provider. Available balance is decreased on the transaction amount (with the fee included if available), reserved balance is increased on the transaction amount (with the fee included if available);
- Completed – transfer is approved by the provider, the current balance is reduced on the transaction amount (with the fee included if available), reserved balance is decreased on the transaction amount (with the fee included if available);
- Failed – transfer is rejected. The available balance is increased on the transfer amount (with the fee included if available), the reserved balance is decreased on the transaction amount (with the fee included if available);
- Date, time – the date and time when the transfer was initiated.
- Remitter and recipient bank account number/IBAN;
- Amount – amount without fee;
- Amount of fee;
- Total amount – amount with fee;
- Payment type: incoming or outgoing;
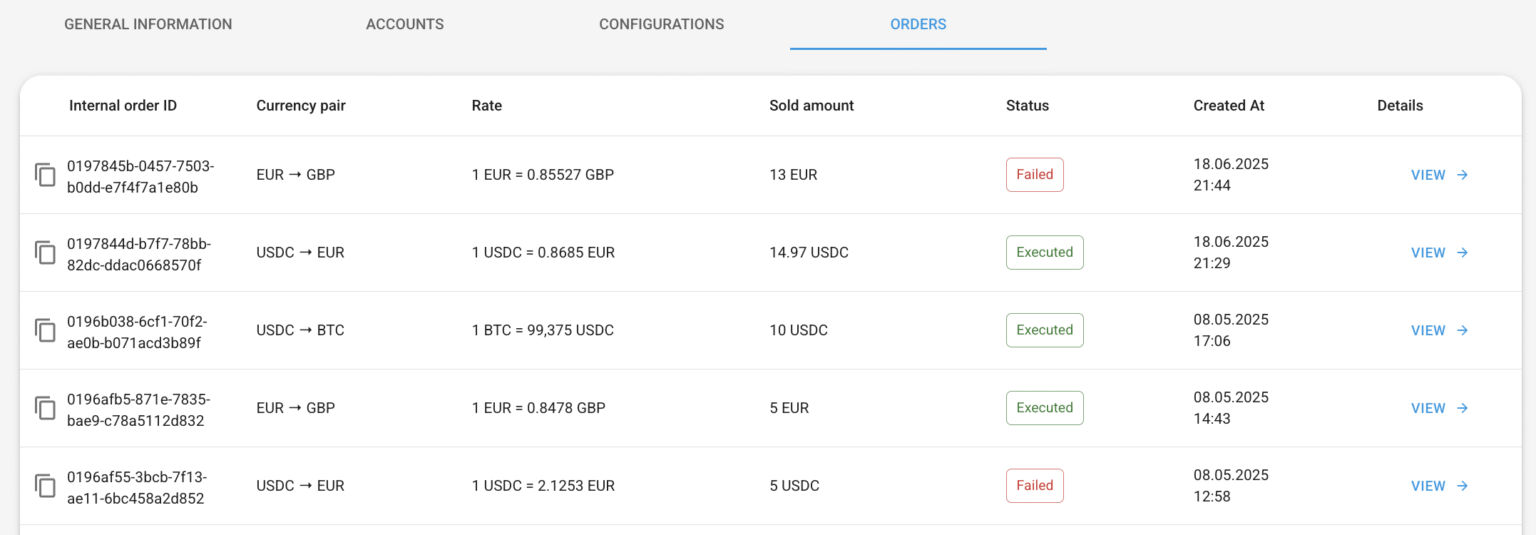
3. 📦 Orders
This tab represented the info about users’ orders. The following information is displayed for each order:- Internal order ID
- Currency pair
- Rate
- Sold amount
- Status
- Date of creation

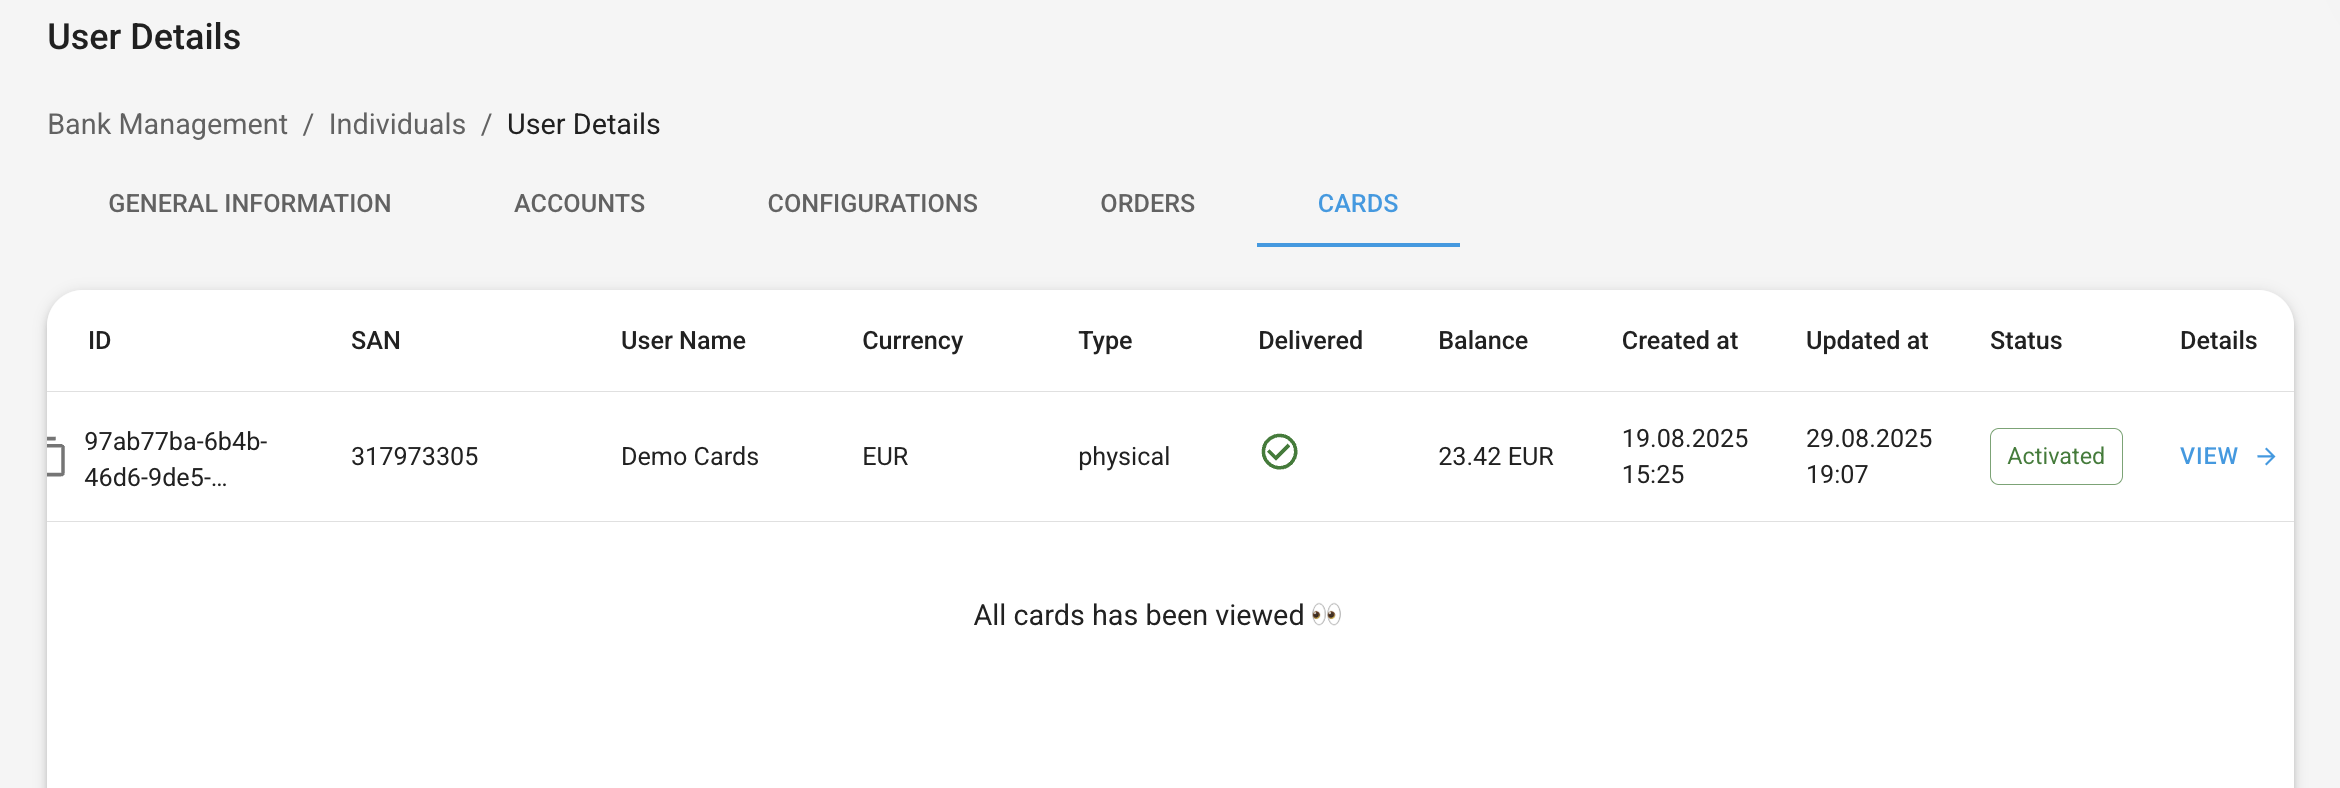
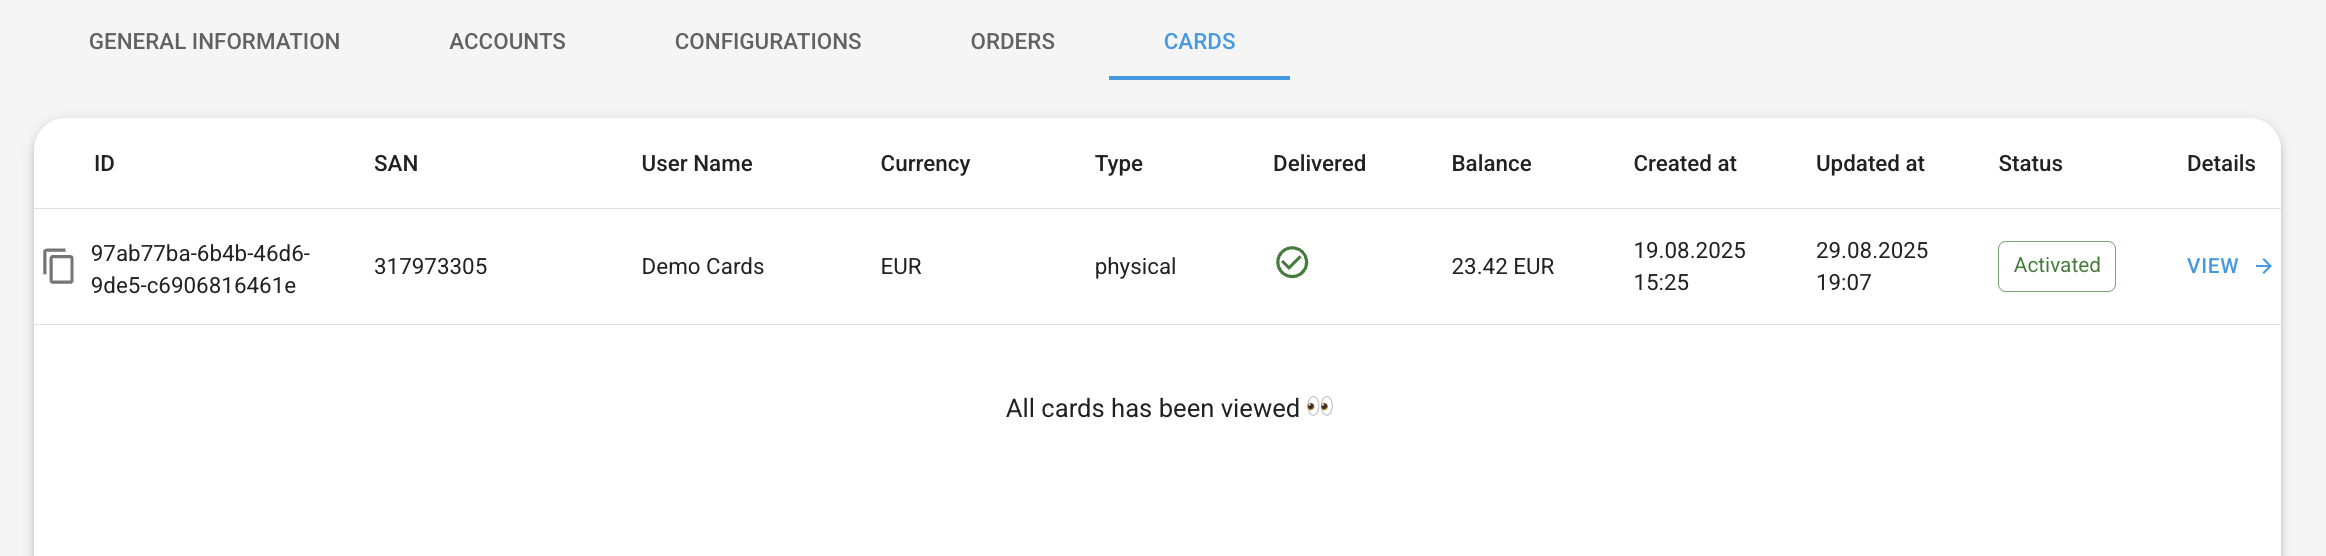
4. 💳 Cards
This tab represented the info about users’ cards. The following information is displayed for each card:- ID
- SAN – a unique short account number that contains a 9-digit number
- User Name – First, Last name / Company name as a link to individual/corporate
- Currency
- Type – virtual or physical
- Delivered – yes/no (shows ”-” if the card is virtual)
- Balance
- Created at
- Updated at
- Status
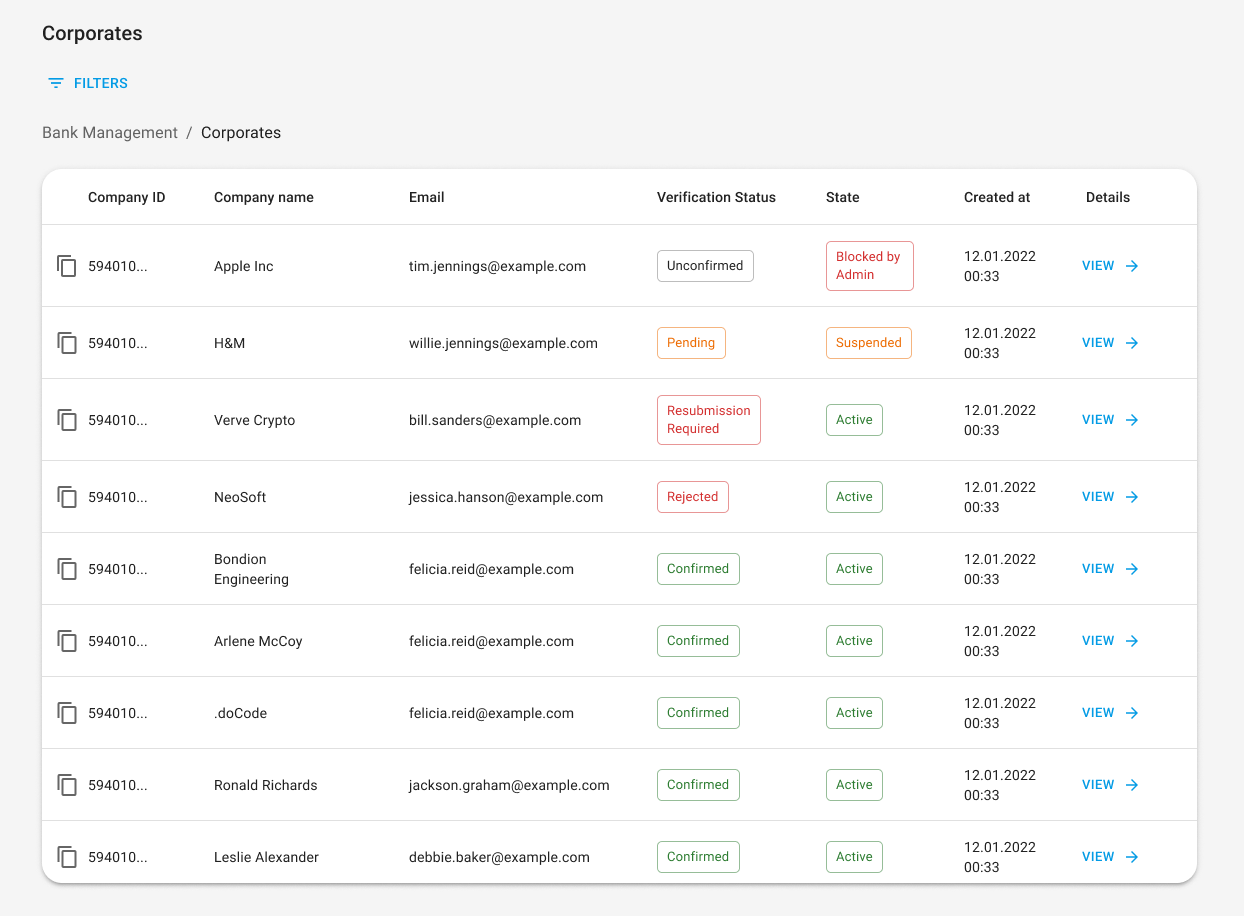
🏢 Corporates
A corporate is a legal entity that is separate and distinct from its owners. Corporate might have a profile in a white label application and be authorized to access and perform various banking activities through it.The corporate might be registered to white label web or mobile interface only after creating a profile for an individual. Also as with individual users, it is not possible to create a corporate via the admin panel. The table on page “Corporates” represents the scope of all corporates signed up to the White Label application. Each individual contains the following information:
- Company ID;
- Company name;
- Email;
- Verification Status;
- Status;
- Date of creation;
✅ Verification status
Represents the status of corporate verification via KYB procedure. Applicable values:- Unconfirmed – documents for starting KYB procedure verification have not been submitted;
- Pending – the verification of provided documents is not finished;
- Resubmission Required – it is needed to resubmit any of provided documents;
- Rejected – an application is rejected by KYB Service permanently;
- Confirmed – the KYB procedure is successfully passed, and the corporate user is approved;
🔐 State
The value represents the state of the corporate in the white label system.Applicable values:
- Active – user has access to all functionality;
- Suspended – functionality “Send money”, “Create accounts” are not available. Admin has a right to unsuspend the user;
- Blocked by Admin – the user is blocked permanently. The user cannot access his corporate profile;
- Closed – user is closed (done on his/her own). The user cannot access his corporate profile. The profile might be closed only if all his bank account balances are zero and there are no pending transactions.
🔎 View details
Per each corporate, it is possible to look through the detailed information by pressing the [View] button. Given the details are opened the information there is divided into separate blocks:- General information
- Accounts
- Orders
- Cards
1. 📑 General information
General information is divided into two main sections: company info and legal company info.- Company info represents the information the user entered manually while signed up the corporate.
- Legal company info displays information that is pulled from the KYB service provider. KYB Id serves as a link to an external service provider (SumSub) and enables an admin who has access to this service to look through all the documents/details the applicant submitted for verification.
2. 💳 Accounts
Here is represented the info about users’ bank accounts. An admin has a right just to view those details, there is no possibility to open the account, edit, or close (delete) it. The following information is displayed per each account:- Id – unique account identifier in the white label system;
- Account title – the name of the account which is automatically generated, pattern: currency_account_order;
- Currency – available currencies EUR, GBP, USD, PLN, ETH, USDT, USDC, TRX;
- Available balance – the balance resulting from all transactions (including pending status). This is the balance user sees in the app and is available to use;
- Reserved balance – the balance resulted from all incomplete (pending) transactions. A total sum of currency on hold for the account (outcoming from the account);
- Current balance – the balance created according to transaction that are Completed.
- Created at – the date when the account was initiated;
- Updated at – the date when information about the account was changed last time: status, balance, created transaction, etc.
3. 💳 Cards
This tab represented the info about users’ cards. The following information is displayed for each card:- ID
- SAN – a unique short account number that contains a 9-digit number
- User Name – First, Last name / Company name as a link to individual/corporate
- Currency
- Type – virtual or physical
- Delivered – yes/no (shows ”-” if the card is virtual)
- Balance
- Created at
- Updated at
- Status
💰 Transactions
Tab Transactions of the admin panel is divided into 4 sub-tabs:- All transactions
- Pending in AML
- Failed AML
- Manual Review
📑 All transactions
The represented table on page “All transactions” shows the list of all transactions that were made in the White Label application. Each transaction contains the following information:- Transaction ID
- Date of creation
- Payment method
- Payment direction
- Remitter
- Recipient
- Account ID
- Amount
- Status
⚙️ AML & Manual Review Configuration
AML (Anti-Money Laundering) checks and Manual Review are two configurable features that control the transaction approval flow. They can be enabled or disabled independently, giving your compliance team full control over which transactions are processed automatically and which require human approval.Configuration levels
There are two levels of configuration:- System-wide (tenant level) – applies to all users by default.
- Per-user level – navigate to Bank Management → Individuals (or Corporates) → select a user → Configurations tab. Each setting has two options: Default (follows system-wide configuration) or Skip (turns it off for this specific user).
Per-user configuration has the highest priority. For example, if Manual Review for SEPA is ON at system level but a specific user has “Skip Manual Review” for SEPA, that user’s SEPA transactions will NOT go to Manual Review.

AML Check
When enabled, every transaction is forwarded to SumSub for AML monitoring. SumSub evaluates the transaction and assigns a risk score, resulting in one of three statuses:| AML Status | Meaning |
|---|---|
| AML Confirmed | Passed — proceeds to next step (Manual Review or provider) |
| AML Failed | Rejected — will not be forwarded to the provider |
| AML Pending | Requires additional review on the SumSub side |
Manual Review
When enabled, transactions appear in the Transactions → Manual Review tab where an admin must Approve or Reject each one before it reaches the banking provider. Supported payment methods: Internal (outgoing only), SEPA, SEPA Instant, Faster Payment, SWIFT.- Approve → transaction is forwarded to the banking provider. The system records who approved and when.
- Reject → transaction fails and is NOT sent to the provider. The user’s reserved balance is rolled back.
Per-user skip
When setting a user to “Skip Manual Review,” you must select which payment methods to skip (Internal, SEPA, SEPA Instant, SWIFT, UK Faster Payment). At least one payment method must be selected.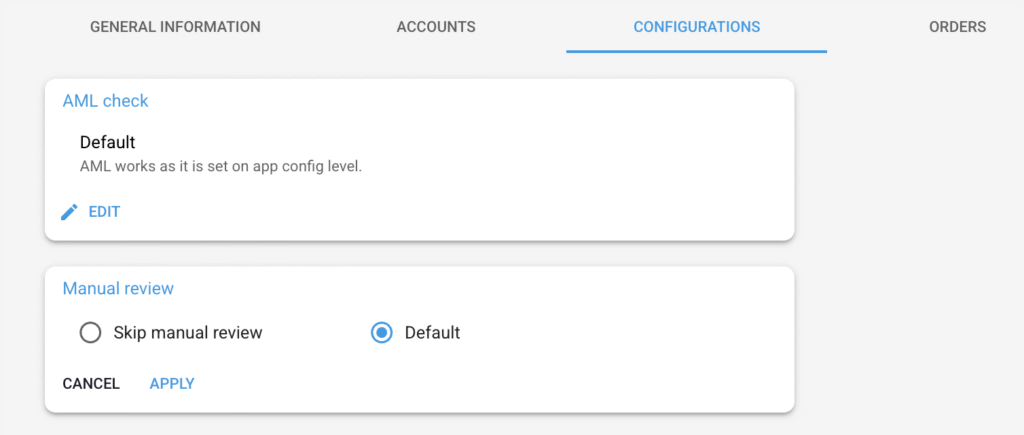
Transaction flow summary
| AML Check | Manual Review | What happens |
|---|---|---|
| OFF | OFF | Transaction goes directly to the provider |
| ON | OFF | Transaction goes through SumSub. AML Confirmed → provider. AML Failed → fails |
| OFF | ON | Transaction skips AML, goes to Manual Review queue |
| ON | ON | Transaction goes through SumSub first, then Manual Review queue. Admin makes the final decision |
🛡️ Pending in AML
AML stands for Anti-Money Laundering. It is a set of regulations, policies, and procedures implemented by financial institutions and governments to detect and prevent the illegal process of making illegally obtained money appear legal or “clean.” The purpose of AML measures is to combat money laundering by identifying suspicious transactions and activities, reporting them to the relevant authorities, and preventing the integration of illicit funds into the legitimate financial system. Currently, the White Label platform uses 3rd party provider – SumSub for AML monitoring. Sumsub’s Transaction Monitoring offers real-time fraud protection for all kinds of businesses. Each transaction initiated by the end users within the White Label Client application is forwarded to the 3rd party provider for AML monitoring. As a result of the performed check the risk score is assigned to the transaction. Based on the risk score the transaction may have assigned appropriate AML status: AML confirmed, AML failed or AML pending.Admin can view all scope of pending in AML transactions moved through the system on the tab Pending in AML. The table with transactions contains the following data:
- Transaction Id – unique transaction identifier in the white label system
- Transaction date – the date when the transaction was initiated
- Payment method (7 payment methods available for now: “Internal transfers”, “Faster Payment”, “SEPA”, “SEPA – Instant”, “SWIFT”, “Arbitrum”, and “Ethereum”)
- Payment type: outgoing or incoming
- Remitter (first and last name/company name in case of business users)
- Recipient (first and last name/company name in case of business users)
- Total Amount (amount + fee)
- AML status
- Status
- Risk score (from 3rd party provider)
- A link to 3rd party provider SumSub for this particular transaction
- [View] button
- Approval – then after that it can be sent to the BaaS provider.
- Rejection – otherwise, if it is rejected it would not be sent to the BaaS provider and become failed right after the AML check.
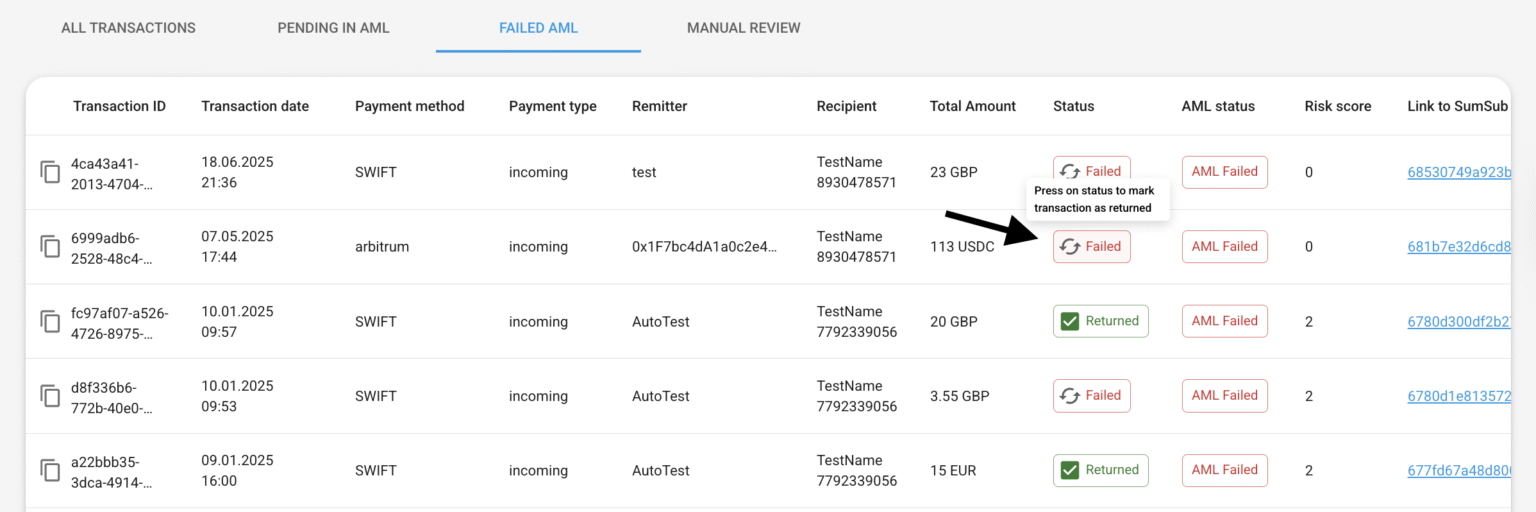
❌ Failed AML
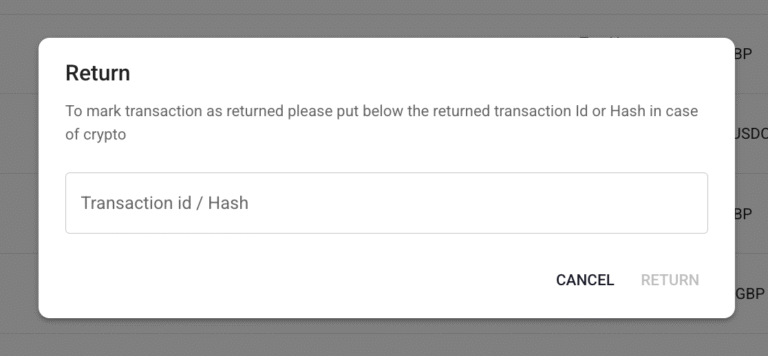
This tab was created specially for the compliance department and their convenience. All transactions failed due to AML reasons, you can see on this tab. Here is the special column called “Status” that has two values:- Failed – that means that the transaction failed and didn’t return
- Returned – that means that you already returned this transaction to the remitter
👀 Manual review
A manual review is an additional option granted to the Clients’ admin team to take control of the end users activity within the system examining specific transactions for potential risks, compliance issues, or suspicious activities. An admin has a right to switch on/off the possibility of manual reviewing of transactions. The manual review option works bearing in mind different transaction flows:- Flow with AML check on 3rd party side (currently SumSub)
- Flow without AML check
Flow 1: With AML check
Given an admin has switched ON the manual review option when the transaction passed the AML check (on SumSub) then it should appear in the list of transactions for manual review – tab Manual review. The table with transactions contains the info as follows:- Transaction Id – unique transaction identifier in the white label system
- Transaction date – the date when the transaction was initiated
- Payment method (4 payment methods available for now: “Internal transfer”, “Faster Payment”, “SEPA” and “SWIFT”)
- Payment type: outgoing
- Remitter (first and last name/company name in case of business users)
- Recipient (first and last name/company name in case of business users)
- Total Amount (amount + fee)
- Status
- AML status
- Risk score (from SumSub)
- [Approve] and [Reject] buttons
- [View] button
- AML confirmed – transaction successfully passed AML check
- AML failed – transaction did not pass AML check and is rejected so it would not be forwarded to the BaaS provider
- AML pending – transaction requires an additional manual check on the SumSub side
If the member of the Clients’ admin team rejects the transaction that is on the manual review it will not be forwarded to the BaaS provider and become failed. Given an admin has switched OFF the manual review option when the transaction passed the AML check (on SumSub) then it should NOT appear in the list of transactions for manual review but should be forwarded to the provider (if AML confirmed) or should NOT be forwarded to the provider (if AML failed).
Flow 2: Without AML check
The flow without an AML check just skips the forwarding transaction to SumSub.- If manual review is ON, then after initiating the transaction by the end user it appears in the admin panel, tab Transactions / Manual review. Approve and reject options work as in Flow 1.
- If manual review is OFF, then right after initiating the transaction by the end user it goes to the BaaS provider.
📤 Transaction Export
Admins can export the transaction list from the Backoffice as a CSV file. The export feature is available on the Transactions page.How to export
- Navigate to the Transactions page.
- Optionally, apply filters (date range, payment method, status, currency, etc.) to limit the data set.
- Click the “Export data” button (changes to “Export filtered data” when filters are active).
- A toggle “Include applied filters in export” allows you to include or exclude your active filters from the export.
- A pop-up confirms that the file is being generated: “The exported transaction file is currently being generated. The process may take some time.”
- Click “Move to Export page” to track progress, or “Continue” to stay on the current page.
Export page
The export page is located at Administration → Export. It shows all generated export files in a table:- File name — format:
Transactions_Export_%timestamp%.csv - Export ID
- Type (e.g. Transactions)
- Created (date/time)
- Completed (date/time)
- Progress (e.g. 10%, 53%, 100%)
- Status — Pending, In process, Completed, or Error
- Download button — active once the export is completed
CSV file contents
The exported CSV includes a header with applied filters and generation timestamp (UTC), followed by the transaction data. Each row contains the following fields (when available): Core transaction data: Transaction ID, Created at (UTC), Payment method/network, Fee type, Payment direction, Amount, Currency, Amount of fee, Total amount, FX markup revenue, Account ID, Account provider, Status, Reference, Purpose, Description, Provider, SumSub applicant ID. Remitter details: Name (first/last or corporate), Type, IBAN, BIC/SWIFT, Account number, Intermediary bank BIC/SWIFT, Sort code, Transit number, Institution number, Routing number, Wallet address, Bank name, Bank country, Bank address, Country, City, Address line, Post code. Recipient details: Name (first/last or corporate), IBAN, Account number, Sort code, BIC/SWIFT, Wallet address, Bank name, Bank country, Bank address, Type, Country, City, Address line, Post code, Intermediary bank BIC/SWIFT, Intermediary bank account number, Intermediary bank name, Intermediary bank address, Intermediary bank country, Transit number, Institution number, Routing number. Card data (if applicable): Card type, Card masked PAN, Card title. Exchange data (if applicable): Order ID, Currency pair, On-chain transaction ID.💰 Incoming Transfer
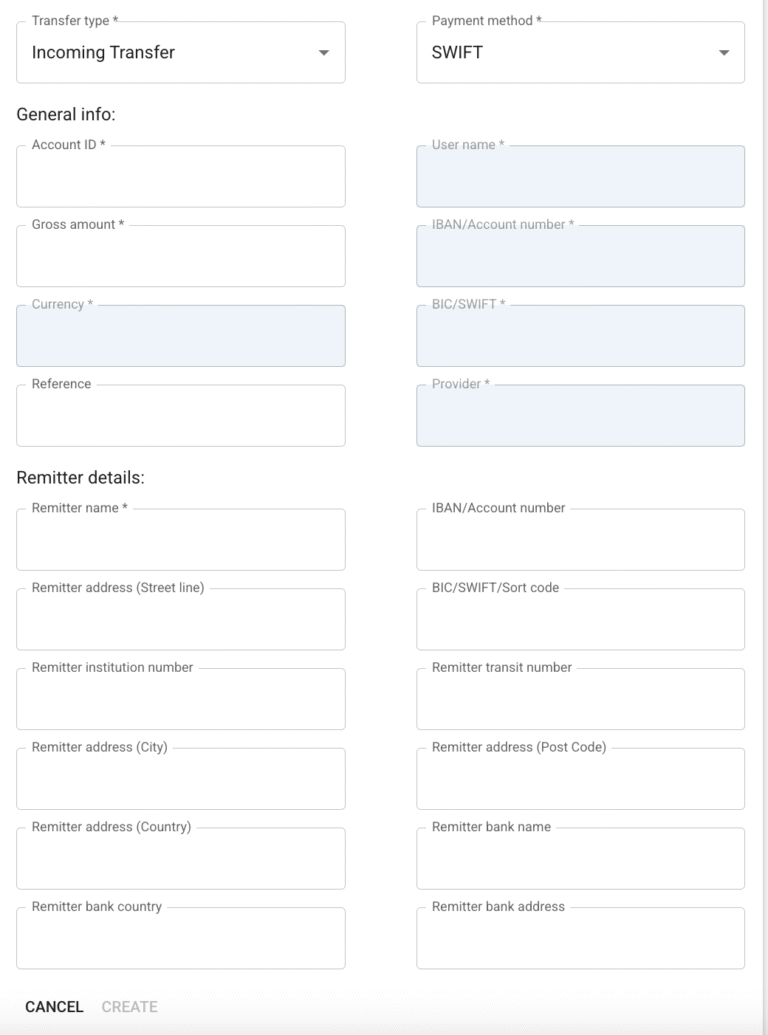
Our system includes a BaaS provider simulator that replicates the core functionality of a real BaaS provider. We call this simulator the Mock Provider.As an admin, you can manually create incoming SEPA, SWIFT, SEPA INSTANT, UK Faster Payments, UAE Local, or Canadian Local transactions. At the top of the Transactions page, click “Create transaction”.
A modal window will appear with the following fields: Transfer Details
- Transfer type – Incoming transfer
- Payment method – SEPA, SWIFT, SEPA INSTANT, UK FP, UAE Local, Canadian Local
- Account ID – Mandatory, accepts digits only
- IBAN – Auto-filled by the system based on the Account ID
- BIC/SWIFT – Auto-filled by the system based on the Account ID
- User name – Auto-filled by the system based on the Account ID
- Gross amount
- Currency – EUR, USD, or GBP
- BaaS provider – Auto-filled (Mock Provider)
- Reference
- Remitter name – Mandatory
- IBAN or account number – Optional
- BIC/SWIFT or Sort code – Optional
- Remitter address – Street line 1, line 2, city, post code, country (optional)
- Remitter bank name – Optional
- Remitter bank country – Optional
- Remitter bank address – Optional
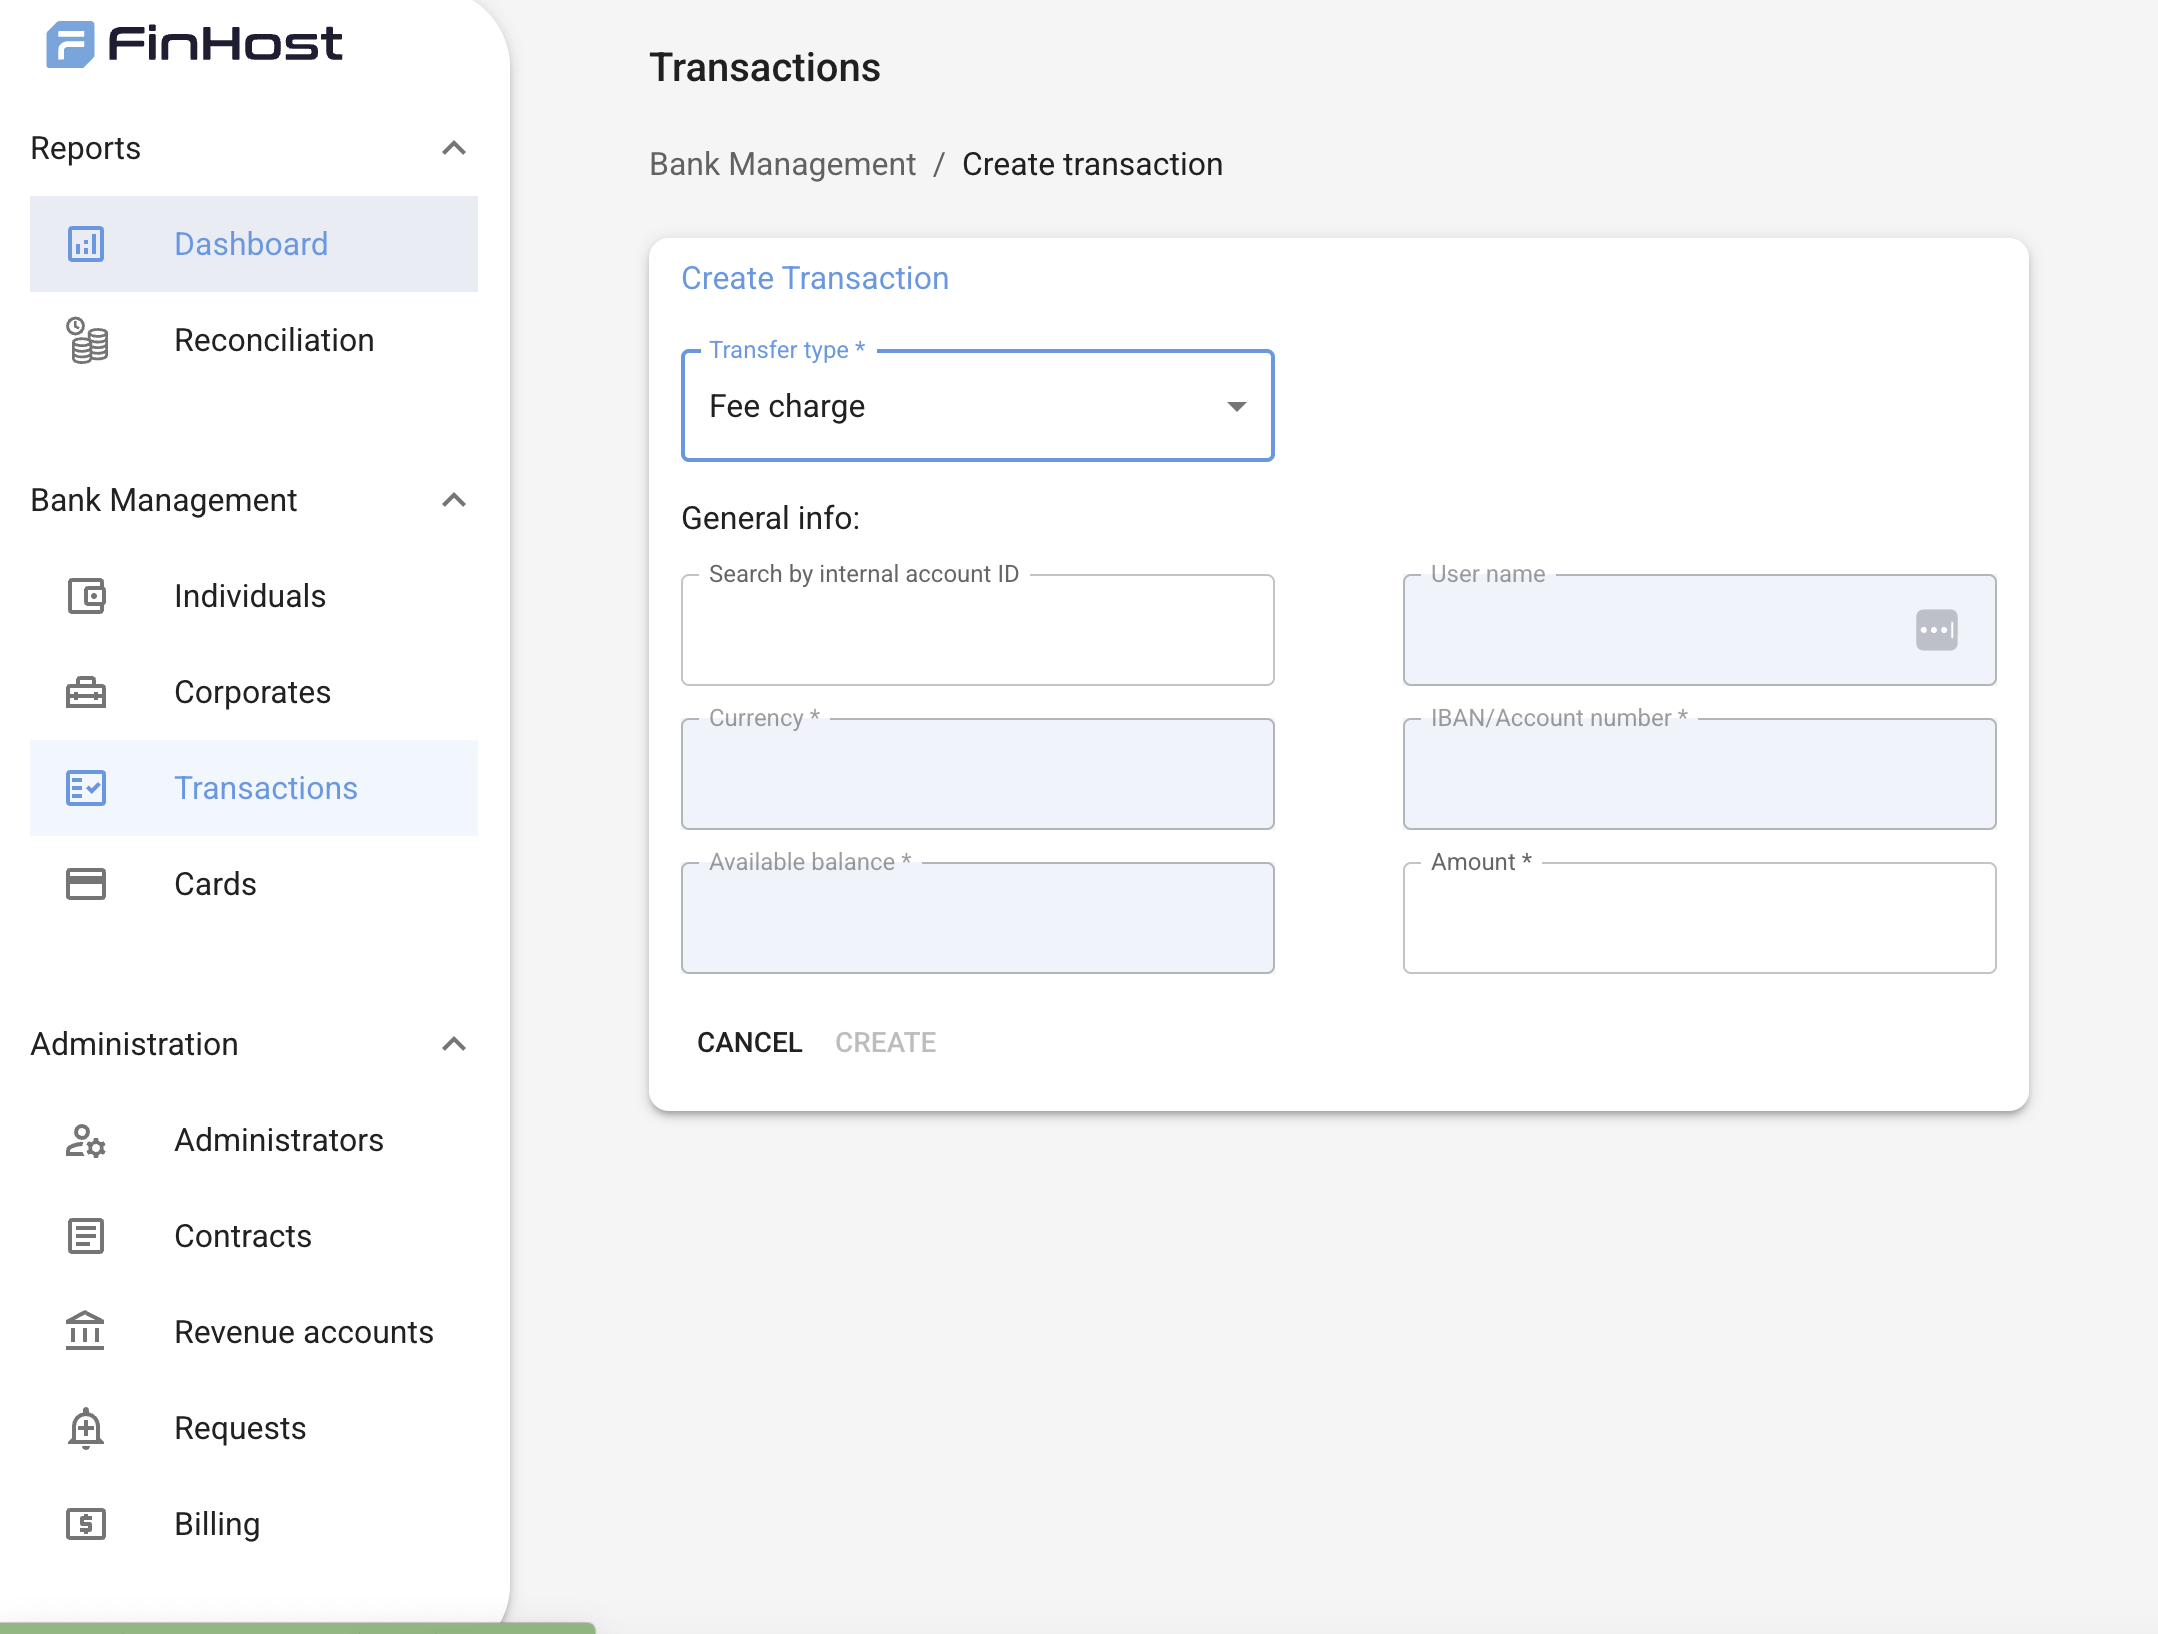
⚙️ Charge Fee
In addition to creating incoming transactions, admins can also apply account-related fees such as account opening or monthly maintenance fees directly through the system. On the Transactions page, select Create transaction, then choose the Transfer type – Fee charge option.This allows you to manually debit a specific amount from a user’s account. General Info
- Search by internal account ID – Mandatory
- User name – Auto-filled
- IBAN / Account number – Auto-filled
- Currency – Mandatory
- Available balance – Auto-filled for reference
- Amount – Mandatory
💡 Notes:
- You can manage fees manually from the Back Office under Bank Management → Transactions.
- Monthly fee automation is planned for release soon, allowing recurring charges to be applied automatically.
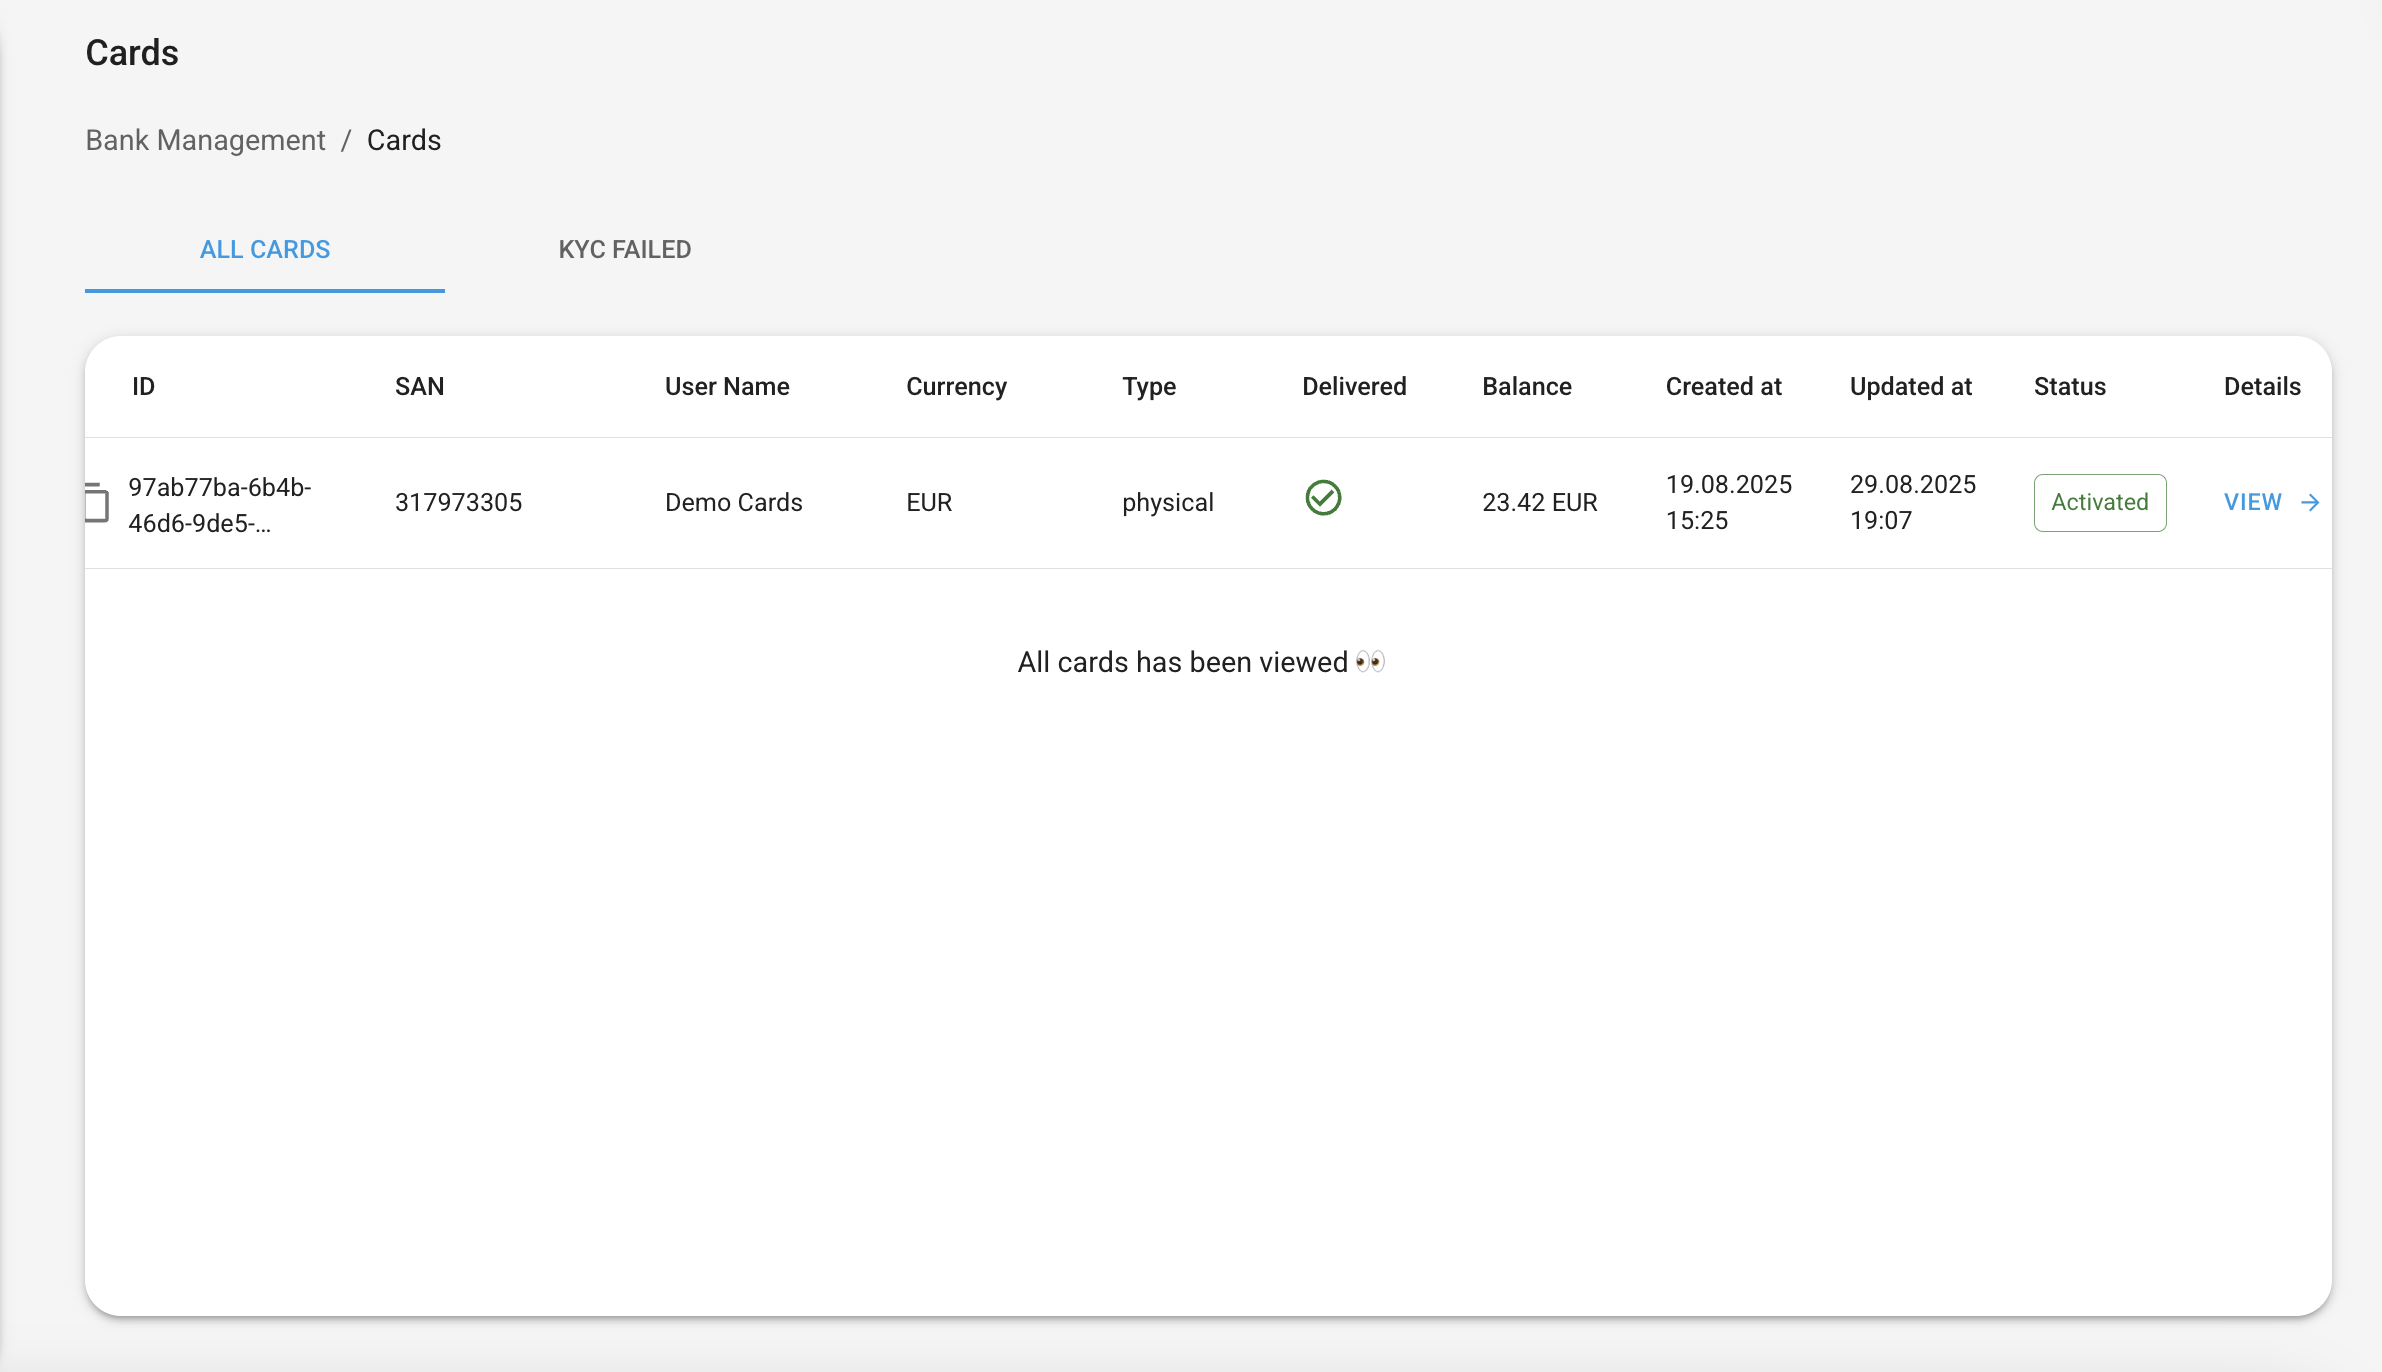
💳 Cards
Each user can create a card for their account in our system.The represented table on page “Cards” shows the list of all cards that were created in the White Label application. It contains two pages:
- All Cards
- KYC Failed
- ID
- SAN – a unique short account number that contains a 9-digit number
- User Name – First, Last name / Company name as a link to individual/corporate
- Currency
- Type – virtual or physical
- Delivered – yes/no (shows ”-” if the card is virtual)
- Balance
- Created at
- Updated at
- Status
- KYC Status – available only on the KYC Failed page
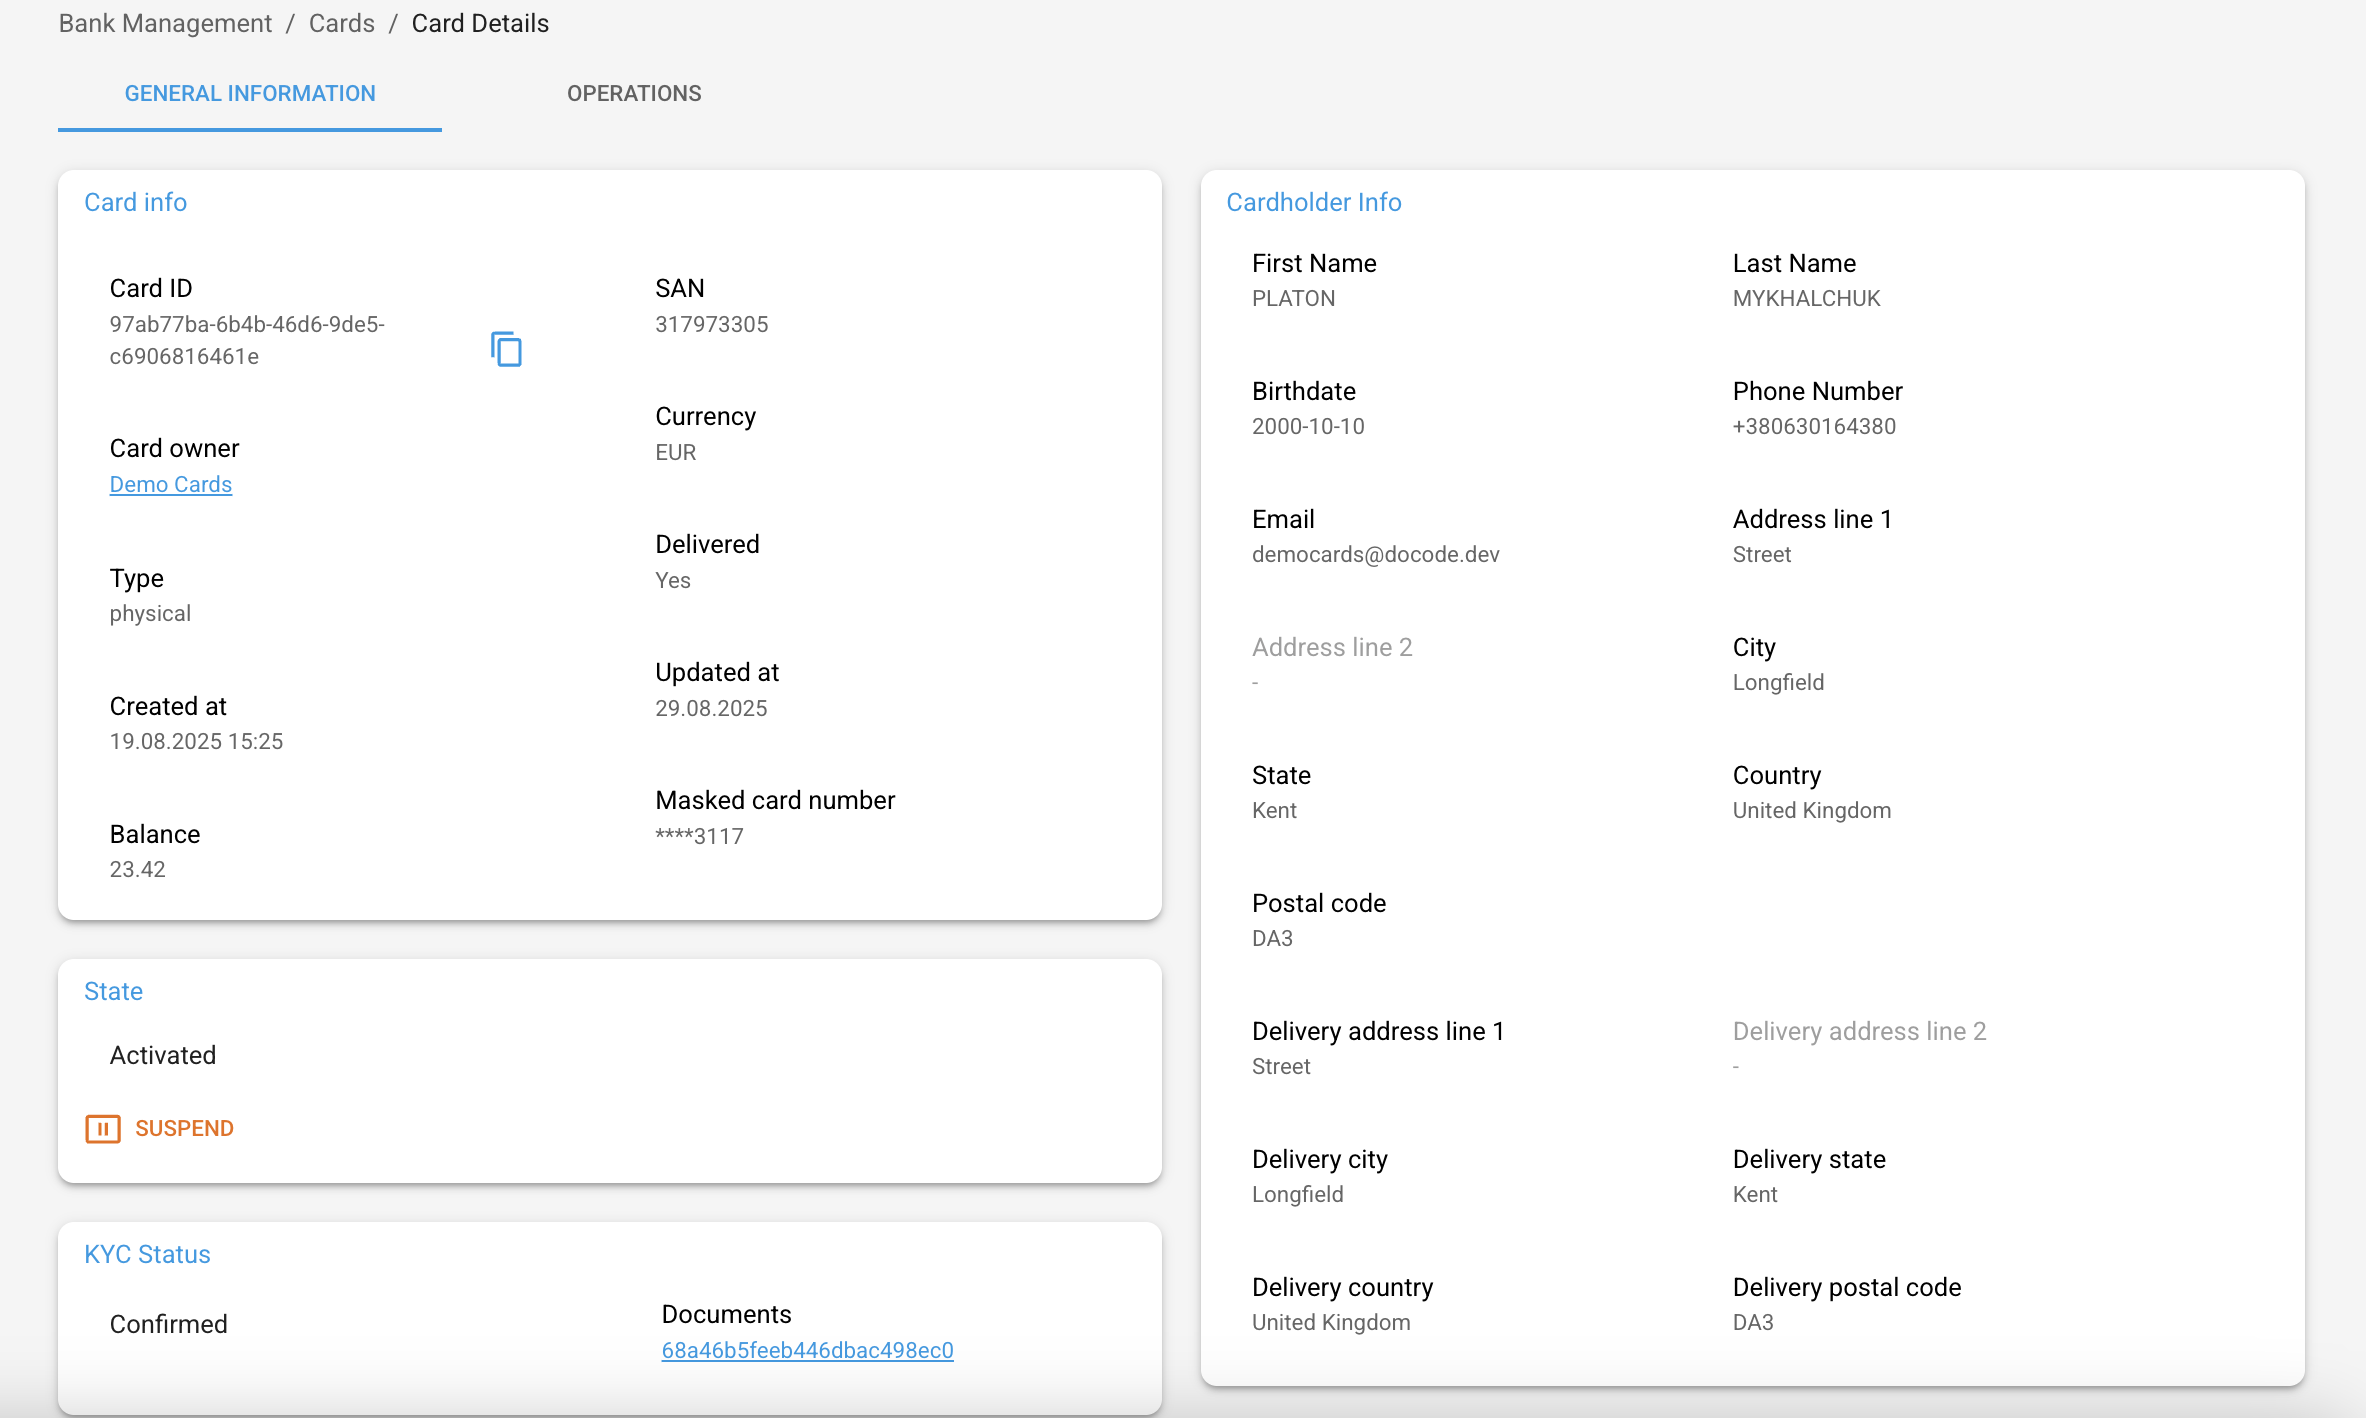
🔎 View Details
Per each card, it is possible to look through the detailed information by pressing the [View] button.When details are opened, the information is divided into 2 separate blocks:
- General information
- Operations
📑 General Information
General information is divided into two main sections:- Card information – shows the same data as on the page “Cards” plus an additional field: Masked card number
- Cardholder information – displays information about the user, pulled from the KYC service
🛡️ KYC Statuses
| Status | Explanation |
|---|---|
| Unconfirmed | Technical default status when a card is created on our side but the KYC upload process hasn’t started yet. |
| Initiated | The KYC upload started. |
| Pending | Once a card is created, the KYC documents are automatically sent to Intercash. Once it is done, the KYC status is pending. |
| Submission failed | The KYC upload failed (documents might be invalid, absent, or in the wrong format). In this case, the KYC status will change to “submit_failed”. The back-office admin can resolve this issue manually by uploading documents via email. If Intercash does not approve KYC anyway, the back-office admin clicks Reject and both card status and KYC status become Rejected. |
| Resubmission requested | If KYC was rejected by Intercash, the card remains in pending status but shows “Resubmission requested” with rejection reason. The admin needs to contact Intercash manually (clientservices@intercash.com) and resubmit the documents. |
| Rejected | If Intercash does not approve and the admin understands it is a final decision – the back-office admin clicks Reject, and the card status becomes Rejected (final). |
| Confirmed | If Intercash approves, the status will change to Approved automatically. |
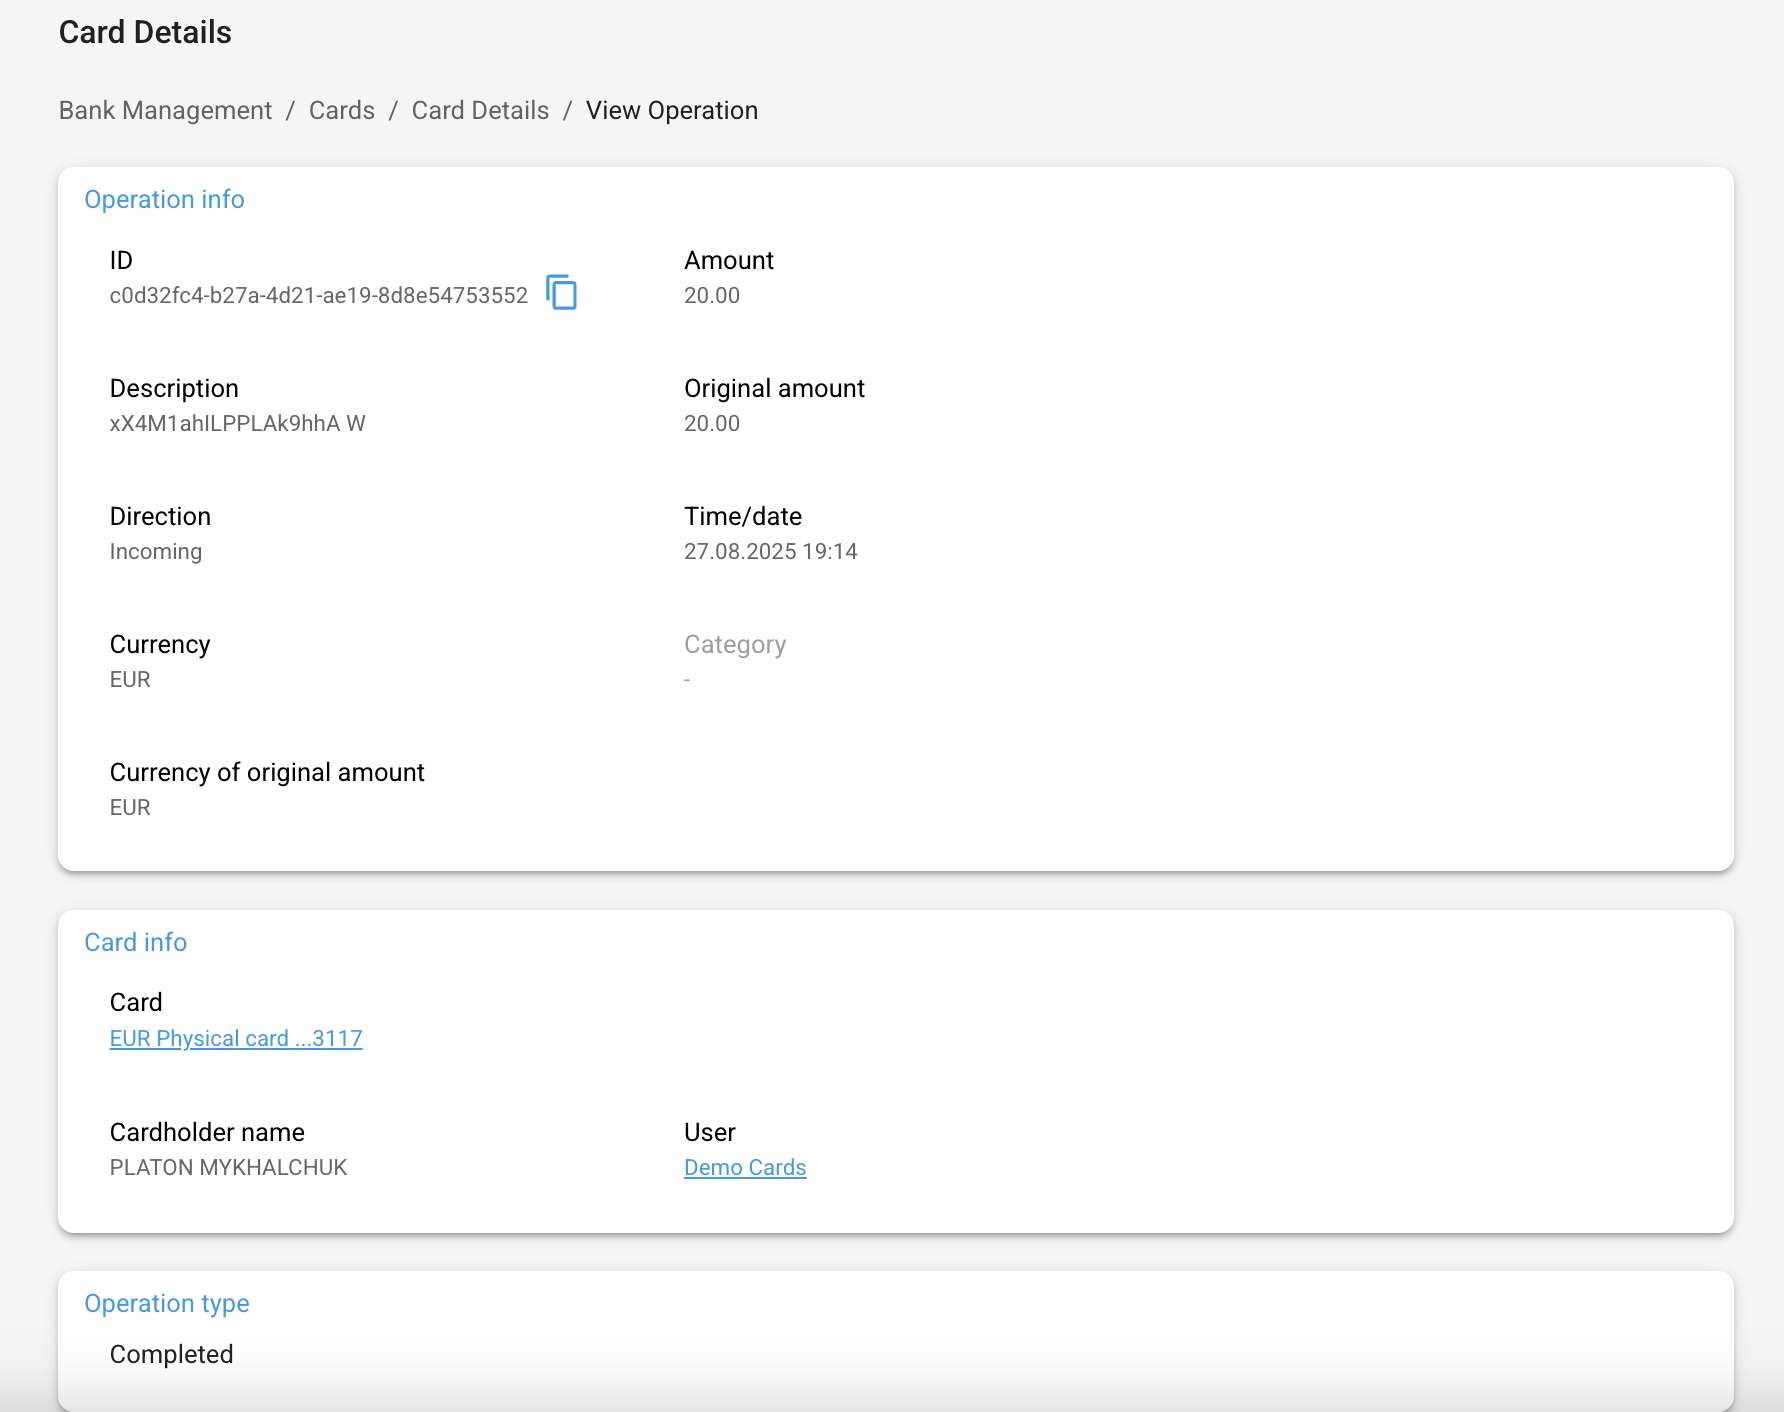
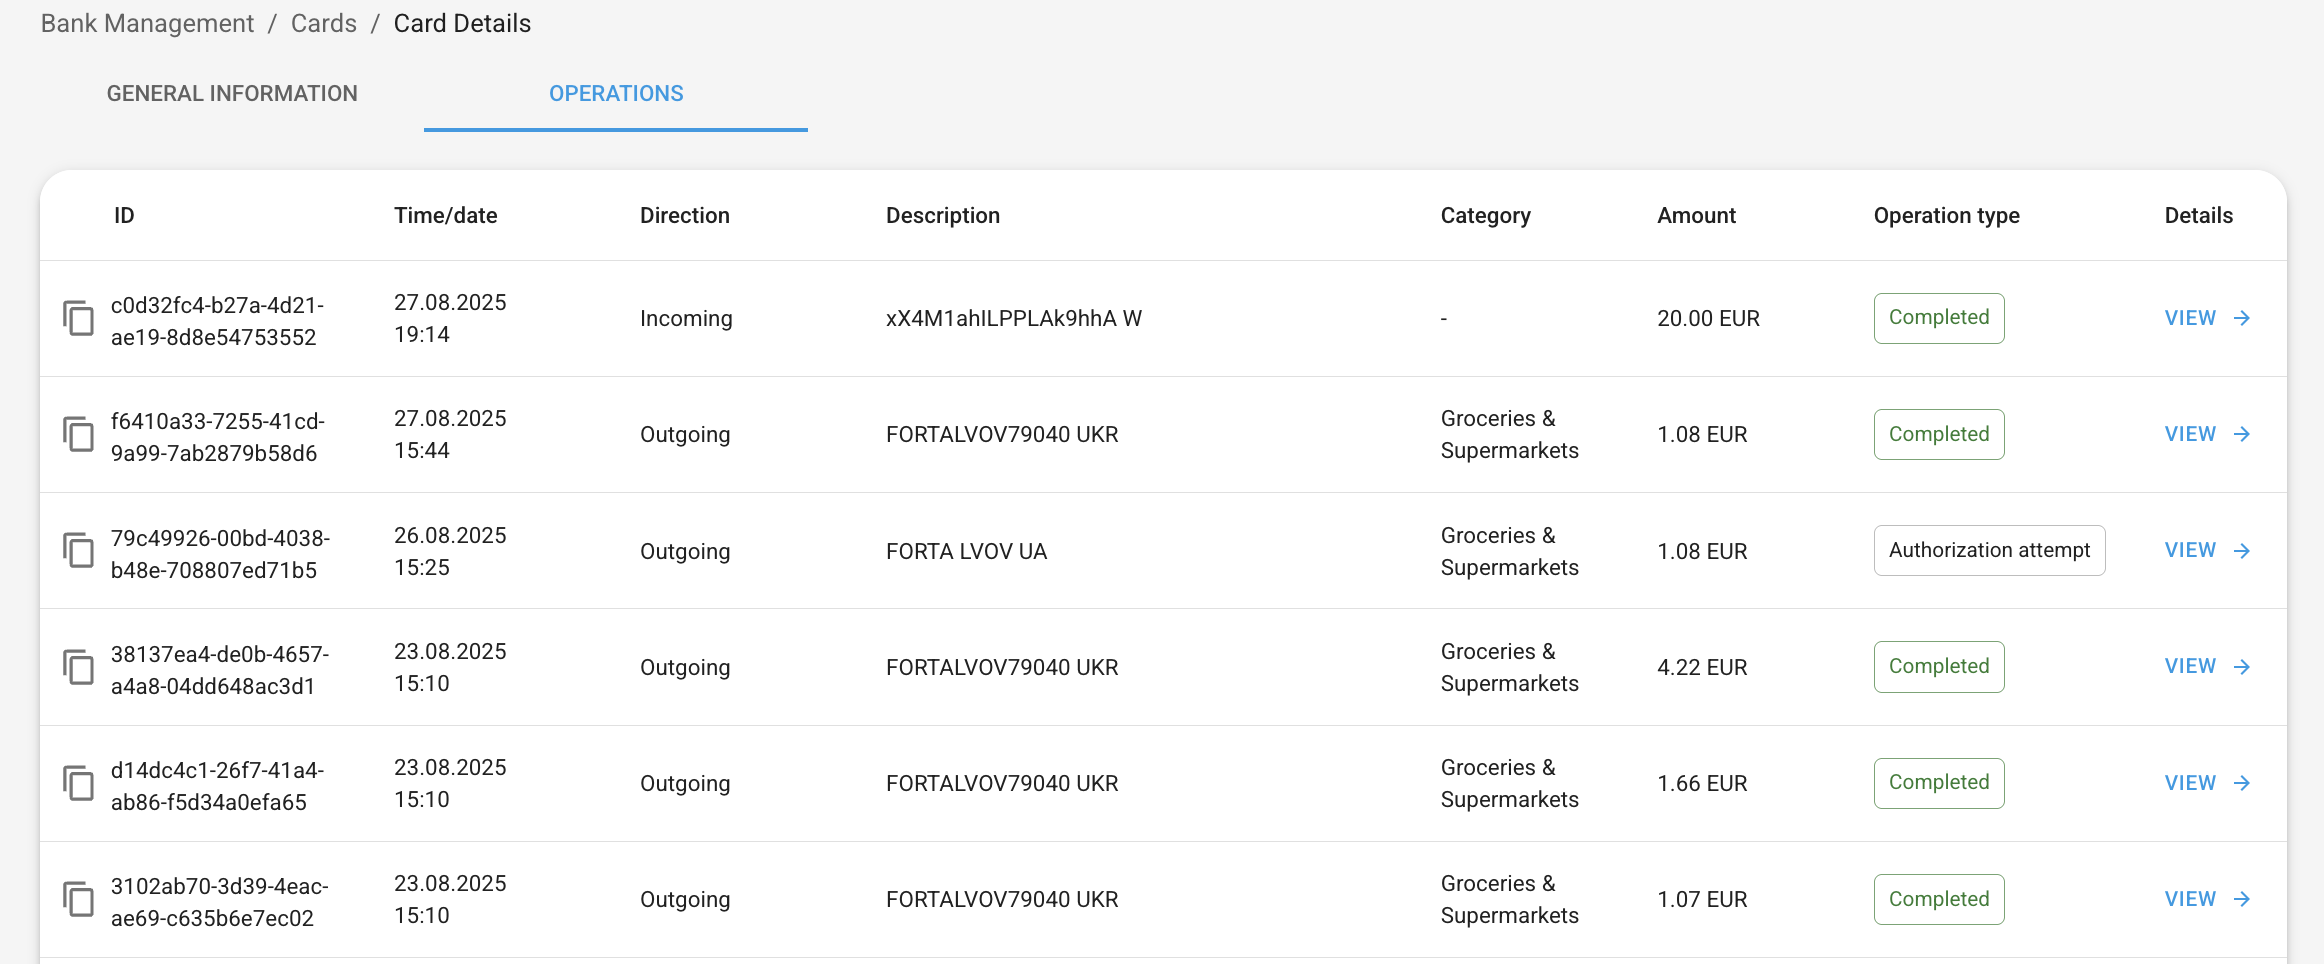
💳 Operations
This block represents the information about operations made with the chosen card. ⚠️ An admin has the right only to view these details.There is no possibility to cancel or change an operation. The following information is displayed per each operation:
- ID
- Time/Date
- Description – Card top-up / merchant name / ATM name
- Category – defined according to MCC code
- Amount
- Operation type – completed / authorization attempt
🔎 Operation Details
Per each operation, it is possible to view detailed information by pressing the [View] button.When details are opened, the information is divided into 3 separate blocks:
- Operation information
- Operation type
- Operation status