> ## Documentation Index
> Fetch the complete documentation index at: https://docs.finhost.io/llms.txt
> Use this file to discover all available pages before exploring further.
# Administration
## 👥 Administrators
Tab **Administrators** is the place where is represented all information about each member of the Clients’ admin team. Here is possible to add a new member of the admin team as well.
### ➕ Adding a new administrator
To invite a new member of the admin team please follow the next steps:
1. Press **\[+ Add Administrator]**
2. Fill in the form with appropriate data: *first and last name, email, and role*
3. Press **\[Add]**
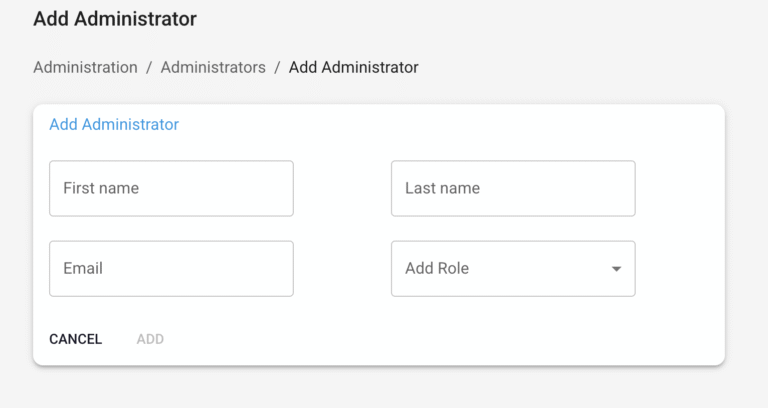 Once the user was added to the admin panel, this user has to receive an invitation letter on the provided email with the details about the **username** and **temporary password**. Using these credentials it is possible to log in to the back-office.
***
### 🧩 Roles
A role refers to a predefined set of permissions and responsibilities assigned to a user or a group of users. Roles are used to define the level of access and the specific actions that users with that role can perform within the admin panel.
Currently, within the system, there are **three roles available**:
* **Supervisors** – see all functionality, can interact with all functions.
* **Compliance** – see all functionality.
* **Restricted by back-end:**
* Cannot add admins with role compliance/supervisors
* Cannot edit role (any role)
* Cannot delete admin with any role
* Cannot enable/disable admin with any role
* **Admins** – don’t see the following elements:
* “Requests” tab
* “Configurations” tab in view Individual/Corporate
* Info about AML in view transaction
* “Return” button on “transaction details” page of transaction with aml failed status
**Restricted by back-end:**
* Create transaction (for mock provider)
* Get requests
* Get transactions in pending AML, failed AML, and manual review
* Return the AML failed transactions
* Approve/reject requests
* Approve/reject manual review
* Inside transaction details, get info about AML and manual review
* Get account configurations on the user’s level
* Add admins with role compliance/supervisor
* Cannot edit role
* Cannot delete admin with any role
* Cannot enable/disable admin with any role
***
### 📋 Administrators Table
The table on the tab **Administrators** contains the following information about each admin:
* First name
* Last name
* Email
* Role(s)
* Date of the last update
For each Admin, it is possible to perform the following actions:
* **Enable/Disable** – once the Admin’s account is disabled then the user is not able to log in to the White Label Admin panel. After a new Admin is created – he/she is automatically enabled.
* **Edit** – the following info can be edited: first name, last name, and role.
* **Delete**
Once the user was added to the admin panel, this user has to receive an invitation letter on the provided email with the details about the **username** and **temporary password**. Using these credentials it is possible to log in to the back-office.
***
### 🧩 Roles
A role refers to a predefined set of permissions and responsibilities assigned to a user or a group of users. Roles are used to define the level of access and the specific actions that users with that role can perform within the admin panel.
Currently, within the system, there are **three roles available**:
* **Supervisors** – see all functionality, can interact with all functions.
* **Compliance** – see all functionality.
* **Restricted by back-end:**
* Cannot add admins with role compliance/supervisors
* Cannot edit role (any role)
* Cannot delete admin with any role
* Cannot enable/disable admin with any role
* **Admins** – don’t see the following elements:
* “Requests” tab
* “Configurations” tab in view Individual/Corporate
* Info about AML in view transaction
* “Return” button on “transaction details” page of transaction with aml failed status
**Restricted by back-end:**
* Create transaction (for mock provider)
* Get requests
* Get transactions in pending AML, failed AML, and manual review
* Return the AML failed transactions
* Approve/reject requests
* Approve/reject manual review
* Inside transaction details, get info about AML and manual review
* Get account configurations on the user’s level
* Add admins with role compliance/supervisor
* Cannot edit role
* Cannot delete admin with any role
* Cannot enable/disable admin with any role
***
### 📋 Administrators Table
The table on the tab **Administrators** contains the following information about each admin:
* First name
* Last name
* Email
* Role(s)
* Date of the last update
For each Admin, it is possible to perform the following actions:
* **Enable/Disable** – once the Admin’s account is disabled then the user is not able to log in to the White Label Admin panel. After a new Admin is created – he/she is automatically enabled.
* **Edit** – the following info can be edited: first name, last name, and role.
* **Delete**
 ***
## 📑 Contracts
The **contract** is a set of configurations that should be applied to the end user of the White Label Client application and determine a set of rules within the system applied to this user.
At this moment, these rules relate to:
* **Fees** that should be paid for some actions within the system
* **Limits** of bank accounts allowed to open
**Service** is any action the user might be charged for: Internal transfer, SWIFT, SEPA, SEPA Instant, UK Faster Payment, and Crypto Exchange.
Each contract should have the following characteristics:
* Id
* User type – individual or corporate
* Contract title
* Creation date and time
* Status: active or archived
* Details
Inside each contract, except for the info described above, there is also:
* Short description of contract characteristics or peculiarities if applicable
* Fee per each available payment method
* Limits of bank account that is possible to create per one user
⚠️ From the security prospects, contract configuration currently is possible **only via AWS service**. Further such possibility might be added to the user interface of the admin panel.
***
### 📝 Configuring contracts
To configure the contract the Client has to fill in the following information:
1. Contract name
2. User type (individual/corporate)
3. Account limits: maximum number of accounts possible to create in each of available currencies
4. Fees per different services
To set up the fees the following information should be filled in:
* **Service**: e.g. Internal transfer, SWIFT, SEPA, SEPA Instant, UK Faster Payment, Crypto Exchange
* **Currency**: EUR, USD, GBP, PLN, BTC, ETH, USDT, USDC, TRX
* **Amount range(s)**: maximum 3 ranges “from-to” per each service
* **Fee types**:
* Min between flat and percentage
* Max between flat and percentage
* Sum of flat and percentage
* Flat
* Percentage
***
## 📑 Contracts
The **contract** is a set of configurations that should be applied to the end user of the White Label Client application and determine a set of rules within the system applied to this user.
At this moment, these rules relate to:
* **Fees** that should be paid for some actions within the system
* **Limits** of bank accounts allowed to open
**Service** is any action the user might be charged for: Internal transfer, SWIFT, SEPA, SEPA Instant, UK Faster Payment, and Crypto Exchange.
Each contract should have the following characteristics:
* Id
* User type – individual or corporate
* Contract title
* Creation date and time
* Status: active or archived
* Details
Inside each contract, except for the info described above, there is also:
* Short description of contract characteristics or peculiarities if applicable
* Fee per each available payment method
* Limits of bank account that is possible to create per one user
⚠️ From the security prospects, contract configuration currently is possible **only via AWS service**. Further such possibility might be added to the user interface of the admin panel.
***
### 📝 Configuring contracts
To configure the contract the Client has to fill in the following information:
1. Contract name
2. User type (individual/corporate)
3. Account limits: maximum number of accounts possible to create in each of available currencies
4. Fees per different services
To set up the fees the following information should be filled in:
* **Service**: e.g. Internal transfer, SWIFT, SEPA, SEPA Instant, UK Faster Payment, Crypto Exchange
* **Currency**: EUR, USD, GBP, PLN, BTC, ETH, USDT, USDC, TRX
* **Amount range(s)**: maximum 3 ranges “from-to” per each service
* **Fee types**:
* Min between flat and percentage
* Max between flat and percentage
* Sum of flat and percentage
* Flat
* Percentage
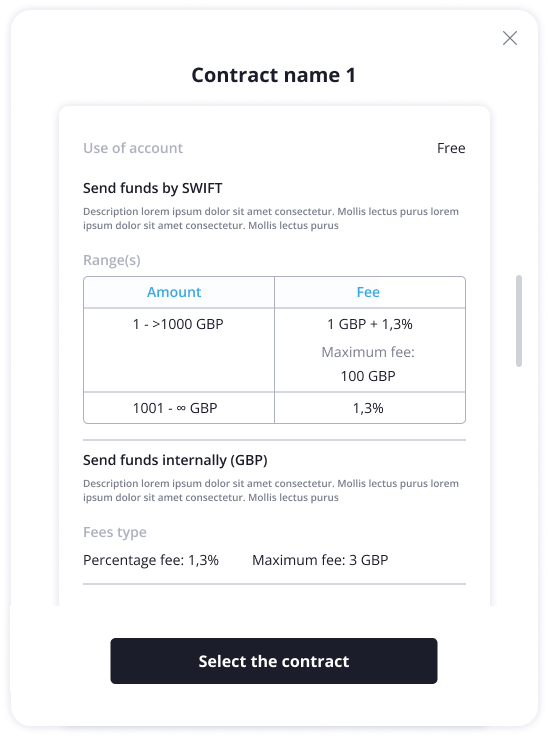 📌 There are no limits on how many contracts the Client may configure. Each end user is eligible to select the most preferable contract at the last stage of onboarding as well as change it later.
***
## 💵 Revenue accounts
All the fees that are collected from transactions in the White Label system should be transferred to a separate account – a **revenue account**. There should be separate revenue accounts for each currency and each Provider.
Before end users onboarding it is required for the Client to:
* Sign up for the Client part of the White Label solution
* Pass KYC/KYB (if corporate)
* Open a bank account in each available currency
* Provide the development team with the account details
Once an account is marked as **revenue**, it won’t be charged while doing any transfers.
***
## 📬 Requests (Manual mode)
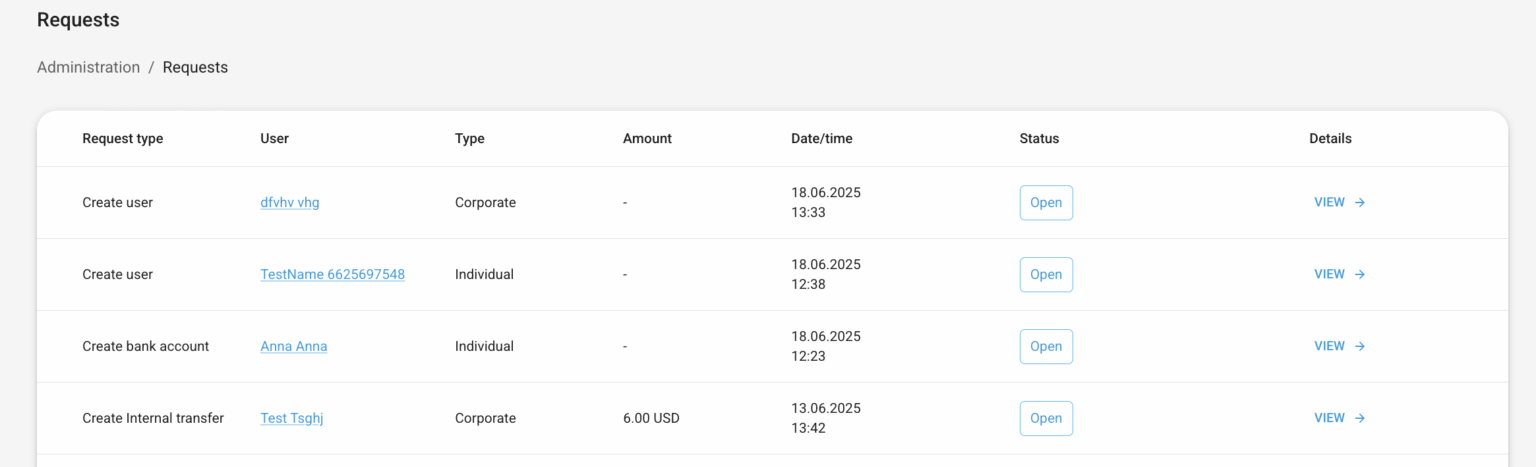
On this page, you will receive all requests from users that have a **Mock provider** (BaaS provider that works in manual mode).
Manual mode is designed to enable launching the setup as quickly as possible, without needing to wait for API integration with the banking provider to be completed. This feature allows you to start your business without API integration, managing account issuing and transfers manually via Finhost and the banking provider back offices while integration is in progress. Once the API integration is complete, we ensure a smooth transition from manual operations to automated processes for account issuing and payment processing.
Currently, we have such types of requests:
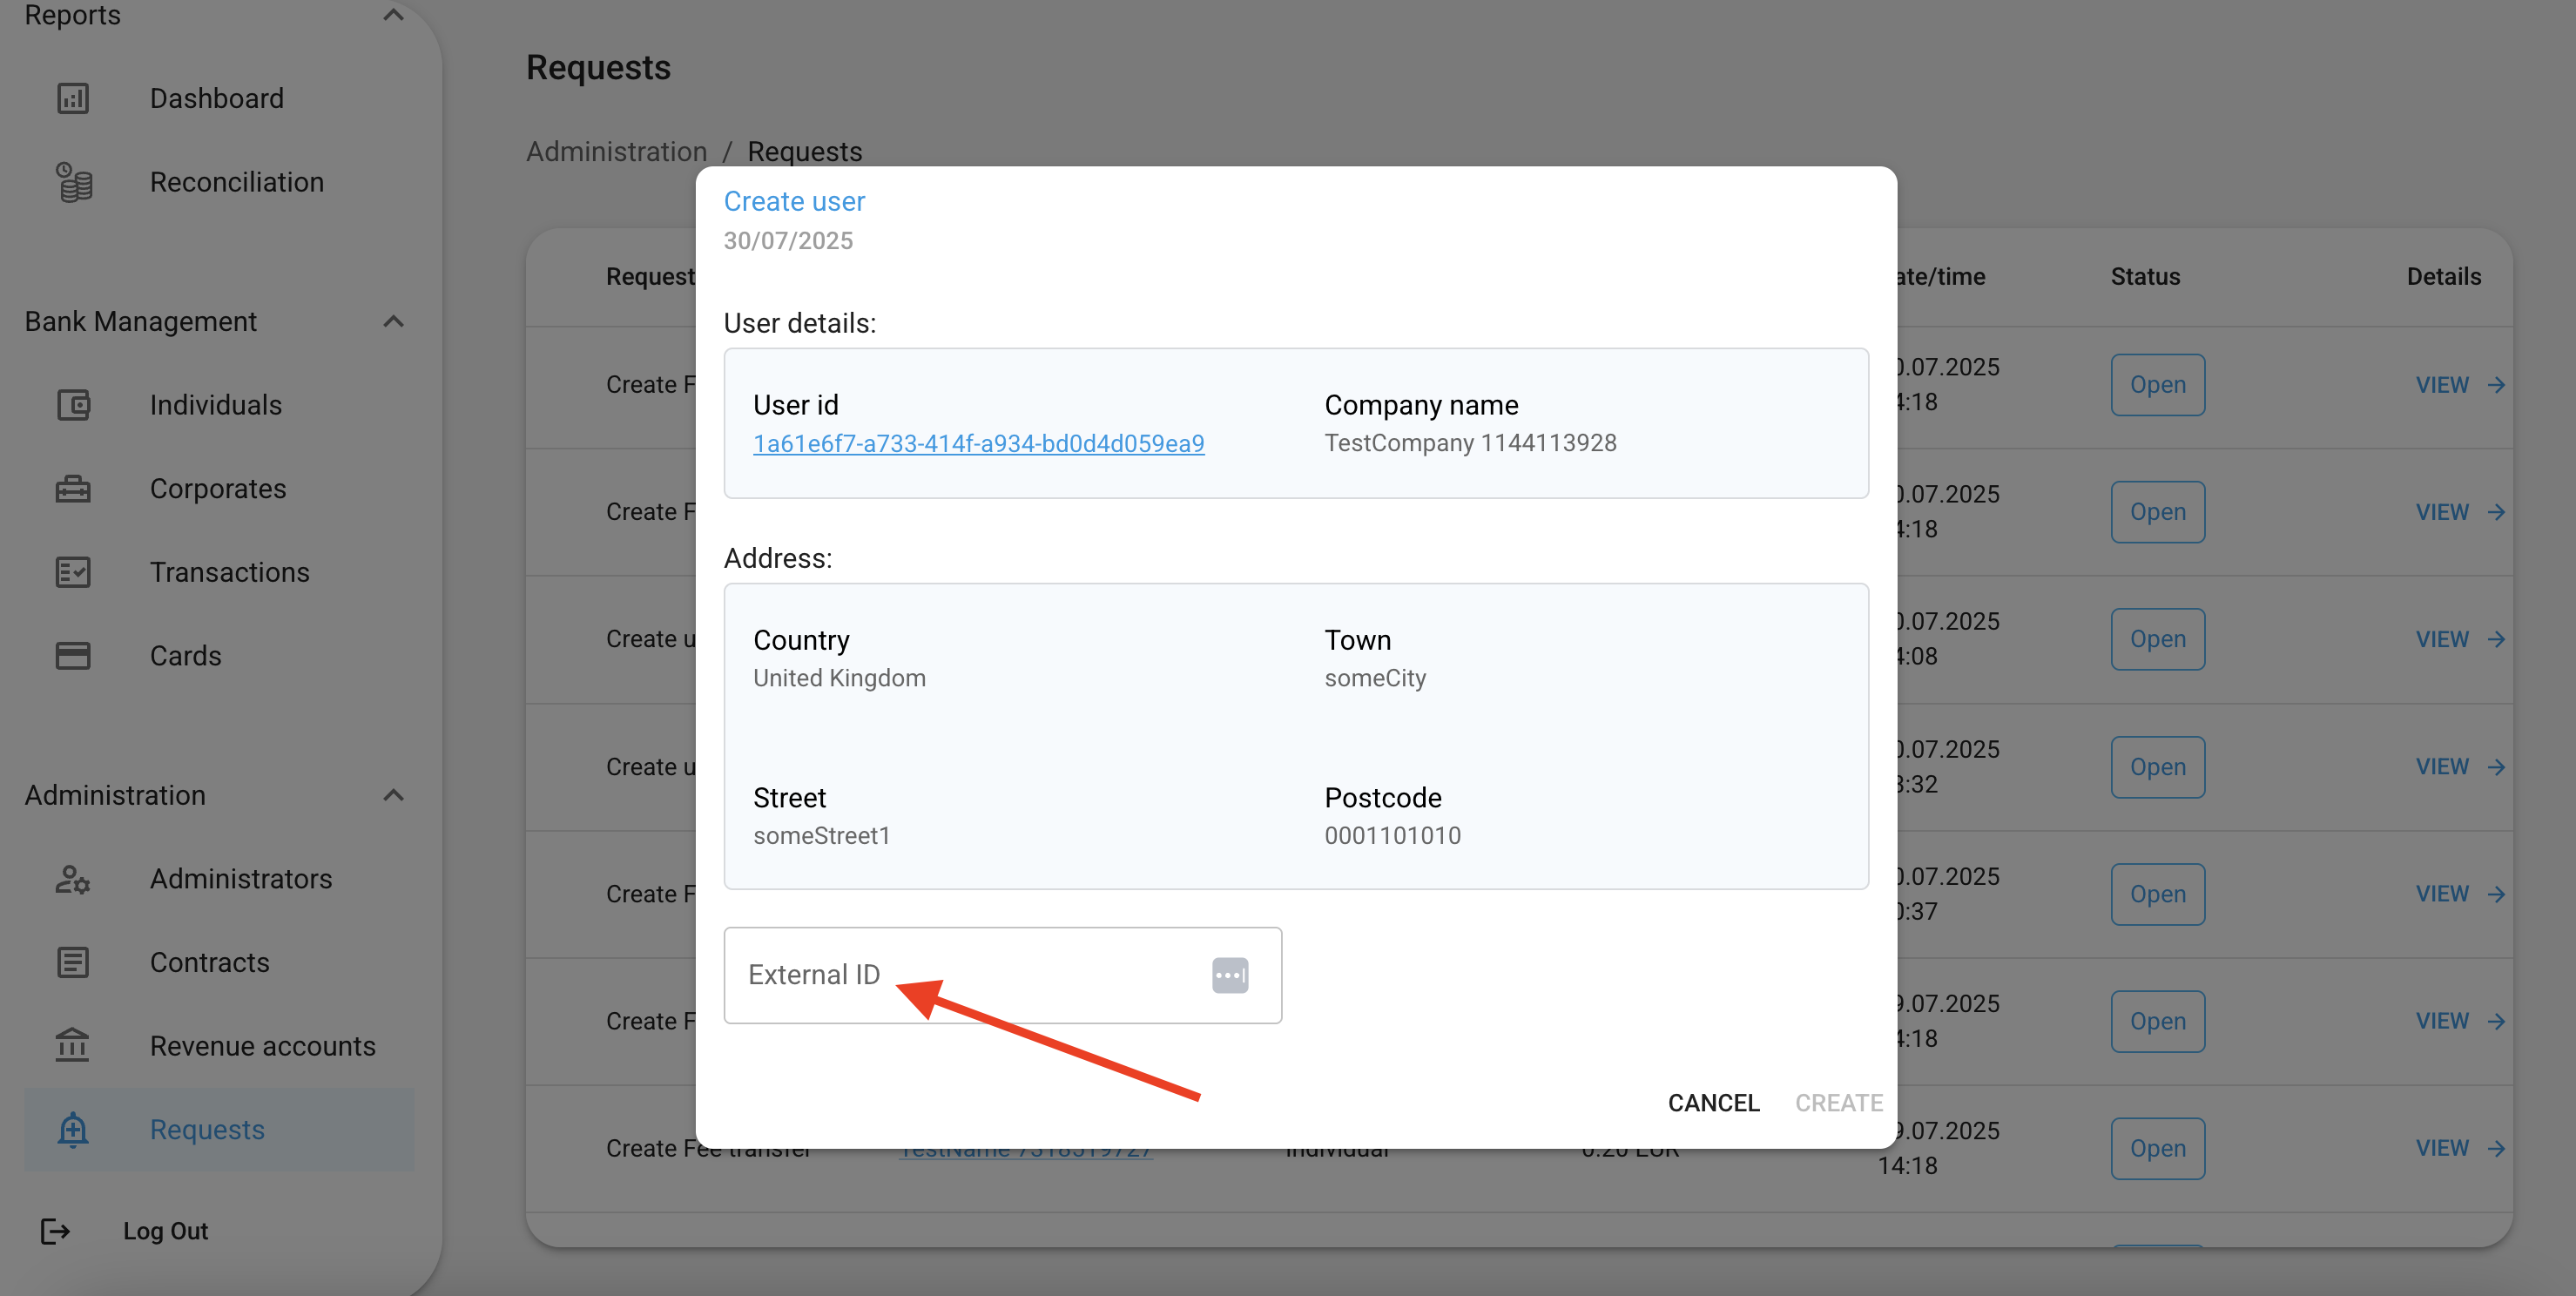
* **Create user** – to create user, you need to provide the external ID
* **Create bank account** – to create a bank account you need to provide:
* IBAN
* BIC/SWIFT
* External account ID
* **Create a transfer** – it could be SEPA, SEPA Instant, Internal, UK Faster payment, or Swift.\
With this request, you will see the window with details of transaction and only approve or reject the transaction.
* **Create Fee transfer** – this request is created automatically after you approve the request for creation of a transfer.
📌 There are no limits on how many contracts the Client may configure. Each end user is eligible to select the most preferable contract at the last stage of onboarding as well as change it later.
***
## 💵 Revenue accounts
All the fees that are collected from transactions in the White Label system should be transferred to a separate account – a **revenue account**. There should be separate revenue accounts for each currency and each Provider.
Before end users onboarding it is required for the Client to:
* Sign up for the Client part of the White Label solution
* Pass KYC/KYB (if corporate)
* Open a bank account in each available currency
* Provide the development team with the account details
Once an account is marked as **revenue**, it won’t be charged while doing any transfers.
***
## 📬 Requests (Manual mode)
On this page, you will receive all requests from users that have a **Mock provider** (BaaS provider that works in manual mode).
Manual mode is designed to enable launching the setup as quickly as possible, without needing to wait for API integration with the banking provider to be completed. This feature allows you to start your business without API integration, managing account issuing and transfers manually via Finhost and the banking provider back offices while integration is in progress. Once the API integration is complete, we ensure a smooth transition from manual operations to automated processes for account issuing and payment processing.
Currently, we have such types of requests:
* **Create user** – to create user, you need to provide the external ID
* **Create bank account** – to create a bank account you need to provide:
* IBAN
* BIC/SWIFT
* External account ID
* **Create a transfer** – it could be SEPA, SEPA Instant, Internal, UK Faster payment, or Swift.\
With this request, you will see the window with details of transaction and only approve or reject the transaction.
* **Create Fee transfer** – this request is created automatically after you approve the request for creation of a transfer.
 ***
### 🧩 1. Create Account
Here you can see three schemas that illustrate the sequence of actions when **creating an account** and **processing transactions** in manual mode.
***
### 🧩 1. Create Account
Here you can see three schemas that illustrate the sequence of actions when **creating an account** and **processing transactions** in manual mode.
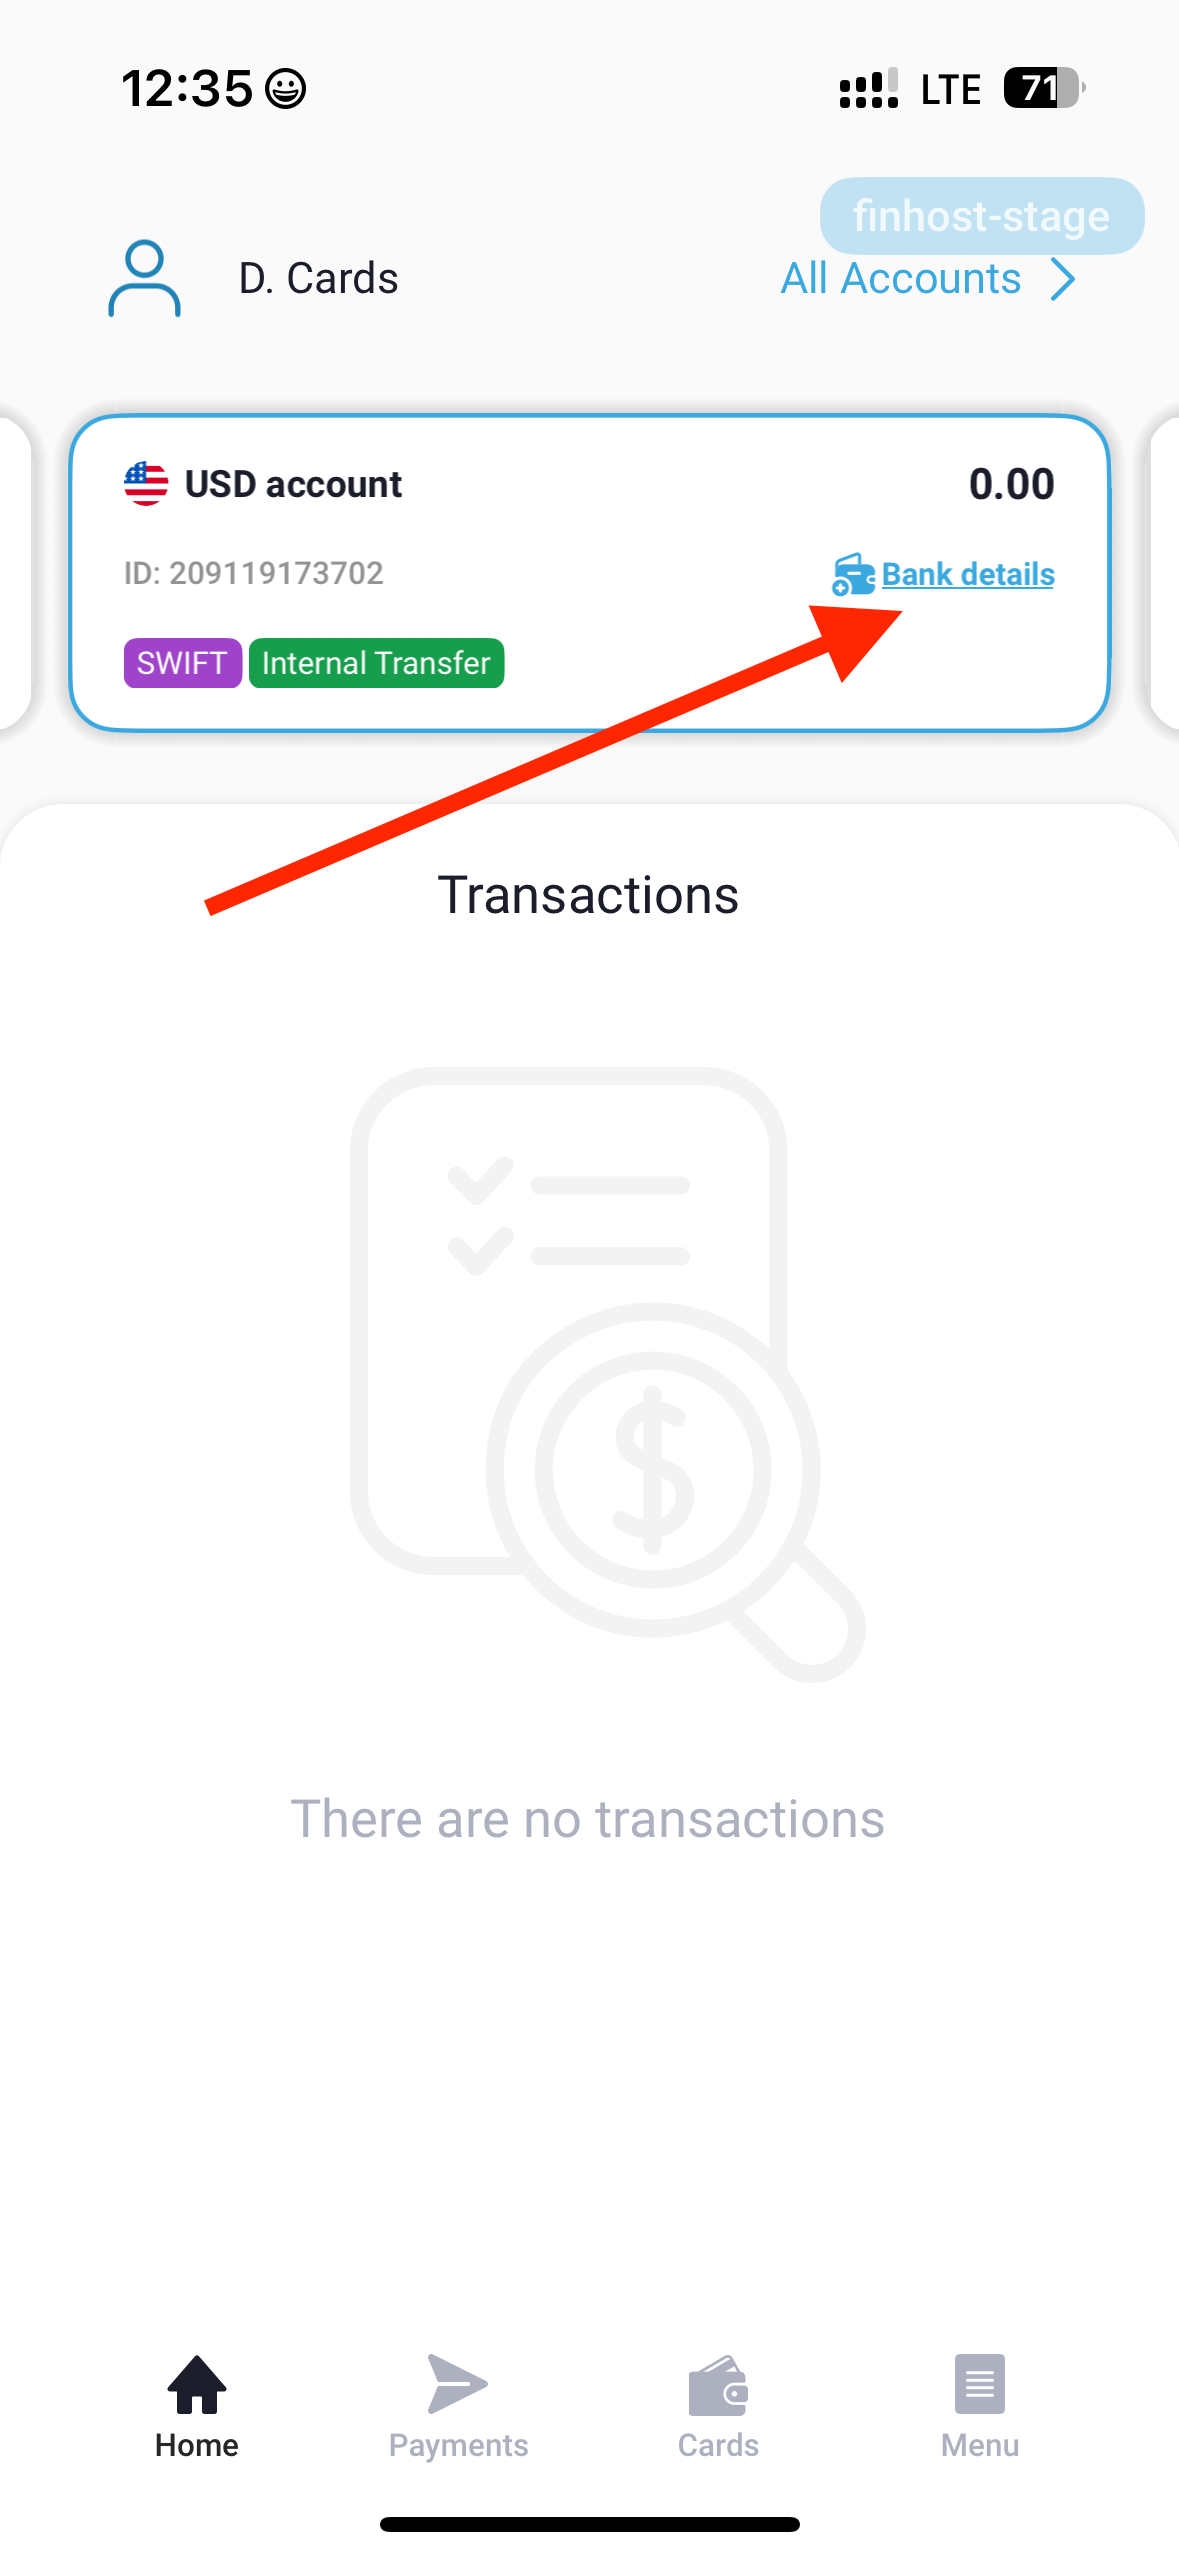
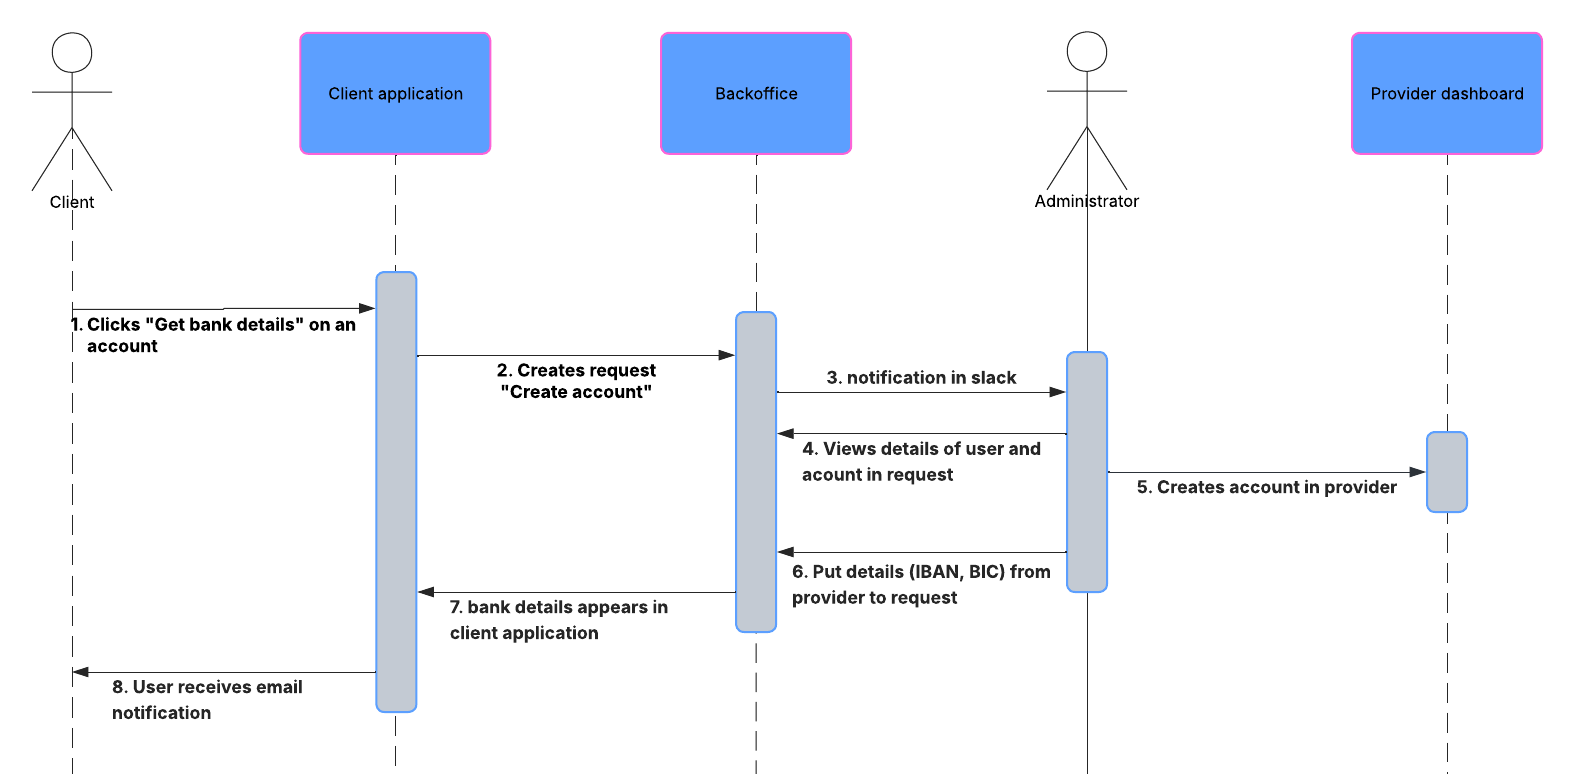 #### Step 1 — User Action
The user clicks **“Get Bank Details”** on their account.
#### Step 1 — User Action
The user clicks **“Get Bank Details”** on their account.
 #### Step 2 - Slack Notification
Once the user initiates account creation, a **Slack notification** is automatically sent to the internal operations channel.
These notifications are internal and allow the team to track newly initiated account requests in real time.\
They are not visible to end users.
#### Step 3 — Provider Verification
After the first account creation request, the system will prompt the creation of a **user**.\
This information must be submitted to the banking provider.\
Once the end user is **accepted** by the provider, you can proceed with user and account creation in the provider’s portal.
🧾 Creating User
1. Submit user information from Finhost to the provider’s onboarding system.
2. Wait for the provider to approve and return the **User ID**.
3. Copy the **User ID** and insert it into the Finhost Backoffice field **External User ID**.
#### Step 2 - Slack Notification
Once the user initiates account creation, a **Slack notification** is automatically sent to the internal operations channel.
These notifications are internal and allow the team to track newly initiated account requests in real time.\
They are not visible to end users.
#### Step 3 — Provider Verification
After the first account creation request, the system will prompt the creation of a **user**.\
This information must be submitted to the banking provider.\
Once the end user is **accepted** by the provider, you can proceed with user and account creation in the provider’s portal.
🧾 Creating User
1. Submit user information from Finhost to the provider’s onboarding system.
2. Wait for the provider to approve and return the **User ID**.
3. Copy the **User ID** and insert it into the Finhost Backoffice field **External User ID**.

 Some banking providers do not have a separate “User” entity — they only support “Accounts.”\
In such cases, simply approve the user creation step in the Finhost Backoffice.
After the **User** is created on the provider’s side, the **User ID** should become available.\
Insert this ID into our field **External User ID**.\
This is essential for the upcoming transition to **API-based automation**.
#### Step 4 — Admin Account Creation
Once the user is created and verified on the provider’s side, the **Admin** can create an account for that user in the Finhost Backoffice.
Some banking providers do not have a separate “User” entity — they only support “Accounts.”\
In such cases, simply approve the user creation step in the Finhost Backoffice.
After the **User** is created on the provider’s side, the **User ID** should become available.\
Insert this ID into our field **External User ID**.\
This is essential for the upcoming transition to **API-based automation**.
#### Step 4 — Admin Account Creation
Once the user is created and verified on the provider’s side, the **Admin** can create an account for that user in the Finhost Backoffice.
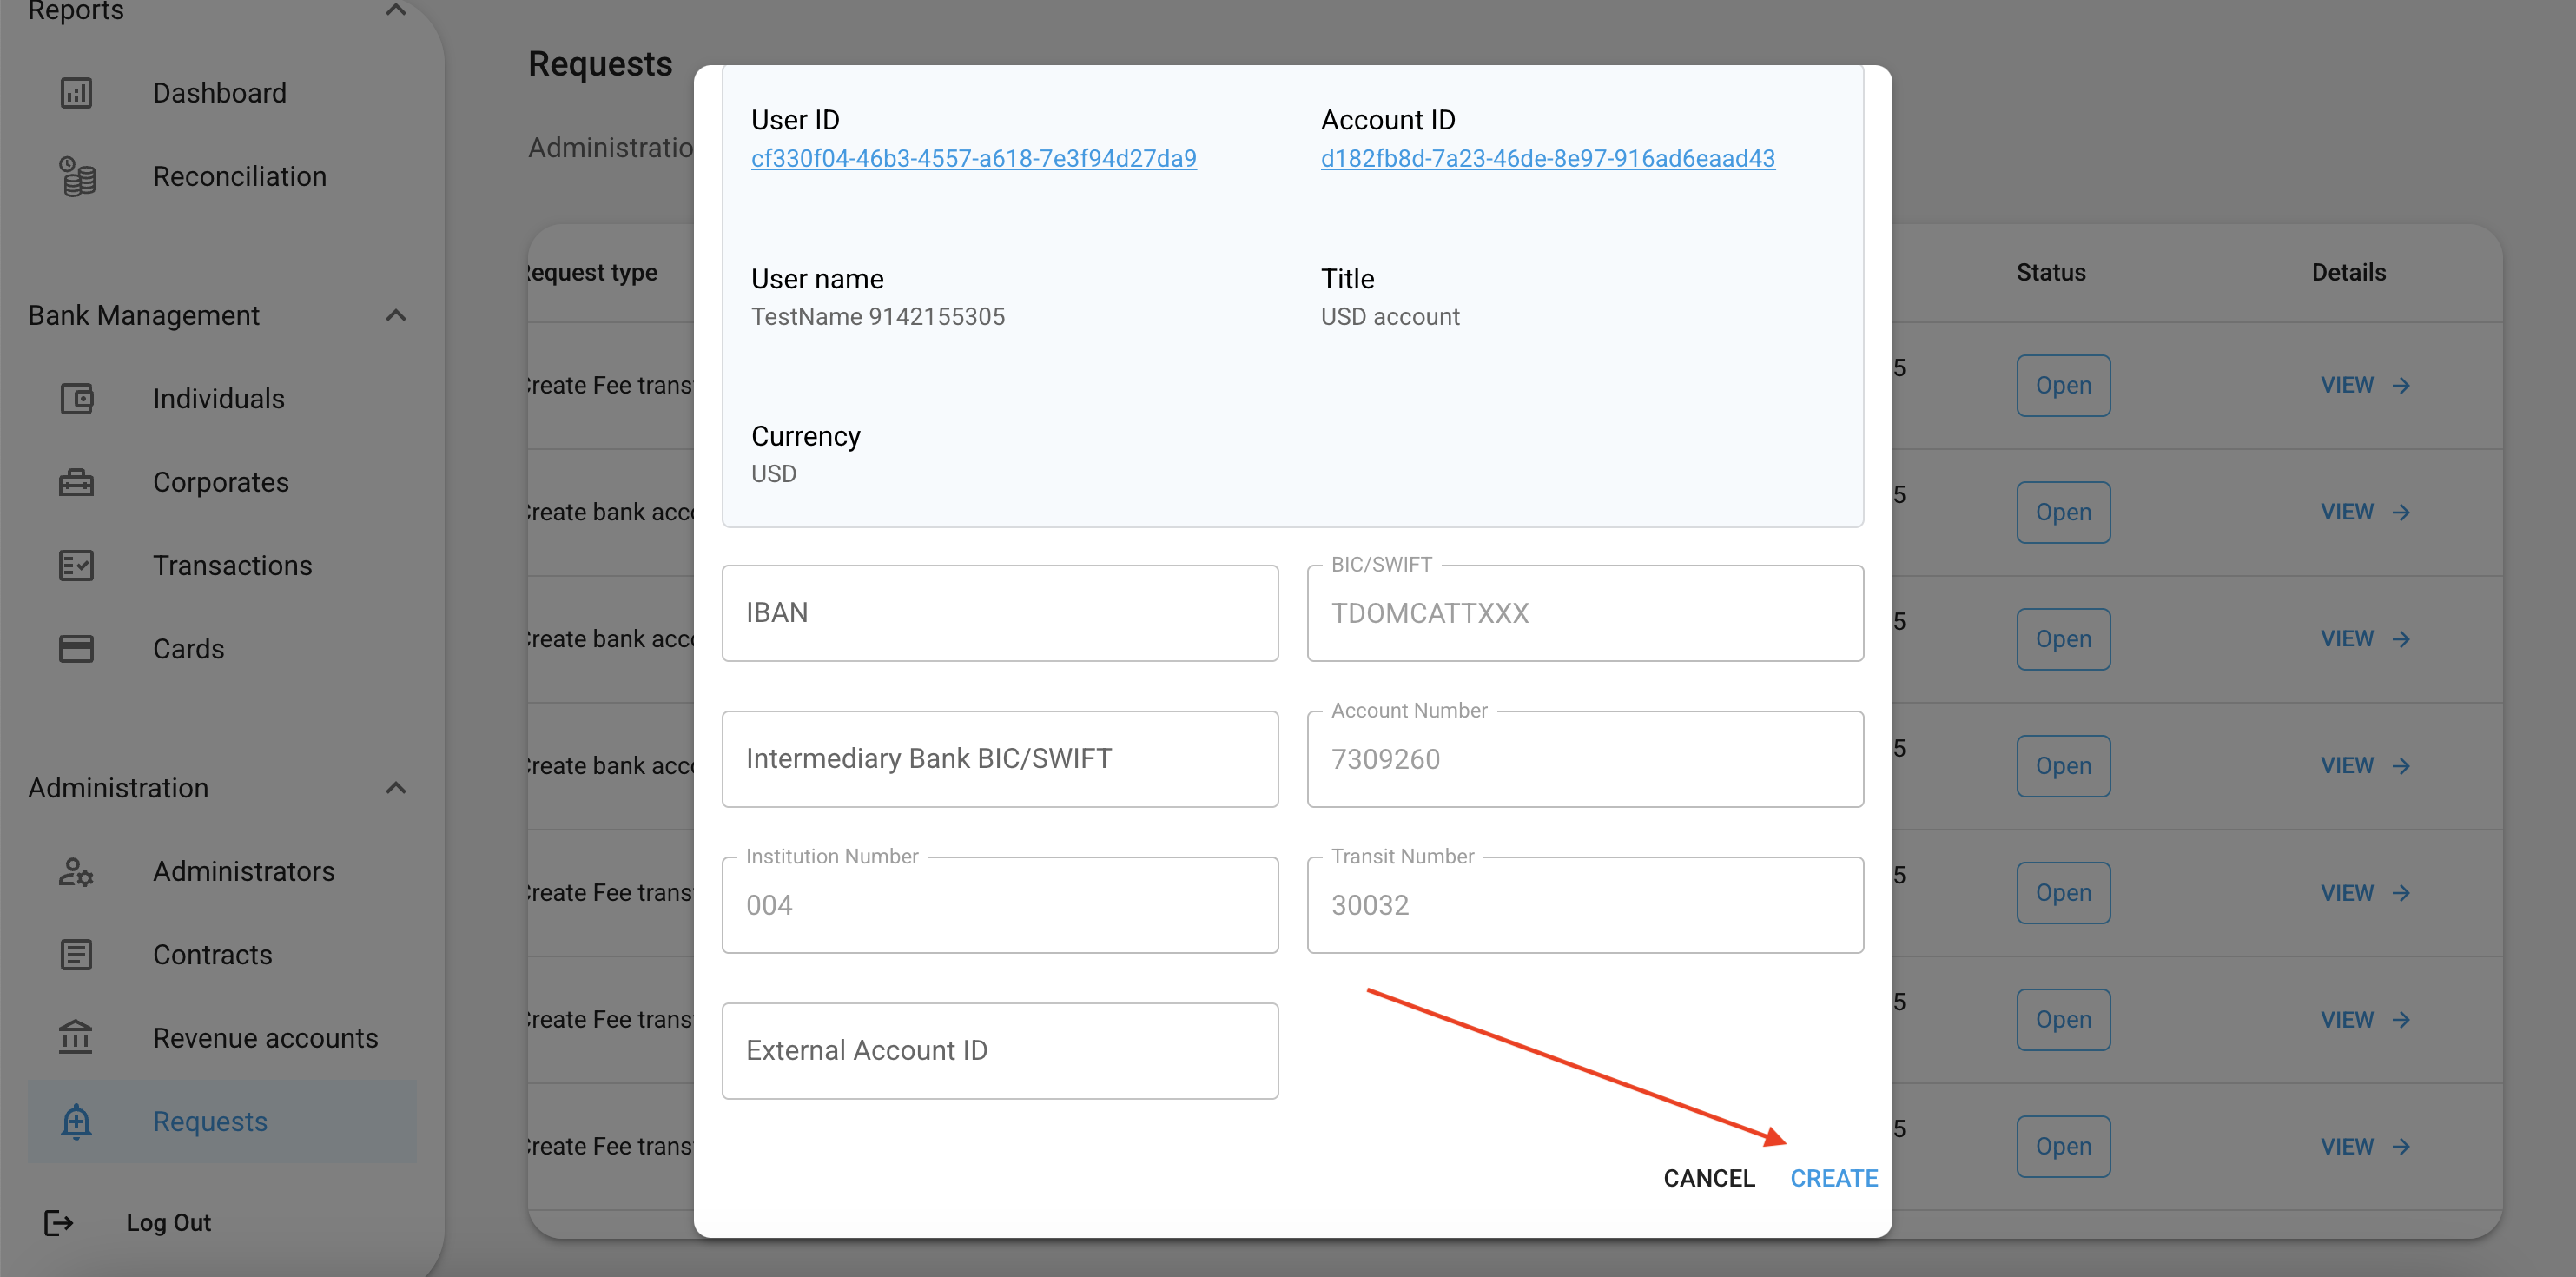 After the **Account** is created on the provider’s side, the **Account ID** should be available.\
Insert this ID into our field **External Account ID**.\
This will be critical when all accounts are migrated under **API automation**.
***
### 💸 2. Create Outgoing Transaction
General Schema
After the **Account** is created on the provider’s side, the **Account ID** should be available.\
Insert this ID into our field **External Account ID**.\
This will be critical when all accounts are migrated under **API automation**.
***
### 💸 2. Create Outgoing Transaction
General Schema
 This diagram illustrates the general process of how an outgoing transaction is created and processed in **manual mode**.
***
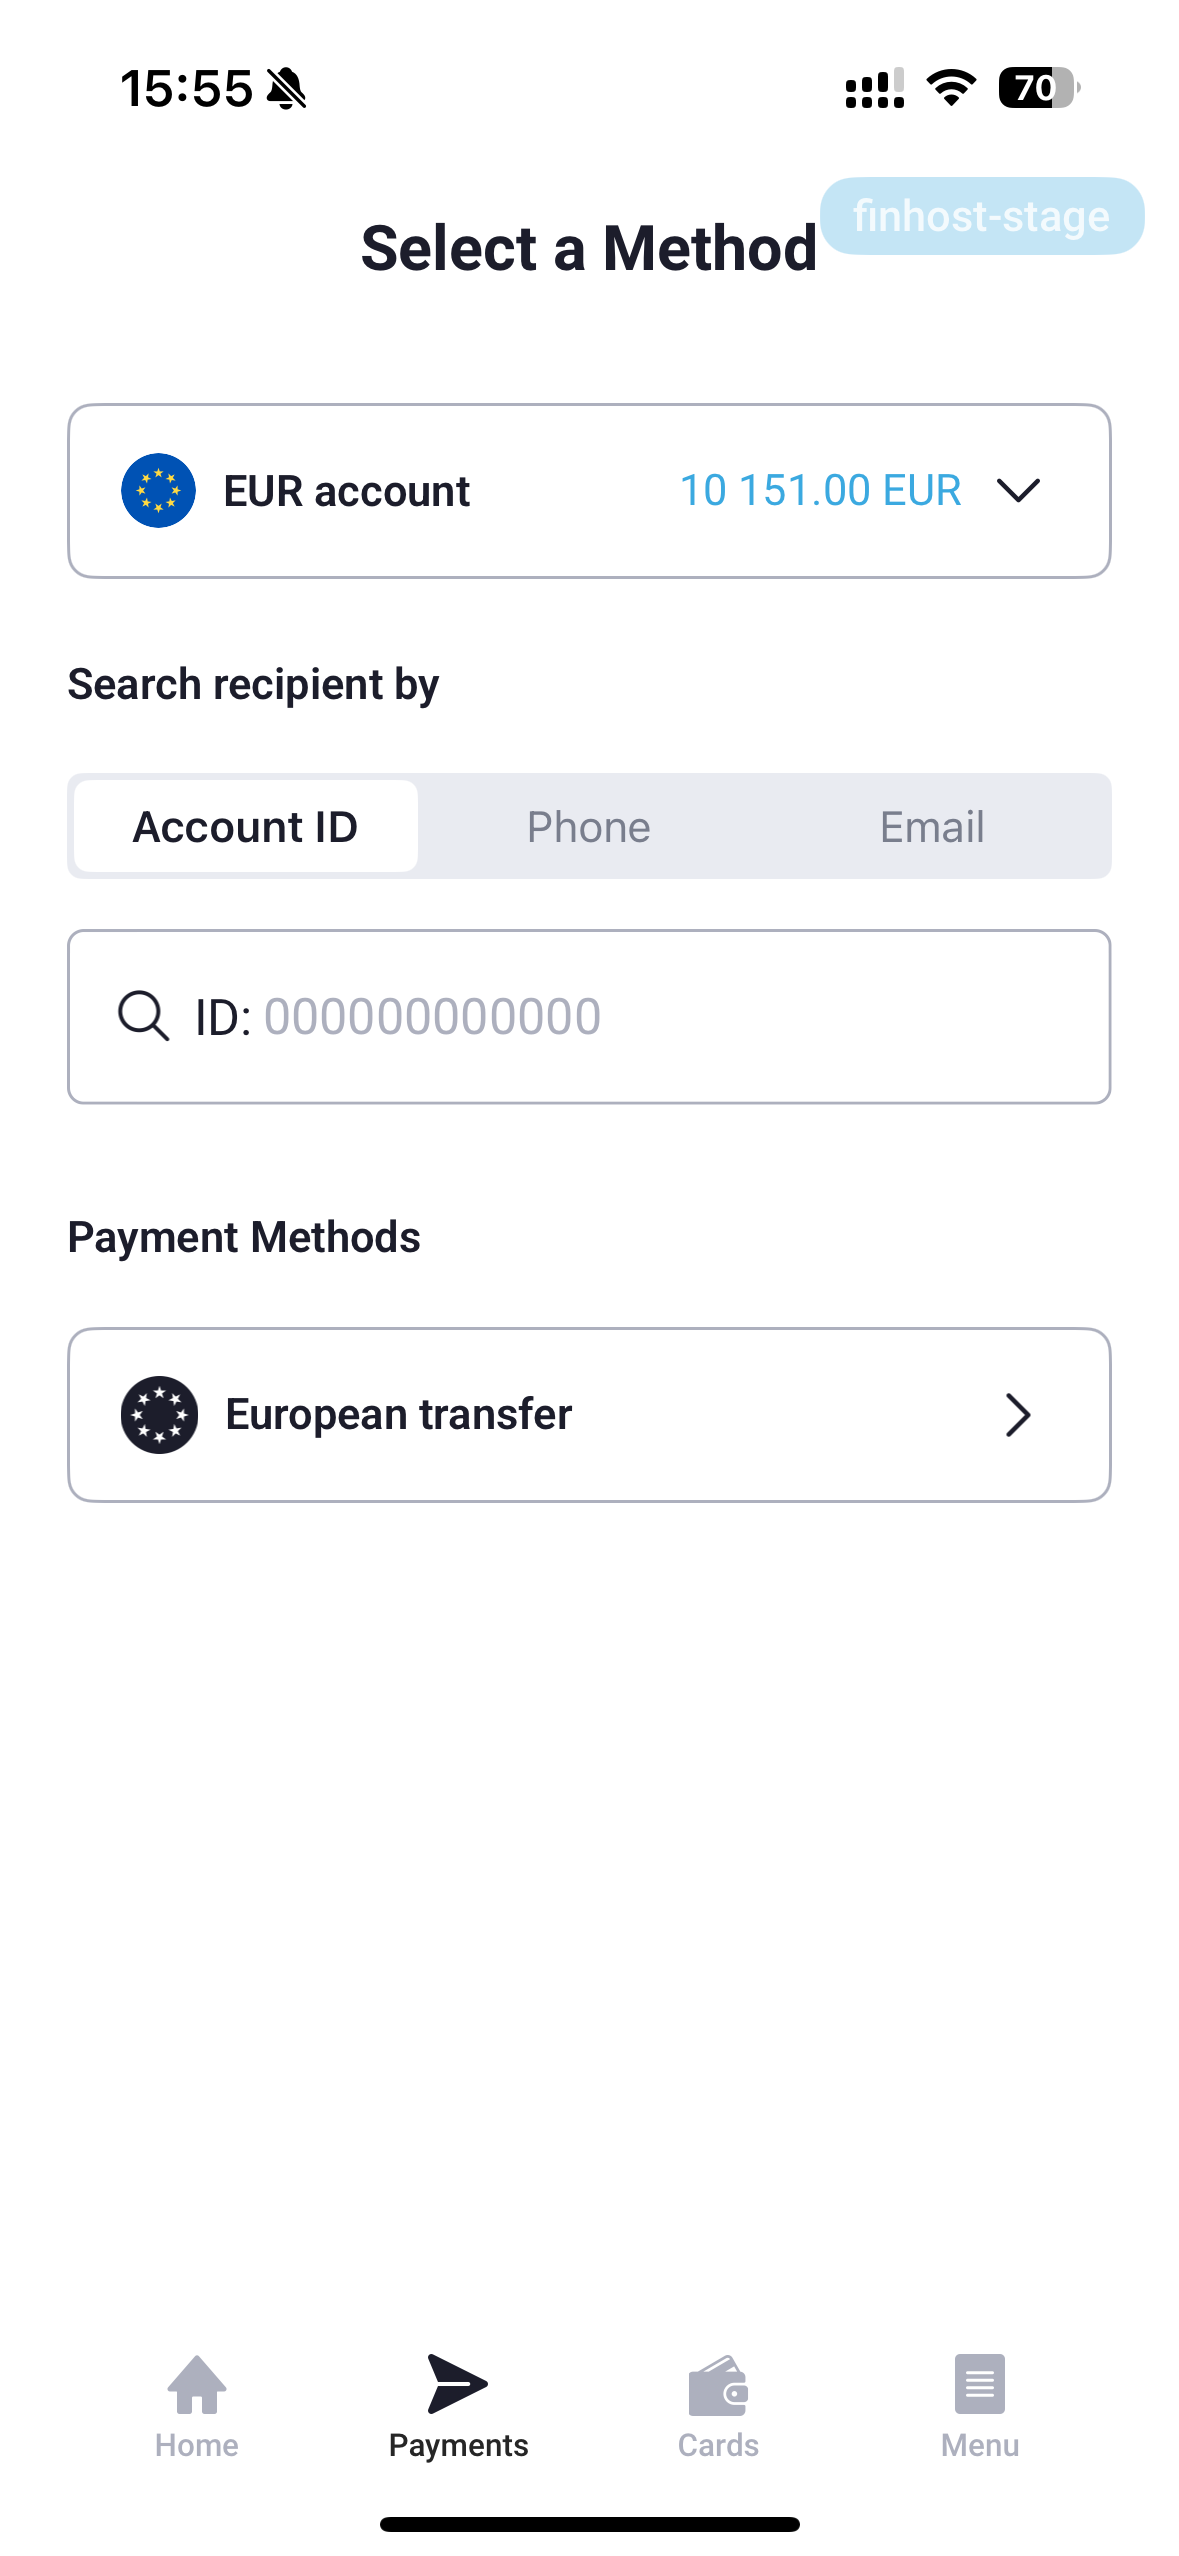
#### Step 1 — User Initiates Payment
The user initiates a payment request through their account interface.
This diagram illustrates the general process of how an outgoing transaction is created and processed in **manual mode**.
***
#### Step 1 — User Initiates Payment
The user initiates a payment request through their account interface.
 ***
#### Step 2 - Slack Notification
Once the user initiates outgoing payment, a **Slack notification** is automatically sent to the internal operations channel.
These notifications are internal and allow the team to track newly initiated account requests in real time.\
They are not visible to end users.
#### Step 3 — Admin Initiates Payment on Provider Side
Once the user submits a payment request, an **Admin** must manually initiate this transaction in the **banking provider’s portal**.
It’s important to wait until the payment is **approved** by the banking provider before proceeding with any actions inside Finhost Backoffice.
***
#### Step 4 — Approve or Reject Transaction in Finhost Backoffice
After receiving a response from the banking provider, the Admin should review the transaction in **Finhost Backoffice**.
***
#### Step 2 - Slack Notification
Once the user initiates outgoing payment, a **Slack notification** is automatically sent to the internal operations channel.
These notifications are internal and allow the team to track newly initiated account requests in real time.\
They are not visible to end users.
#### Step 3 — Admin Initiates Payment on Provider Side
Once the user submits a payment request, an **Admin** must manually initiate this transaction in the **banking provider’s portal**.
It’s important to wait until the payment is **approved** by the banking provider before proceeding with any actions inside Finhost Backoffice.
***
#### Step 4 — Approve or Reject Transaction in Finhost Backoffice
After receiving a response from the banking provider, the Admin should review the transaction in **Finhost Backoffice**.
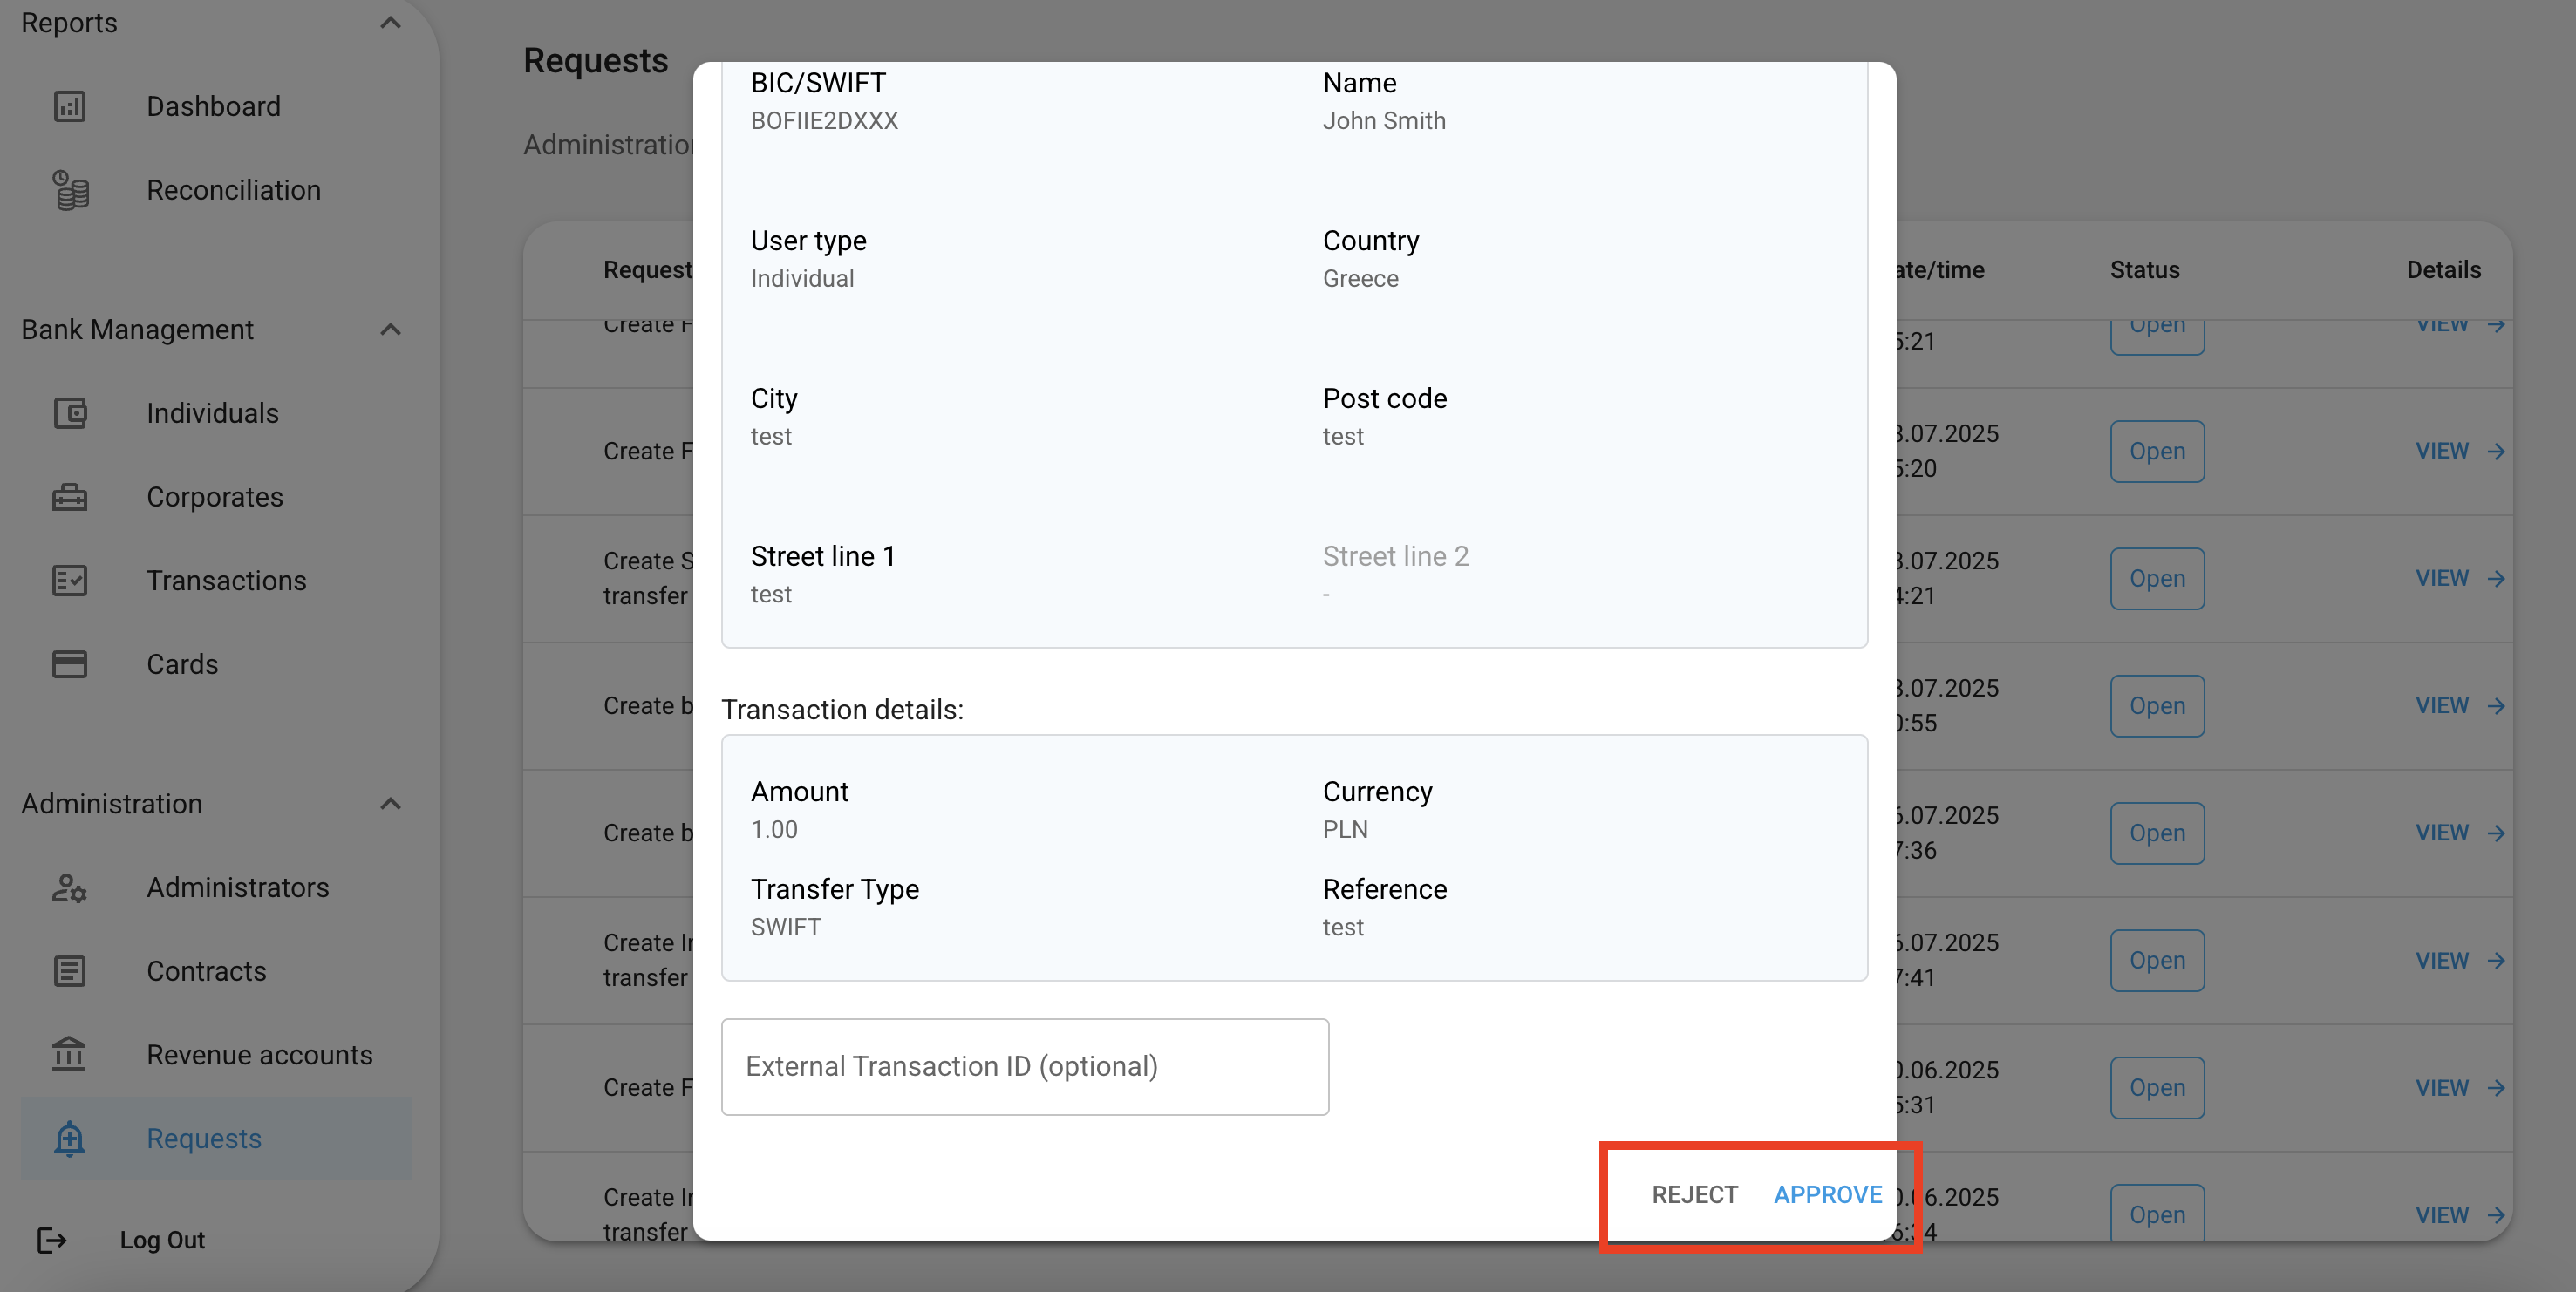 ✅ Approving a Transaction
If the payment is approved on the provider’s side:
1. Approve the transaction in Finhost Backoffice.
2. Insert the **External Transaction ID** received from the provider.
Inserting the correct **External Transaction ID** is essential for maintaining synchronization between the provider’s system and Finhost Backoffice during API automation.
❌ Rejecting a Transaction
If the payment is **rejected** by the provider:
* Use the **Reject** button in Finhost Backoffice.
* You can specify a **rejection reason**, if available from the provider.\
This reason will **not be visible to the end user**, but it will remain stored internally for your operational records.
***
#### Step 5 — End User Notification and Balance Update
Once the transaction is approved and the external ID is recorded:
* The **end user receives an email notification** confirming the payment.
* The **account balance** is automatically updated.
* The transaction status changes to **Completed**.
***
#### Step 6 — Fee Transaction Approval
Since this is **manual mode**, once the main payment is approved, a **fee transaction** will be created automatically.
✅ Approving a Transaction
If the payment is approved on the provider’s side:
1. Approve the transaction in Finhost Backoffice.
2. Insert the **External Transaction ID** received from the provider.
Inserting the correct **External Transaction ID** is essential for maintaining synchronization between the provider’s system and Finhost Backoffice during API automation.
❌ Rejecting a Transaction
If the payment is **rejected** by the provider:
* Use the **Reject** button in Finhost Backoffice.
* You can specify a **rejection reason**, if available from the provider.\
This reason will **not be visible to the end user**, but it will remain stored internally for your operational records.
***
#### Step 5 — End User Notification and Balance Update
Once the transaction is approved and the external ID is recorded:
* The **end user receives an email notification** confirming the payment.
* The **account balance** is automatically updated.
* The transaction status changes to **Completed**.
***
#### Step 6 — Fee Transaction Approval
Since this is **manual mode**, once the main payment is approved, a **fee transaction** will be created automatically.
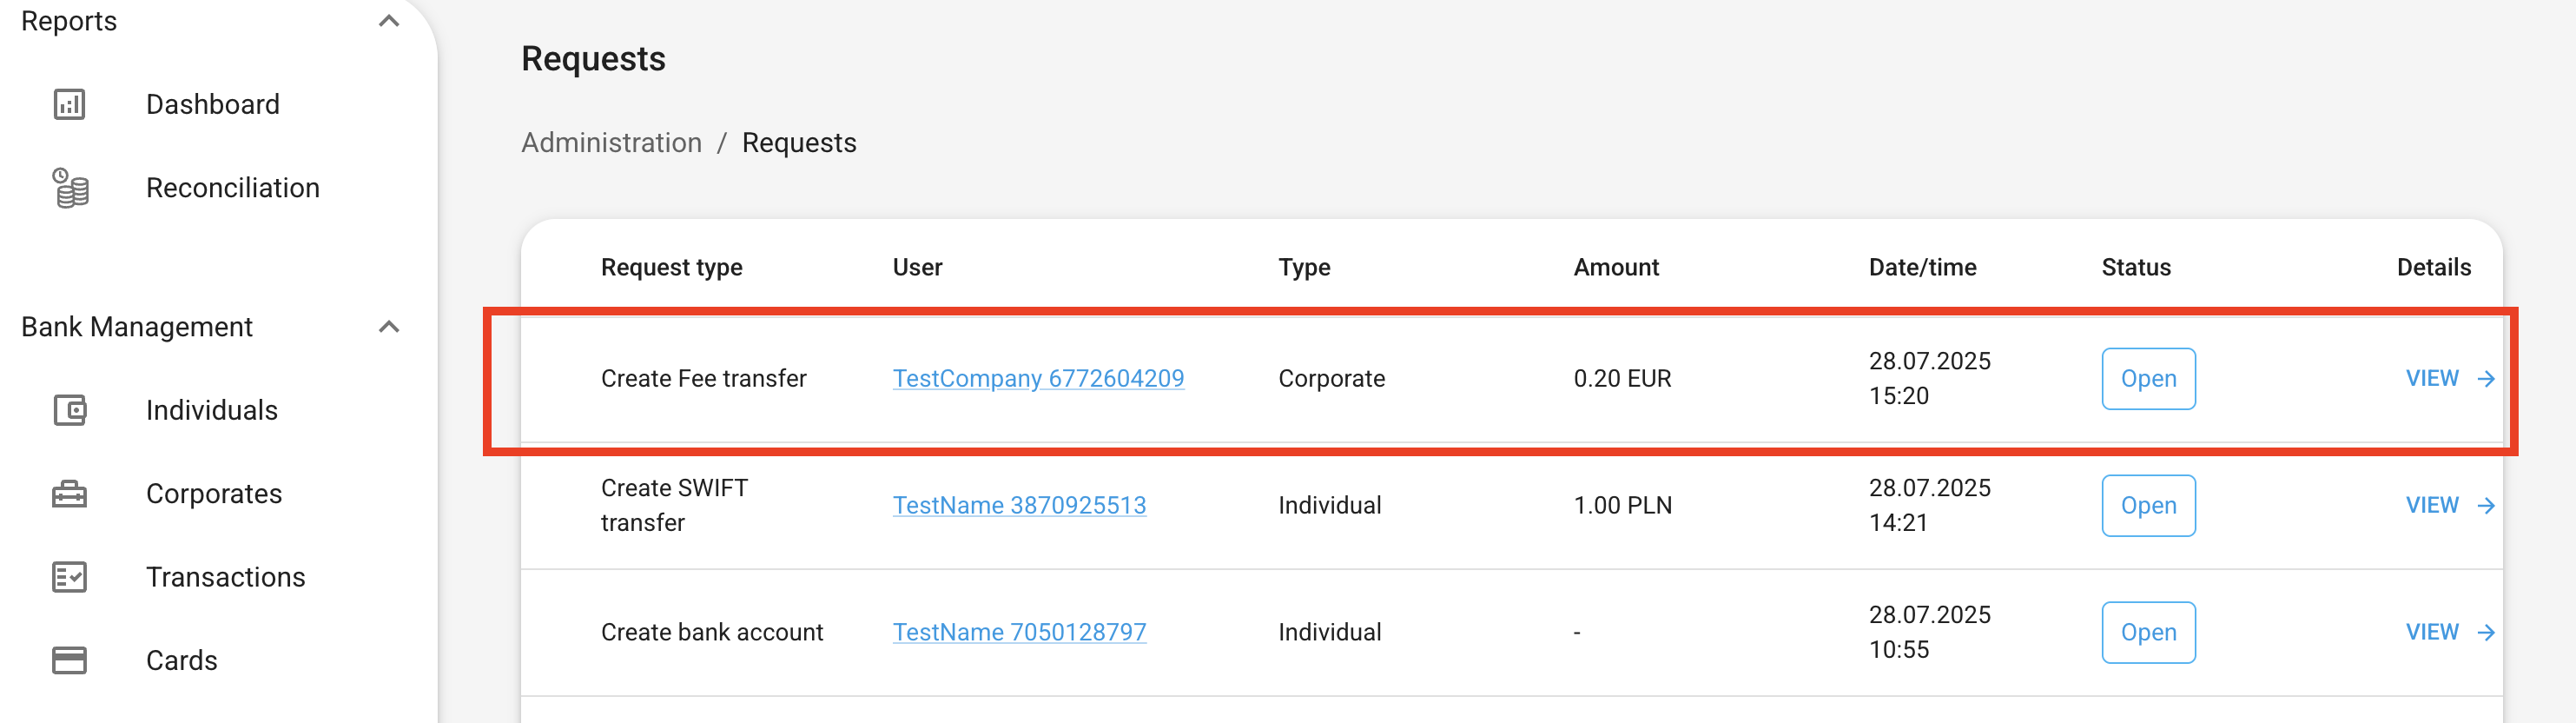 After approving the main payment:
1. Locate the automatically generated **fee transaction** in Finhost Backoffice.
2. Review and **approve it** to finalize the payment flow.
Always ensure the fee transaction is approved immediately after the main payment to maintain accounting accuracy and ensure consistent balance synchronization.
***
***
## 💰 3. Create Incoming Transaction
After approving the main payment:
1. Locate the automatically generated **fee transaction** in Finhost Backoffice.
2. Review and **approve it** to finalize the payment flow.
Always ensure the fee transaction is approved immediately after the main payment to maintain accounting accuracy and ensure consistent balance synchronization.
***
***
## 💰 3. Create Incoming Transaction
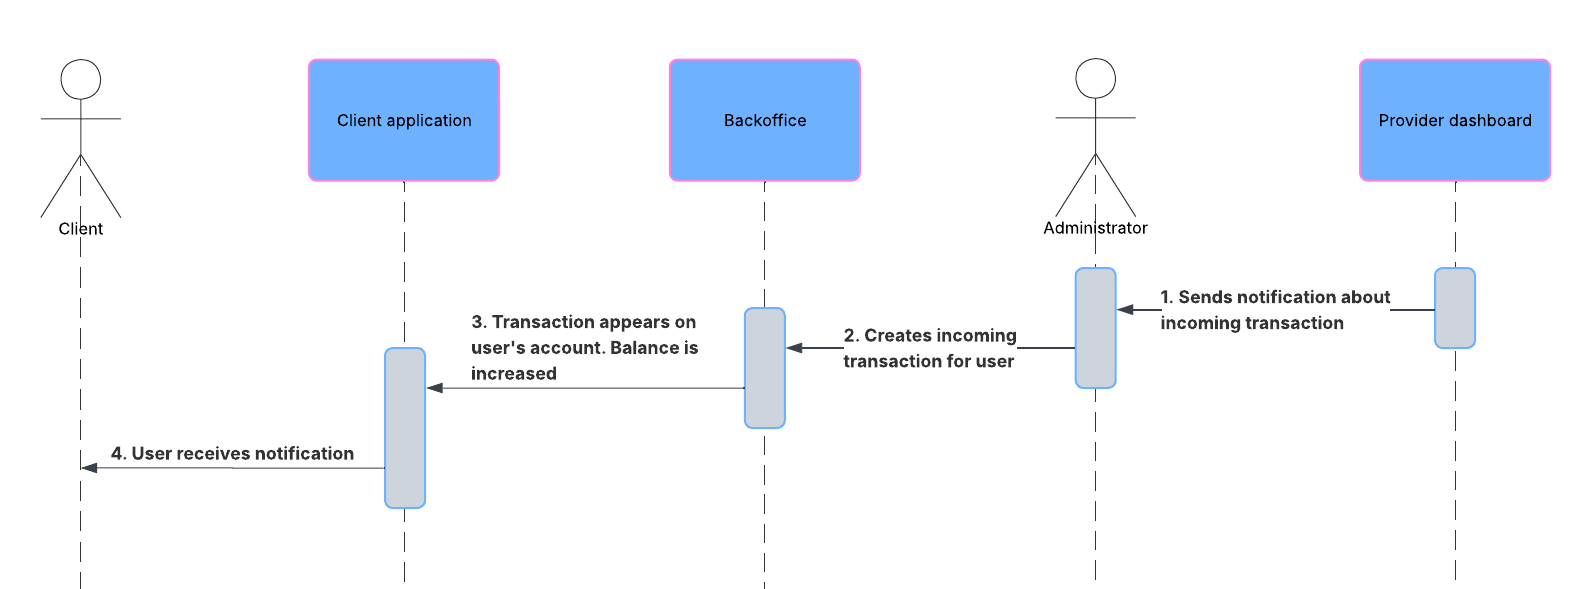 This diagram illustrates how incoming transactions (deposits) are processed in **manual mode**.
***
#### Step 1 — Monitor Provider Dashboard
The first task for the **Admin** is to regularly monitor the **banking provider’s admin dashboard** to identify new incoming deposits.
We highly recommend enabling **email or system notifications** (if supported by the provider) to ensure that deposits are credited to end users’ accounts **as soon as possible**.
***
#### Step 2 — Log the Deposit in Finhost Backoffice
Once a deposit is visible in the provider’s system, it needs to be logged manually in Finhost Backoffice.
This diagram illustrates how incoming transactions (deposits) are processed in **manual mode**.
***
#### Step 1 — Monitor Provider Dashboard
The first task for the **Admin** is to regularly monitor the **banking provider’s admin dashboard** to identify new incoming deposits.
We highly recommend enabling **email or system notifications** (if supported by the provider) to ensure that deposits are credited to end users’ accounts **as soon as possible**.
***
#### Step 2 — Log the Deposit in Finhost Backoffice
Once a deposit is visible in the provider’s system, it needs to be logged manually in Finhost Backoffice.

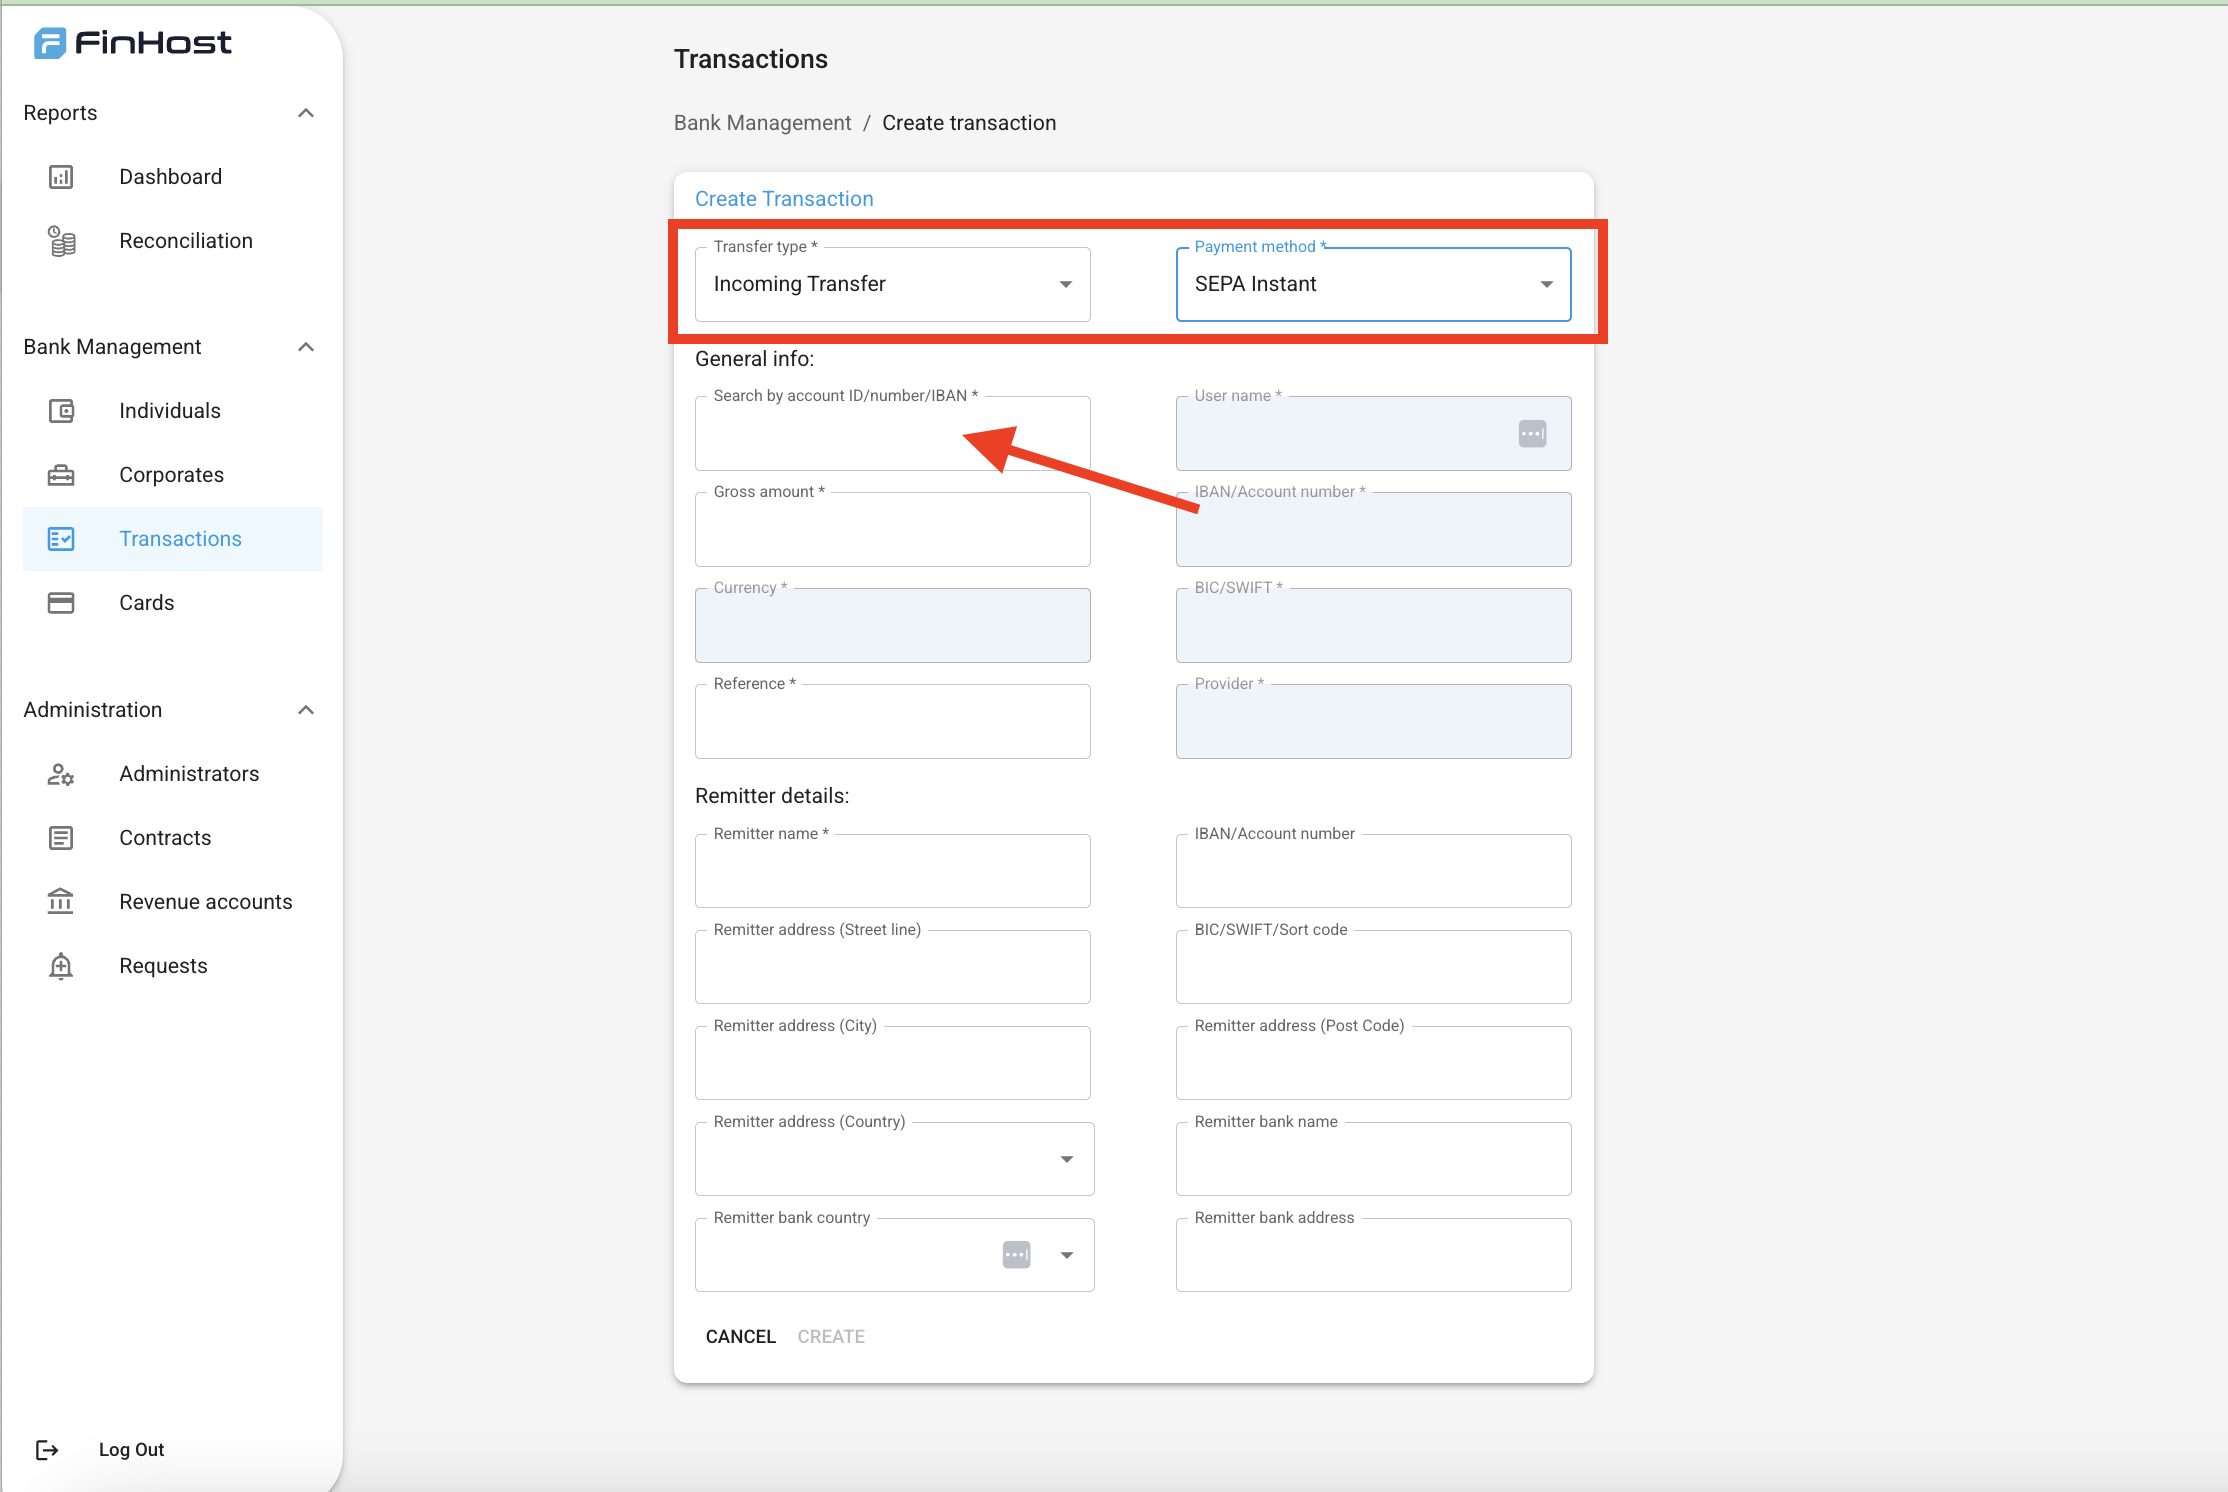 1. Open the **Create Transaction** page.
2. Select **Incoming Payment** as the transaction type.
3. Choose the appropriate **payment method**.
4. Search for the target account using one of the following options:
* **Internal Account ID**
* **Account Number**
* **IBAN**
If the user deposits to a **pooled account** and is identified via the **payment reference**,\
use the **Reference ID**, which corresponds to the **Internal Account ID** in our system.
If the user deposits to a **dedicated banking account**, you can use the **Account Number** or **IBAN** for convenience.
***
#### Step 3 — Complete Transaction Details
Fill in all required fields according to the **sender’s information** provided by the banking provider.\
Ensure that the sender’s name, payment reference, and amount match the details shown in the provider’s dashboard.
***
#### Step 4 — Confirm Deposit
Once the transaction is created and confirmed:
* The **user’s balance** will be automatically updated.
* An **email notification** will be sent to the end user confirming the deposit.
* The transaction status will change to **Completed** in Finhost Backoffice.
***
Always verify sender details carefully before approving the transaction to avoid misallocating funds between accounts.
## 💠 Crypto Module Administration Guide
### 1. Introduction
The **Crypto Module** connects fiat and crypto operations through two main providers:
* **Fireblocks (FB)** — manages crypto wallets, generates deposit addresses, and processes incoming and outgoing crypto payments.
* **Kraken (KR)** — handles all crypto–fiat conversions using **market orders** for real-time liquidity.
Together, these systems enable your clients to exchange between fiat (e.g. EUR) and crypto (e.g. BTC) without manual intervention.\
The flow relies on **centralized liquidity** and does **not** create separate accounts for each client on the providers’ sides —\
**all client balances are handled and reflected within the Finhost Core Banking Ledger**, which tracks and synchronizes virtual balances for end-users.
***
### 2. How Money Flows Work
#### 🔄 A. Fiat → Crypto Exchange and Withdrawal
**Example:** Convert EUR to BTC and send out.
**Steps:**
1. The user creates a **EUR account (Acc A)** with SEPA and Crypto Exchange capability (supported by the **Fiat Provider**).\
→ An account is created on the Fiat Provider side.
2. The user creates a **BTC account (Acc B)** (supported by **Fireblocks** and **Kraken**).\
→ No individual wallet is created on the provider’s side; Finhost uses Fireblocks and Kraken **master accounts** for all clients.
3. The user receives EUR via SEPA to **Acc A**, reaching a balance of *100 EUR*.\
Funds are settled on the Fiat Provider account.
4. When the user requests to exchange EUR → BTC:
* The conversion takes place on **Kraken** via a **market order**.
* **Acc B** (BTC) balance is updated to *0.0017 BTC* within the Finhost Core Banking Ledger.
* ⚠️ **Important:** To perform this conversion successfully, there must be **enough liquidity on the Kraken side** in the respective fiat currency (e.g. EUR). Insufficient liquidity will cause exchange delays or failures.
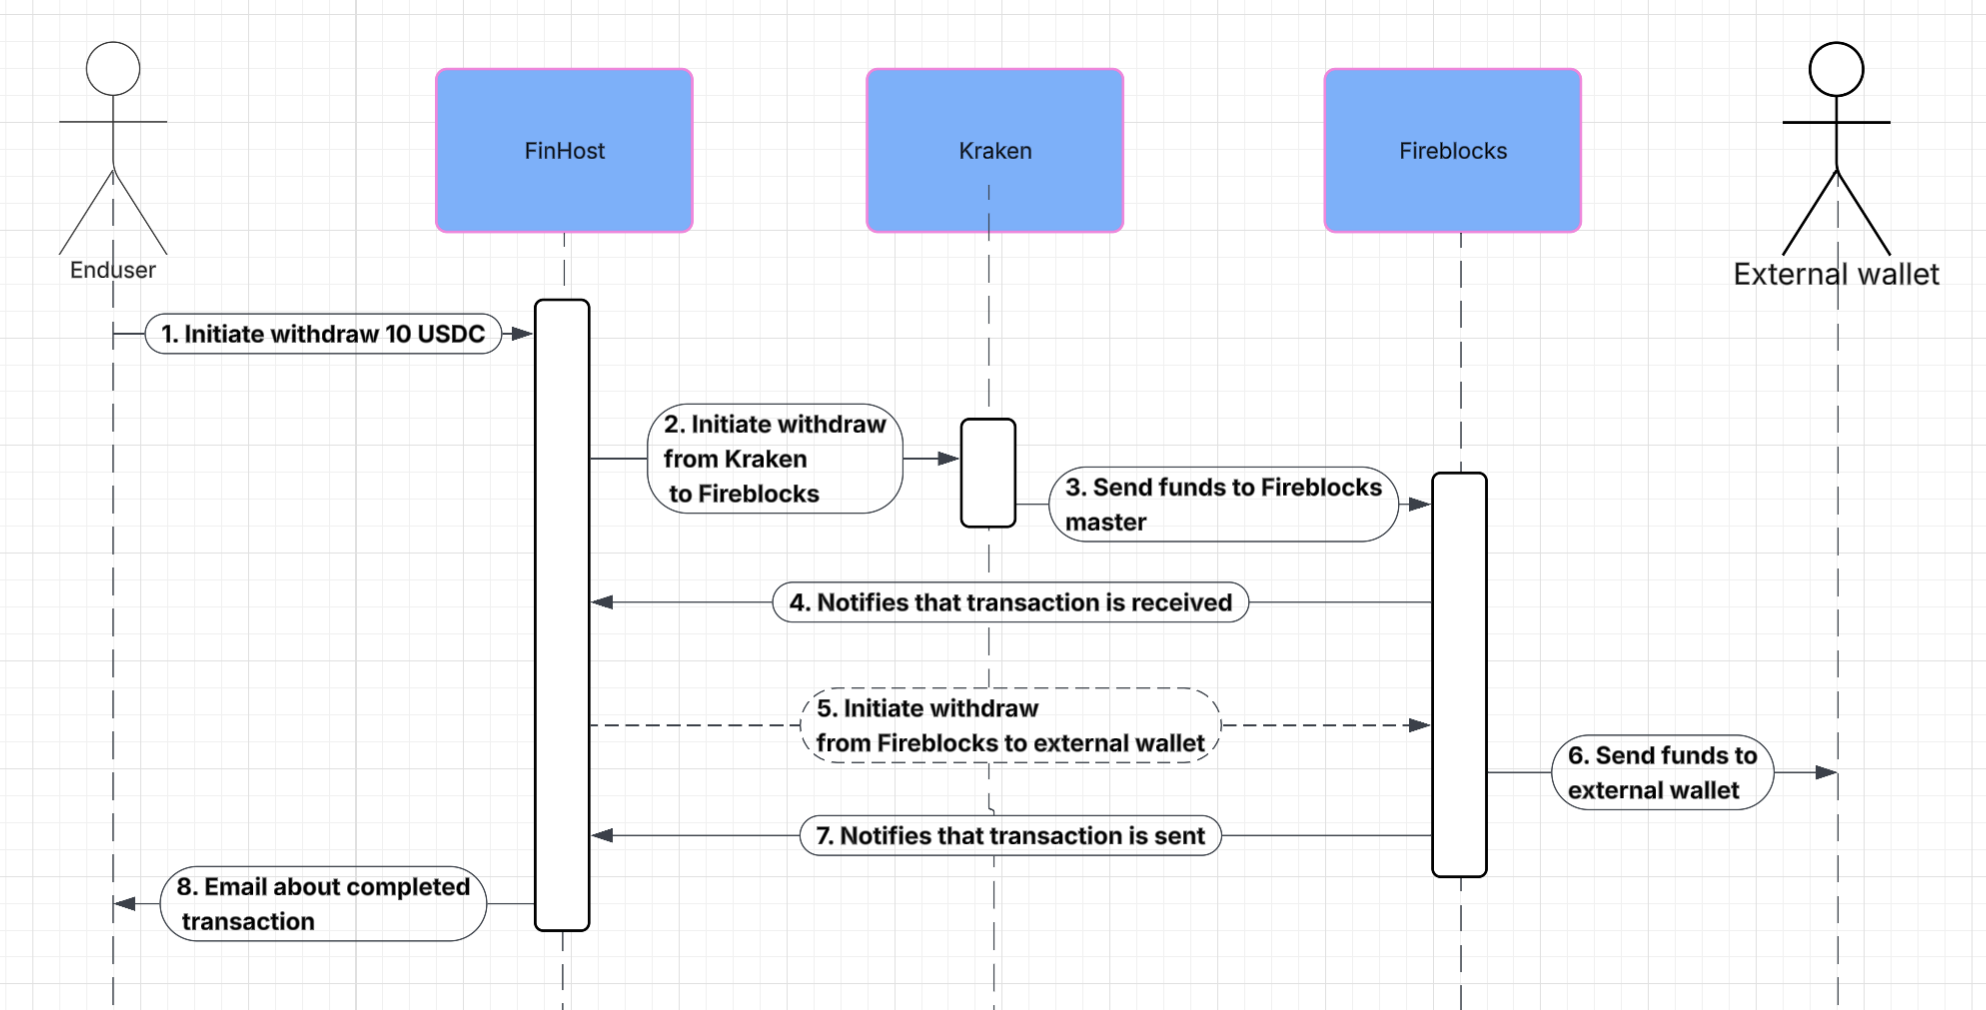
5. When the user withdraws BTC:\
The transaction flow is **Kraken → Fireblocks Master → External crypto address**.
1. Open the **Create Transaction** page.
2. Select **Incoming Payment** as the transaction type.
3. Choose the appropriate **payment method**.
4. Search for the target account using one of the following options:
* **Internal Account ID**
* **Account Number**
* **IBAN**
If the user deposits to a **pooled account** and is identified via the **payment reference**,\
use the **Reference ID**, which corresponds to the **Internal Account ID** in our system.
If the user deposits to a **dedicated banking account**, you can use the **Account Number** or **IBAN** for convenience.
***
#### Step 3 — Complete Transaction Details
Fill in all required fields according to the **sender’s information** provided by the banking provider.\
Ensure that the sender’s name, payment reference, and amount match the details shown in the provider’s dashboard.
***
#### Step 4 — Confirm Deposit
Once the transaction is created and confirmed:
* The **user’s balance** will be automatically updated.
* An **email notification** will be sent to the end user confirming the deposit.
* The transaction status will change to **Completed** in Finhost Backoffice.
***
Always verify sender details carefully before approving the transaction to avoid misallocating funds between accounts.
## 💠 Crypto Module Administration Guide
### 1. Introduction
The **Crypto Module** connects fiat and crypto operations through two main providers:
* **Fireblocks (FB)** — manages crypto wallets, generates deposit addresses, and processes incoming and outgoing crypto payments.
* **Kraken (KR)** — handles all crypto–fiat conversions using **market orders** for real-time liquidity.
Together, these systems enable your clients to exchange between fiat (e.g. EUR) and crypto (e.g. BTC) without manual intervention.\
The flow relies on **centralized liquidity** and does **not** create separate accounts for each client on the providers’ sides —\
**all client balances are handled and reflected within the Finhost Core Banking Ledger**, which tracks and synchronizes virtual balances for end-users.
***
### 2. How Money Flows Work
#### 🔄 A. Fiat → Crypto Exchange and Withdrawal
**Example:** Convert EUR to BTC and send out.
**Steps:**
1. The user creates a **EUR account (Acc A)** with SEPA and Crypto Exchange capability (supported by the **Fiat Provider**).\
→ An account is created on the Fiat Provider side.
2. The user creates a **BTC account (Acc B)** (supported by **Fireblocks** and **Kraken**).\
→ No individual wallet is created on the provider’s side; Finhost uses Fireblocks and Kraken **master accounts** for all clients.
3. The user receives EUR via SEPA to **Acc A**, reaching a balance of *100 EUR*.\
Funds are settled on the Fiat Provider account.
4. When the user requests to exchange EUR → BTC:
* The conversion takes place on **Kraken** via a **market order**.
* **Acc B** (BTC) balance is updated to *0.0017 BTC* within the Finhost Core Banking Ledger.
* ⚠️ **Important:** To perform this conversion successfully, there must be **enough liquidity on the Kraken side** in the respective fiat currency (e.g. EUR). Insufficient liquidity will cause exchange delays or failures.
5. When the user withdraws BTC:\
The transaction flow is **Kraken → Fireblocks Master → External crypto address**.
 ***
#### 🔁 B. Crypto → Fiat Exchange and Withdrawal
**Example:** Convert BTC to EUR and withdraw via SEPA.
**Steps:**
1. The user creates a **BTC account (Acc A)** (supported by **Fireblocks** and **Kraken**).\
→ A unique Fireblocks crypto address is generated for the user to receive and send crypto funds.
2. The user creates a **EUR account (Acc B)** with SEPA and Exchange capability (supported by the **Fiat Provider**).\
→ An account is created on the Fiat Provider side.
3. The user deposits *0.0017 BTC* to the crypto address.
* Fireblocks receives the transaction and transfers it to the **Kraken Master Account** for liquidity and trading availability.
4. When the user exchanges BTC → EUR:
* The conversion happens on **Kraken** using a market order.
* **Acc B** (EUR) balance updates to *100 EUR* within the Finhost Core Banking Ledger.
5. The user withdraws EUR:
* The flow is **Kraken → Fiat Provider → External recipient (SEPA Out)**.
* ⚠️ **Important:** To initiate and complete the withdrawal successfully, there must be **enough liquidity on the Fiat Provider side** in the respective currency (e.g. EUR). Otherwise, the payment initiation will fail or remain pending.
***
### 3. Reconciliation & Liquidity Management
The **Admin** is responsible for maintaining sufficient liquidity on both **Fiat** and **Crypto** sides.\
These systems are **independent** — the Fiat Provider does not see Crypto Provider balances, and vice versa.
#### ⚙️ Initial Setup Requirements
Before enabling crypto exchange for a currency, ensure liquidity is pre-deposited on both providers’ sides.
**Example:**\
If you plan to enable **EUR** for exchange:
* Deposit liquidity in **EUR** on the **Fiat Provider** side.
* Deposit liquidity in **EUR** on the **Kraken** side.
💡 **Recommendation:** Maintain at least **30 % of total client balances** as available liquidity on each side to ensure smooth operations and prevent conversion or withdrawal delays.
#### 📊 Reconciliation Reports
Use the **[Reconciliation Report](https://docs.finhost.io/reports-dashboard#4-reconciliation)** in the Backoffice to:
* Compare total client balances (from the Core Banking Ledger) with available funds in Fiat and Kraken accounts.
* Quickly detect shortages and top up liquidity where needed.
***
#### 🔁 B. Crypto → Fiat Exchange and Withdrawal
**Example:** Convert BTC to EUR and withdraw via SEPA.
**Steps:**
1. The user creates a **BTC account (Acc A)** (supported by **Fireblocks** and **Kraken**).\
→ A unique Fireblocks crypto address is generated for the user to receive and send crypto funds.
2. The user creates a **EUR account (Acc B)** with SEPA and Exchange capability (supported by the **Fiat Provider**).\
→ An account is created on the Fiat Provider side.
3. The user deposits *0.0017 BTC* to the crypto address.
* Fireblocks receives the transaction and transfers it to the **Kraken Master Account** for liquidity and trading availability.
4. When the user exchanges BTC → EUR:
* The conversion happens on **Kraken** using a market order.
* **Acc B** (EUR) balance updates to *100 EUR* within the Finhost Core Banking Ledger.
5. The user withdraws EUR:
* The flow is **Kraken → Fiat Provider → External recipient (SEPA Out)**.
* ⚠️ **Important:** To initiate and complete the withdrawal successfully, there must be **enough liquidity on the Fiat Provider side** in the respective currency (e.g. EUR). Otherwise, the payment initiation will fail or remain pending.
***
### 3. Reconciliation & Liquidity Management
The **Admin** is responsible for maintaining sufficient liquidity on both **Fiat** and **Crypto** sides.\
These systems are **independent** — the Fiat Provider does not see Crypto Provider balances, and vice versa.
#### ⚙️ Initial Setup Requirements
Before enabling crypto exchange for a currency, ensure liquidity is pre-deposited on both providers’ sides.
**Example:**\
If you plan to enable **EUR** for exchange:
* Deposit liquidity in **EUR** on the **Fiat Provider** side.
* Deposit liquidity in **EUR** on the **Kraken** side.
💡 **Recommendation:** Maintain at least **30 % of total client balances** as available liquidity on each side to ensure smooth operations and prevent conversion or withdrawal delays.
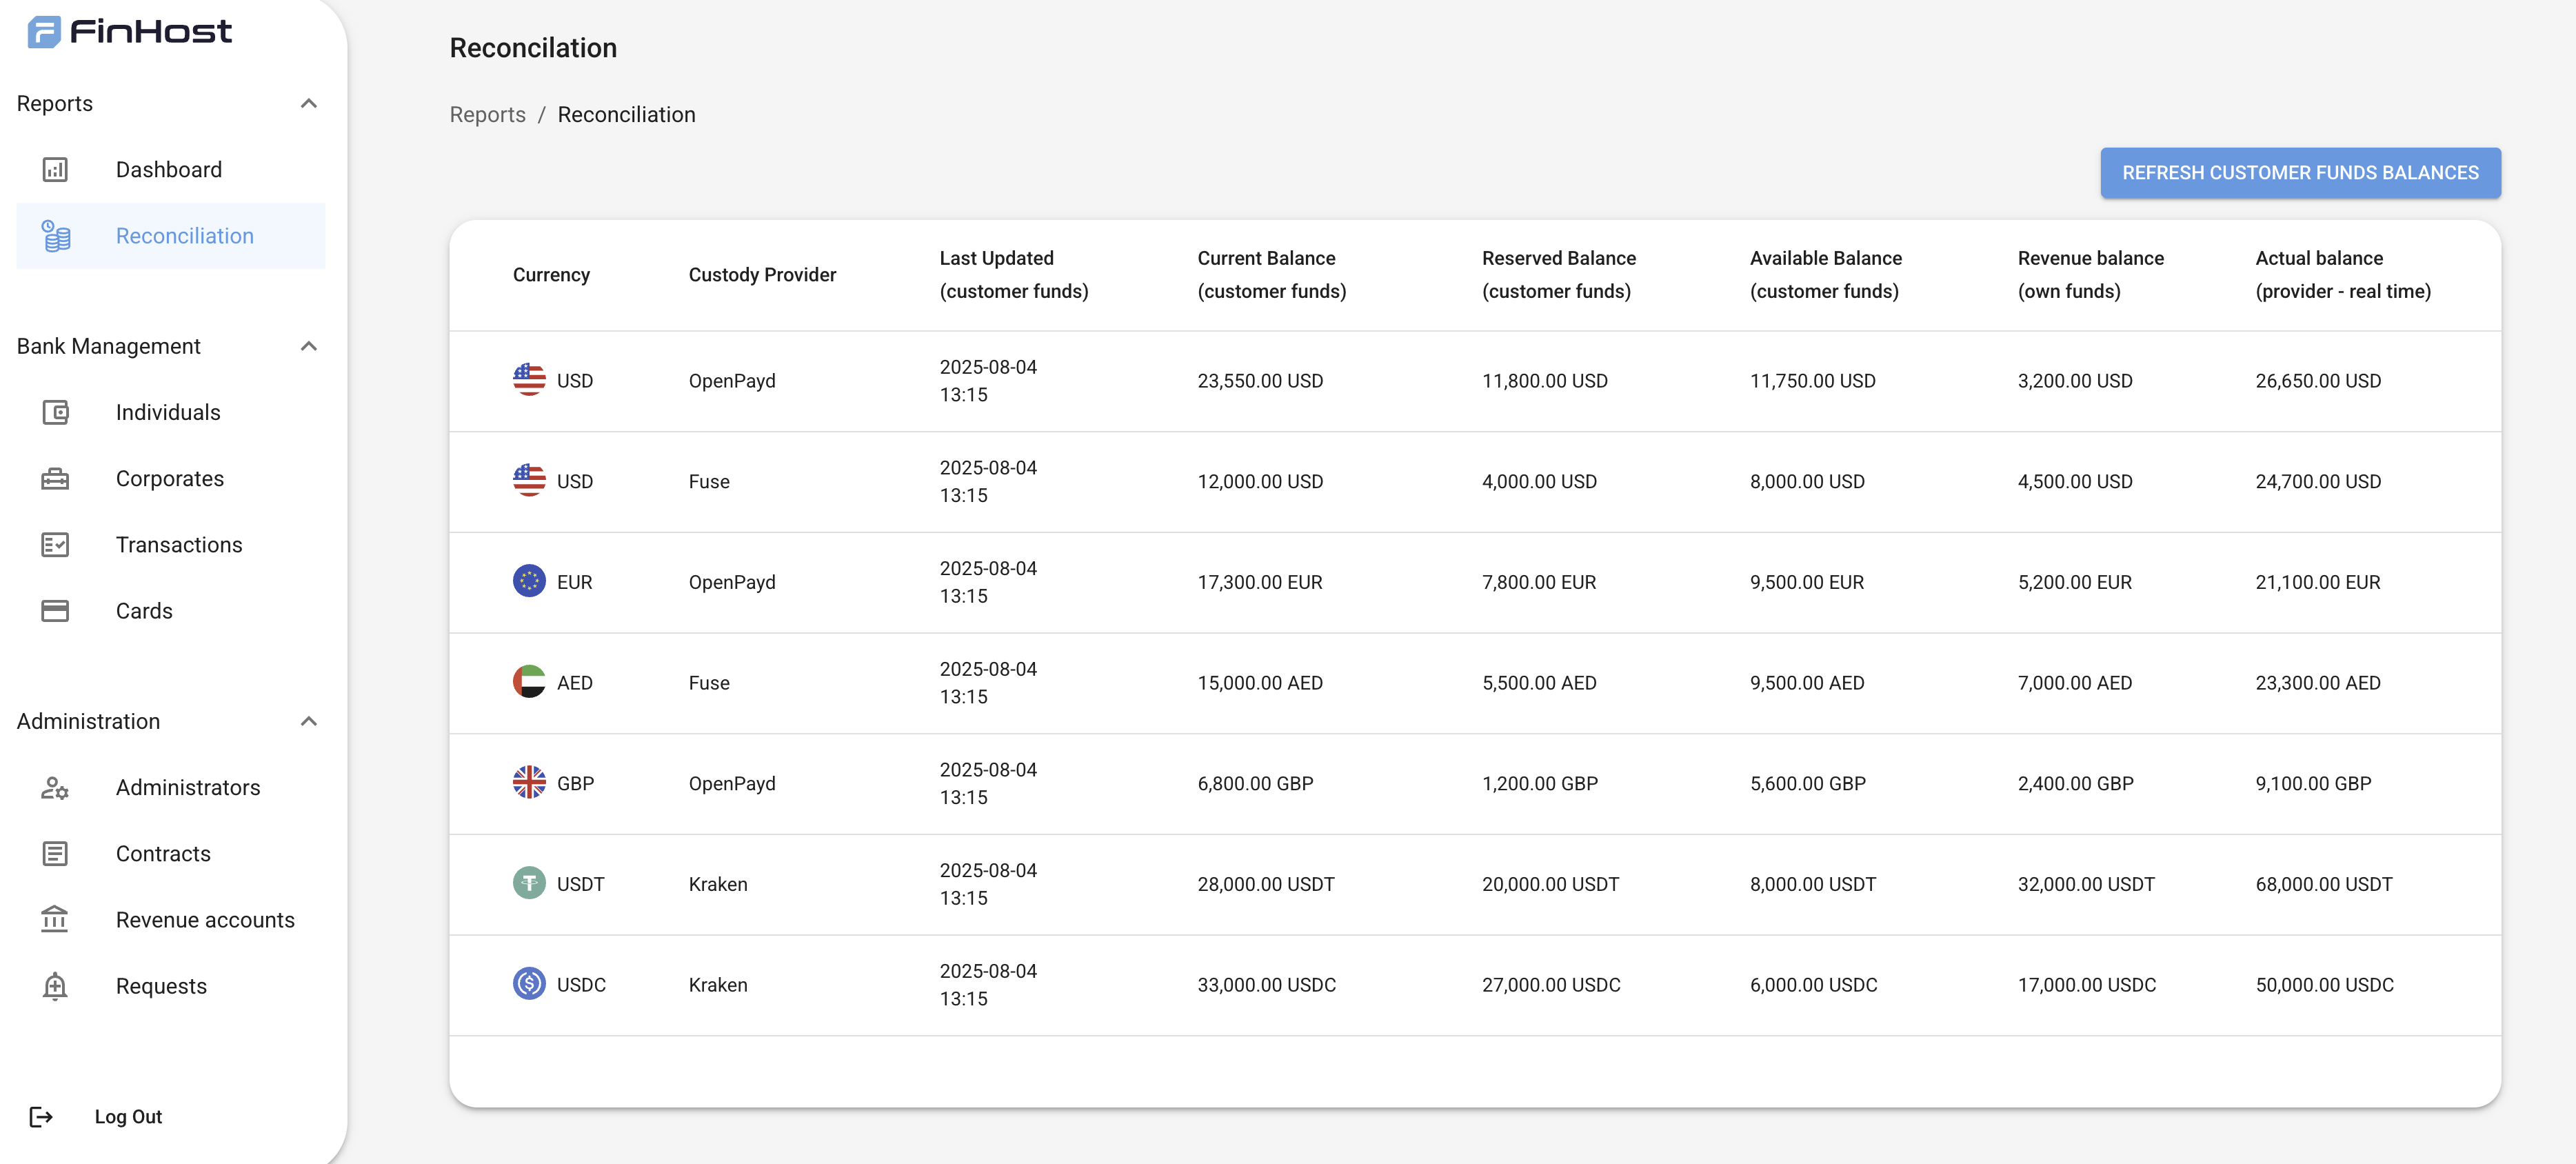
#### 📊 Reconciliation Reports
Use the **[Reconciliation Report](https://docs.finhost.io/reports-dashboard#4-reconciliation)** in the Backoffice to:
* Compare total client balances (from the Core Banking Ledger) with available funds in Fiat and Kraken accounts.
* Quickly detect shortages and top up liquidity where needed.
 ***
### 4. Gas Station (Crypto Network Fees)
Fireblocks requires a **Gas Station wallet** to cover blockchain transaction fees (“network fees”) for outgoing crypto transfers.\
If the Gas Station runs out of funds, **crypto payments will fail** until refilled.
Check fireblocks recommendations [https://support.fireblocks.io/hc/en-us/articles/9378061609884-Default-Gas-Station-values](https://support.fireblocks.io/hc/en-us/articles/9378061609884-Default-Gas-Station-values)
#### 🔋 How to Manage
1. Open **Fireblocks Console → Settings → Gas Station**.
2. Review available balances for each supported network (BTC, ETH, USDT).
3. Refill balances as needed according to Fireblocks recommendations:
* **BTC:** \~0.01 BTC
* **ETH:** \~0.1 ETH
* **USDT (ERC-20):** enough for ≈ 10 outgoing transactions
🪙 Keep the Gas Station **prepaid at all times** to ensure uninterrupted crypto operations and avoid failed withdrawals.
***
### 5. Supported currencies & network fees
The following table shows the currencies and networks currently supported in the Crypto module, together with their corresponding Fireblocks asset mapping and minimum amounts for deposits and withdrawals.
| Currency | Network | Type | Fireblocks mapping | Deposit minimum | Withdraw minimum |
| -------- | -------- | ----- | ------------------------- | --------------- | ---------------- |
| BTC | bitcoin | Coin | `BTC` | 0.0005 | 0.0002 |
| ETH | ethereum | Coin | `ETH` | 0.02 | 0.005 |
| ETH | arbitrum | Coin | `ETH-AETH` | 0.02 | 0.005 |
| ETH | base | Coin | `BASECHAIN_ETH` | 0.02 | 0.005 |
| ETH | optimism | Coin | `ETH-OPT` | 0.02 | 0.005 |
| USDC | ethereum | Token | `USDC` | 20 | 20 |
| USDC | arbitrum | Token | `USDC_ARB_3SBJ` | 10 | 10 |
| USDC | base | Token | `USDC_BASECHAIN_ETH_5I5C` | 10 | 10 |
| USDT | ethereum | Token | `USDT_ERC20` | 20 | 20 |
| USDT | tron | Token | `TRX_USDT_S2UZ` | 10 | 10 |
| TRX | tron | Coin | `TRX` | 40 | 30 |
***
### ✅ Summary Checklist for Administration
| Task | Frequency | Responsible |
| --------------------------------- | --------- | --------------- |
| Review Reconciliation Report | Daily | Admin |
| Check Fireblocks Gas Station | Weekly | Admin |
| Review Fiat & Kraken Balances | Weekly | CFO / Admin |
| Monitor Exchange Orders Execution | Daily | Support / Admin |
***
***
### 4. Gas Station (Crypto Network Fees)
Fireblocks requires a **Gas Station wallet** to cover blockchain transaction fees (“network fees”) for outgoing crypto transfers.\
If the Gas Station runs out of funds, **crypto payments will fail** until refilled.
Check fireblocks recommendations [https://support.fireblocks.io/hc/en-us/articles/9378061609884-Default-Gas-Station-values](https://support.fireblocks.io/hc/en-us/articles/9378061609884-Default-Gas-Station-values)
#### 🔋 How to Manage
1. Open **Fireblocks Console → Settings → Gas Station**.
2. Review available balances for each supported network (BTC, ETH, USDT).
3. Refill balances as needed according to Fireblocks recommendations:
* **BTC:** \~0.01 BTC
* **ETH:** \~0.1 ETH
* **USDT (ERC-20):** enough for ≈ 10 outgoing transactions
🪙 Keep the Gas Station **prepaid at all times** to ensure uninterrupted crypto operations and avoid failed withdrawals.
***
### 5. Supported currencies & network fees
The following table shows the currencies and networks currently supported in the Crypto module, together with their corresponding Fireblocks asset mapping and minimum amounts for deposits and withdrawals.
| Currency | Network | Type | Fireblocks mapping | Deposit minimum | Withdraw minimum |
| -------- | -------- | ----- | ------------------------- | --------------- | ---------------- |
| BTC | bitcoin | Coin | `BTC` | 0.0005 | 0.0002 |
| ETH | ethereum | Coin | `ETH` | 0.02 | 0.005 |
| ETH | arbitrum | Coin | `ETH-AETH` | 0.02 | 0.005 |
| ETH | base | Coin | `BASECHAIN_ETH` | 0.02 | 0.005 |
| ETH | optimism | Coin | `ETH-OPT` | 0.02 | 0.005 |
| USDC | ethereum | Token | `USDC` | 20 | 20 |
| USDC | arbitrum | Token | `USDC_ARB_3SBJ` | 10 | 10 |
| USDC | base | Token | `USDC_BASECHAIN_ETH_5I5C` | 10 | 10 |
| USDT | ethereum | Token | `USDT_ERC20` | 20 | 20 |
| USDT | tron | Token | `TRX_USDT_S2UZ` | 10 | 10 |
| TRX | tron | Coin | `TRX` | 40 | 30 |
***
### ✅ Summary Checklist for Administration
| Task | Frequency | Responsible |
| --------------------------------- | --------- | --------------- |
| Review Reconciliation Report | Daily | Admin |
| Check Fireblocks Gas Station | Weekly | Admin |
| Review Fiat & Kraken Balances | Weekly | CFO / Admin |
| Monitor Exchange Orders Execution | Daily | Support / Admin |
***